DIY Bounce Card for Built-in Pop-up Flash
In this easy and helpful tutorial, I will show how to build a DSLR camera DIY bounce card for your built-in pop-up flash. It’s easy and so inexpensive because you are most likely to have the supplies at home already and if not, they are very cheap!
Equipment
- Hot glue gun
- cutter
- Embossing tool (or a pen that no longer works or the back edge of a scissor)
Ingredients
- Gray cardboard with a thickness that fits into the flash slot
- Black and White cardstock white paper or any pattern if you like for the outside
- White glue or mod podge
- Aluminum foil.
Instructions
STEP 1: PREP WORK
- First I made the pattern for the bounce card. You can snag it here to print and cut.
GET FLASH BOUNCE CARD PATTERN
- I made this video to show in a live way all the processes to create my Flash Bounce card. It looks different because I made these tutorial photos years ago.
- If you prefer a step-by-step photos tutorial just keep Scrolling!
STEP 2: TRACE YOUR PATTERN FOR THE CARD
- I put the pattern on the gray cardboard and adjusted it with clips so it wouldn’t move (clips are optional).
- This kind of cardboard is used by architects for the structure mockups BUT you can find it often on the back of paper blocks, cardstock blocks, and some kind of boxes.
- I marked the entire contour with a pencil and then the folding marks too.
STEP 3: CUT IT OUT
- I cut the pattern helping myself with a ruler on the straight lines and free-handed for the rounded ones.
STEP 4: SHAPING THE BOUNCE CARD
- With an embossing tool, I embossed the folding lines so the cardboard would fold more easily. You can see what I mean in the video.
- Once the whole shape was done and verified that it was fitting perfectly.
STEP 5: GLUE IT TOGETHER – COVERING THE BOUNCE CARD
- I glued the black cardstock to the “inside and outside” of the flash bounce.
- I made sure every edge was well glued and with the help of a ruler I made pressure all over the cardstock to avoid wrinkles.
- Again with the embossing tool, I marked the folding lines. I let it dry.
- Then I cut all the remains of cardstock on the edges to make a fine finish.
- I closed the flash bounce by overlapping both ends. Apply some hot glue or white glue and apply some pressure making sure the ends match perfectly.
- Fold the final flap which will secure the bounce to the camera flash shoe.
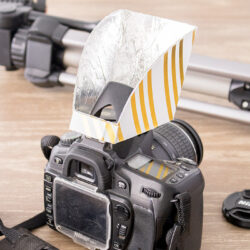
STEP 6: CREATING THE REFLECTIVE SURFACE
- Finally, I took the shape of the front internal side of the bounce and cut the foil paper.
- Glued it to the bounce with white glue.
- Back when I made it the first time I used black cardstock on the outside, nowadays I like to add some color and patterns!
- That’s it! It’s time to try it on.
- Open your built-in camera flash then put your bounce around it and insert the flap inside the flash shoe.
- Depending on each camera you might have more flap that you need, you can just cut a bit until it fits.
- Also, if the cardboard you have is thinner, you can fold the excess and insert it so it will fit better.
- There you have it! Now it’s time to try how it works. Adjust as needed.
Notes
*UPDATE: I found it more effective to fill the entire inside with foil paper instead of black or white cardstock like I showed in the video. This will create a larger bounce surface.