DIY Burlap Wreath for Fall
Let’s create a beautiful DIY burlap wreath for fall with simple supplies. No glue is needed, so you can easily reuse everything later! Perfect project for cozy fall decor.
Equipment
- Wire cutters – for trimming the wire.
- scissors
Ingredients
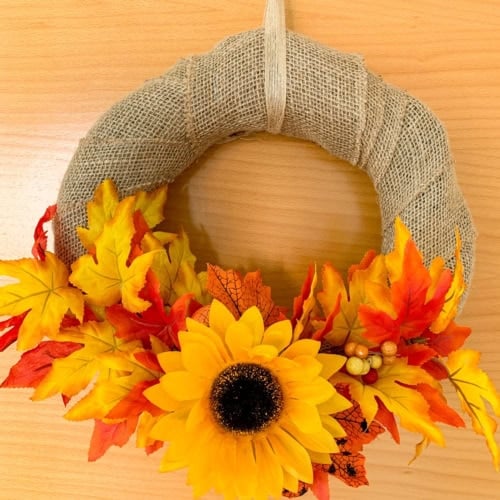
- Grapevine wreath base – mine was about 12 inches but feel free to go larger or smaller and even a different material.
- Wide burlap ribbon to cover the base – about 4-5 inches wide
- Thin rustic ribbon – for hanging the wreath
- Faux fall leaves – a mix of yellow orange, and red gives that lovely autumn feel
- Faux sunflowers – optional but they add such a bright pop of color
- Floral wire – for attaching the decorations
Instructions
Step 1: Wrap the wreath base with burlap
- Start by taking your wide burlap ribbon and wrapping it around the grapevine base. You want it to be snug but not too tight. The idea is to cover the wreath, but it’s totally okay if a little bit of the grapevine peeks through.
- Once wrapped, tuck the end of the burlap ribbon into the back of the wreath. You don’t need glue for this; you will secure it with your floral wire and the burlap’s texture should hold it in place.
Step 2: Arrange the fall leaves
- Now start placing your faux fall leaves around the bottom of the wreath or even slightly to the side.
- Play around with the foliage, flowers, and accents until you find a combination that makes you smile. I used leaves in different colors, along with a small bunch of berries in earthy tones to add a little extra fall touch.
- Arrange the leaves carefully and bend them so they sit just right to make sure your wreath looks balanced and beautiful. Don’t be afraid to tweak things until it feels perfect!
- Once you’re happy with the arrangement, use the floral wire to attach the leaves to the wreath.
- Simply wrap the wire around the stems and the grapevine base, making sure it’s tight enough to hold everything in place then secure the wire on the back of the wreath.
Step 3: Add sunflowers for a pop of color
- Take your faux sunflowers and nestle them among the leaves. I love adding a big sunflower as the focal point and you can also add a smaller one for balance.
- Use the floral wire again to secure them to the wreath, wrapping it around the stems and the base.
Step 4: Attach the hanging ribbon
- Cut a piece of your thin rustic ribbon. I went for about 10 inches, but you can adjust based on where you want it to hang.
- Loop it around the top of the wreath and tie a knot. This ribbon is what you’ll use to hang your wreath, so make sure it’s secure but not too tight.
Step 5: Final touches
- Take a step back and adjust anything that feels out of place. The beauty of using wire instead of glue is that you can move things around until it looks perfect.
- Once you’re satisfied, your wreath is ready to hang!
- And that’s it!