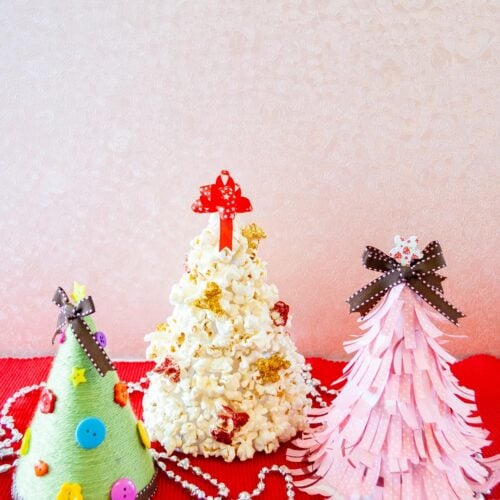
Diy Cone Christmas Trees with popcorn, yarn, and paper
Get into the holiday spirit with these cute DIY Cone Christmas Trees! Create crafty magic using paper, popcorn, and yarn. Easy, fun, and perfect craft for holiday decorations!
Equipment
- scissors
- Ruler
- Hot glue gun and glue sticks
Ingredients
- Cardstock
- Yarn
- Popcorns
- Decorative wrapping paper
- Buttons
- Ribbon
- Glue {I used hot glue white glue and UHU glue… and Spray mount too!}
Instructions
- Print some cone patterns in different sizes and cut them with your scissors. They don’t need to be perfect.
- Assemble the paper cone gluing through the flap.
- Once the glue is dry we are ready to start.
YARN CONE TREE:
- Start wrapping the cone tree from the top to the bottom using white glue or your favorite glue. I prefer white glue because when they dry the surface gets a little bit sturdier.
- Leave a space of less than ½ inch (about 1 cm) at the bottom.
- Wrap the left gap at the bottom with a cute ribbon.
- Then decorate the tree with different button shapes and colors with hot glue. If you are minimalist you can leave as is. But when working with kids they love adding buttons.
- Make a cute bow with the same ribbon as the bottom.
- If you have a button star, glue it to the top of the tree and glue the bow right below it.
- Yarn Cone Christmas Tree is finished.
WRAPPING PAPER CONE TREE:
- Cut a few strips of cute wrapping paper about 2 inches wide. I used 2 different patterns for this. Each strip was about 20 inches long but you can use what you have.
- Then fold them together four times.
- Make cuts all along the folded paper as if you were making a Hawaiian skirt leaving about 1/3 inch from the edge.
- Carefully unfold the strips to get a fun strip of skirt-y paper.
- Next start to glue the paper from the bottom up. It’s easier.
- Make sure you leave a few millimeters of the paper off the base of the cone.
- In this process, I made some creases so the paper can wrap the cone evenly until it meets the other end.
- Alternate the pattern on each row.
- Overlap about 1/2 inch of each row repeating the same process described above.
- Do this until you reach the tip of the cone.
- Then glue a button star and the bow. Or just decorate the top of the tree with your favorite ornament.
- Woot we have the second tree!!! A gorgeous Paper Cone Christmas Tree
POPCORN CONE TREE:
- This one is super fun, especially for kids.
- Pop your popcorn a day ahead and leave it uncovered overnight. This helps to get rid of too much moisture, making the decoration last longer.
- Spreading glue small areas at a time, glue the popcorn from bottom to top.
- Try gluing them as tight together as you can. Keep going until you reach the top.
- Make some of your popcorn look like ornaments. Add glue and glitter to the popcorn.
- I sprayed some popcorn with the spray mount and added some gold and red glitter and glued them to the tree.
- If you are working with kids, don’t use spraying glue, use white glue and let them glitter the popcorn, they just LOVE this.
- Glue the glittery popcorn around the tree like you would put ornaments on your Christmas tree.
- Make a cute ribbon bow and put it to the top of your tree or here again use your favorite type of ornament for the top of your tree.
- Here you have it!!!! One super fun Popcorn Cone Christmas tree.
- Tadaaaaaa!!!! All 3 done!!! Super easy and super fun. They are quite decorative too!