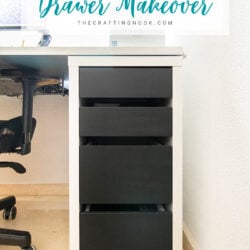
DIY Easy Ikea Desk Drawer Makeover Tutorial
This Ikea desk drawer makeover is such a crazy easy project to take on. You will be able to have it done in one day and it will completely transform the look of your old drawer.
Equipment
- Screwdriver (or the specific tool needed for your drawer)
Ingredients
- 1 Piece A drawer chest Mine is the Micke one and I think this orange one doesn't even exist anymore
- 1 Piece Chalk Paint I used Rust-Oleum in Spray
- 1 Piece Clear Varnish I also used in Spray
- 1 Piece Sandpaper I used it even though they say I didn't need to
- 1 Piece of Cloth any color
Instructions
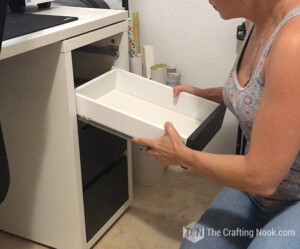
- Firstly, remove all the drawers from the desk. Using the screwdriver or the specific tool you need and detach the front part of your drawer.
- If yours is like this one and has these screw pins make sure you remove them from the front piece as well.
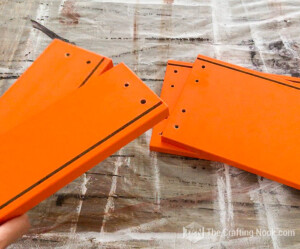
- Once you have all the pieces of your drawers detached let's go to a well-protected table and let's start sending each piece.
- I used 150 grit sandpaper for this. I didn't want it to be too rough and sanded each piece carefully.
- Then green well hp's to remove all the dust left by the sanding. it's a good idea to use a slightly damped piece of cloth or towel.
- Now it's time to paint.
- If like me, you are using spray paint, I suggest going to a ventilated space.
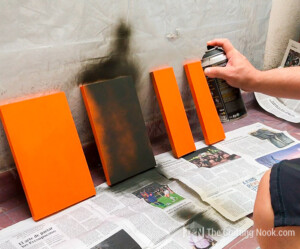
- Protect the surface where you are going to paint using either cardboard, plastic or newspaper.
- Lay all your pieces a little close together and start spraying them respecting the distance instructed by your product.
- Try not to overspray all at once so you avoid drops or paint accumulation in some areas.
- Let them dry, turn them over and spray again.
- It doesn't have to get completely covered in your first coat and that's okay. it took me about three coats to get it completely covered letting it dry between coats.
- Finally, I sprayed the clear varnished over the pieces. this step is mostly to make sure nothing scratches the painted surface and I recommend using a matte varnish.
- Now that you have all your front pieces dry and ready, it's time to reassemble the drawers.
- Lastly, let's put our pretty drawers back on the desk.