DIY Halloween Trick or Treat bags using freezer paper stencil
Learn how to use freezer paper stencils to make Halloween trick or treat bags for your kids. These bags are easy to make, a really fun craft for the kids, can be personalized with whatever you want and you can use them over and over year after year.
Equipment
- Cutting Machine – Silhouette Cameo or Cricut
- Sewing Machine
- Scissors and ruller
- Mark-B-Gone Marker
- Iron
Ingredients
- 1 Yard of white fabric {it can vary depending on the size of the bag}
- 1 Yard of lining fabric – I reused some laundry bags from Hotels as linin.
- Fabric Paints – Black and orange.
- White Rope
- Halloween ribbon
- Freezer paper
Instructions
- These bags have lining. I wanted them to be slightly stiffer than with only fabric. I had some laundry bags from hotels at hand so I used it.
- The main bag and the lining follows exactly the same steps so I’ll show you how to do one and you can repeat for the other.
STET 1: CUT AND SEW THE MAIN PIECES OF THE BAGS.
- I cut the fabrics. For my daughter’s bag, 10 Inches x 14 inches {35×26 cm} both white fabric and lining. For my brother’s bag 12 Inches x 16 Inches {30×40 cm}
- I sewed lining fabric right sides together on 2 long sides and I short side leaving one open.
- Pinch the bottom corner together aligning the side seam with the bottom seam as in the image below.
- Then I measure 2 Inches {5 cm} from the corner and marked on both sides. Then I traced a line joining both marks.
- I stitch and cut the triangle left leaving about 0.5 inches like in the image below. Did the same on the other side.
- When you unfold and open up the bag it will look like this.
- I repeated the same on the main fabric and of course on the other bag too.
STEP 2: PREPARE THE SPOOKY DESIGN
- I made a break here and started with the design Yayyyy!
- I prepared some illustrations in my Silhouette Studio.
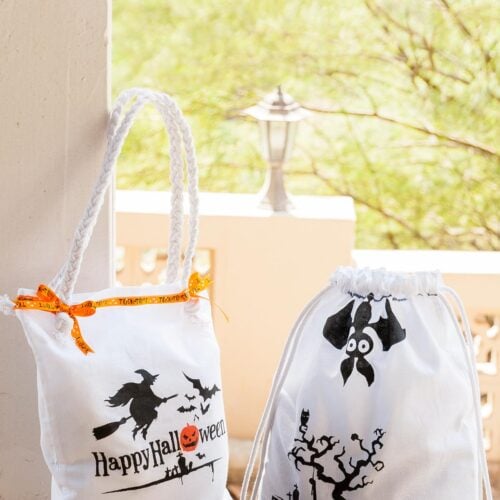
- For Emma, I made a flying witch and for my brother, I made a spooky tree with a bat hanging.
- You can download the cut files in the post
- When the design was ready. I just adjusted the size to almost the maximum the machine could cut (about 11×11 Inches).
- Then when using Freezer paper it’s important to remember that the waxed side should be facing up. For this reason is critical to remember to flip the design before cutting. For this, you just need to select the whole design and go to Object > Mirror > Flip Horizontally.
STEP 3: CUT THE DESIGN
- Then I sent to cut on the the freezer paper. I used Copy Paper setting, BUT I set the blade to 1 instead the default 2.
- Once it was done, it was a little bit tricky because it had so many small parts that weren’t attached to the big design so I had to use some scotch tape to keep them in place while I place the whole stencil where I want to paint. Then carefully I removed the tape putting back the pieces where they should be and immediately I ironed it.
STEP 4: PAINT ON THE FABRIC
- I had a little helper for this step. My little girl helped me painting
- We painted all in black except for the pumpkins that we painted in orange. Although, it was not perfect my daughter and my brother loved it because they helped
- If you want a full detailed tutorial about freezer paper you can check this post out.
- Once I removed the freezer paper I got back to the sewing part LOL.
STEP 5: FINISH THE BAGS ASSEMBLING.
- I sewed the fabric and the lining together. I placed the lining fabric inside the main fabric right sides together. I stitched around the top of the bag 1/4 inch seam allowance from the edge leaving a 2-3 inch opening for turning the bag inside out {It’s better to leave this on the side}
- I turned the bag inside out.
- Push the lining inside the bag and sew all the way around the top of the bag.
- This closed up the opening I used for turning.
- I added the ribbon in this step for Emma’s bag.
- With the white rope, I made a braid with knots at both ends {Sorry for the painted fingers LOL}.
- I Place them on both sides of the bag about 1 inch from the side seam and I stitched them.
- The final touch was some cute ribbon bows on the knots.
- In my brother’s bag, I used the rope as follows. When we pull both sides of the rope the bag ruffles! So fun!
- Tadaaaaaaa!!!! You are done!