DIY Mother Daughter Stenciled Apron Pattern
This DIY Mother Daughter Stenciled Apron Pattern is perfect for creating cute, matching aprons with easy steps and a free pattern guide! Create adorable matching mom and daughter aprons with this easy DIY tutorial!
Equipment
- Cutting Machine – Such as Silhouette Cameo, Cricut or others
- Sewing Machine
- Iron and ironing board
- Scissors or rotary cutter and mat
- Straight pins
- Seam Ripper – In case you need to undo stitches.
Ingredients
- ¼ yard or one Fat Quarter of fabric 1: For the lower bib
- ½ yard of fabric 2: For the skirt
- ⅝ yard of fabric 3: for the upper bib waist and neck ties
- ⅛ yard of lining fabric 4; I used white
- All-purpose thread to coordinate with fabrics:
- Fabric pen or pencil
- Fabric paint – I used hot pink but you can use your favorite color.
- Brush or foam brush
- Freezer paper
Instructions
- The detailed tutorial to sew the main Apron can be found here and the Free pattern can be found here. However, here I’ll teach you how to stencil the aprons and then how to transform the pattern into a smaller version to fit your child.
Step 1: Prep Work
- Adult Apron:
- Download, print, and cut the main apron pattern. DO NOT SCALE, PRINT AT 100%. Cut out each pattern along the solid line and chose the option for cutting on the fold or cutting flat.
- Fabric 1 (star fabric in my sample):
- Using the completed Apron Bib 2 pattern, cut ONE lower bib. Transfer the pattern markings for the darts to the fabric.
- Using the Pocket pattern, cut TWO pockets. Transfer the pattern markings for the box pleats to the fabric.
- Fabric 2 (floral plaid in my sample):
- Cut ONE 18″ high x 37″ wide rectangle (skirt).
- Fabric 3 (Pink fabric in my sample):
- Using the completed Apron Bib 1 pattern, cut TWO upper bibs. The stecil desig will be on ONE of the two bibs.
- Cut FOUR 2½” x 25″ strips
- Cut SIX 2½” x 31″ strips
- Using the Pocket pattern, cut TWO pockets. Transfer the pattern markings for the box pleats to the fabric.
- Fabric 4 (White linen fabric in my sample):
- Using the completed Apron Bib 2 pattern, cut ONE lower bib. Transfer the pattern markings for the darts to the fabric.
- pieces of cut fabric and paper DIY Stenciled Apron Pattern
- Child Apron
- Download, print, and cut the main apron pattern. In this case, we’ll scale the pattern*.
- For kids 2-5 YO, scale the pattern (on print settings) to 60%
- For Kids 6-8 YO, scale the pattern (on print settings) to 70%
- For Kids 9-15 YO, scale the pattern (on print settings) to 85%
- *Before starting to transfer the pattern to the fabric, do a text with the paper against your kid’s chest. adjust the percentage as needed.
- Cut out each pattern along the solid line and chose the option for cutting on the fold or cutting flat.
- Fabric 1 (star fabric in my sample):
- Cut ONE wide rectangle scaled according to the above examples (skirt).
- Fabric 2 (floral plaid in my sample):
- Using the completed Apron Bib 2 pattern, cut ONE lower bib. Transfer the pattern markings for the darts to the fabric.
- Using the Pocket pattern, cut TWO pockets. Transfer the pattern markings for the box pleats to the fabric.
- Fabric 3 (Pink fabric in my sample):
- Using the completed Apron Bib 1 pattern, cut TWO upper bibs. The stencil design will be on ONE of the two bibs.
- Cut FOUR scaled strips
- Cut SIX scaled strips
- Using the Pocket pattern, cut TWO pockets. Transfer the pattern markings for the box pleats to the fabric.
- Fabric 4 (White linen fabric in my sample):
- Using the completed Apron Bib 2 pattern, cut ONE lower bib. Transfer the pattern markings for the darts to the fabric.
- Stencil design
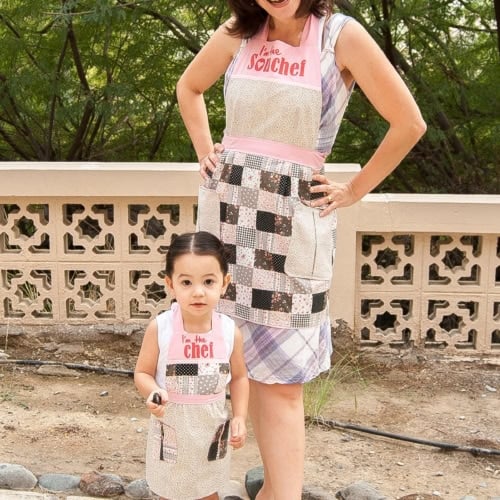
- I wanted to paint some phrases on the upper bibs: “I’m the Chef” for Emma’s Apron and “I’m the sous chef” for mine.
- So once I had the fabric pieces cut, using my Silhouette Studio app, I made the designs to fit the upper bibs. If you like them, you can Get the printables and cut Files HERE.
- To cut it, open the files on your cutting machine app, in my case it’s Silhouette Studio. When using freezer paper, it’s important to make sure you mirror the design before sending it to cut.
- Also, make sure the waxed side of the freezer paper is facing up on your mat so the stickiness of the mat doesn’t damage the wax.
- When using vinyl stencil material, you don’t need to mirror it. Just adjust as needed and send them to cut.
Step 2: Stenciling the Apron’s Bib
- Before even starting to sew the apron I like to stencil any design first. The main reason is that if something goes wrong (and you catch it on time) you can just cut the piece again and re-do it instead of having to make a big part, or the entire apron.
- Once the stencil has been cut, weed out the inner pieces of the design.
- Make sure you leave the pinned pieces of a letter like the “e”, “o”, etc.
- Tape your upper bib fabric to a piece of cardboard or a protected cutting mat so you don’t stain anything with the fabric paint.
- Place the cutout freezer paper on the fabric as centered as possible.
- Make sure to put in the right place the inner pieces of the letters.
- Quick tip: For the O I made a heart inside, you can do this or use any other shape you like.
- As you can see, here’s the typo I mentioned above but don’t worry the free files are fixed.
- Paint your stencil with fabric paint. I wanted a dark warm pink so I mixed a bit of red, a drop of yellow a few drops of white.
- I recommend always painting from the stencil towards the fabric to avoid the paint leaking in under the freezer paper.
- Repeat the same process with the other apron.
- When finished, let both dry well for a couple of hours.
- Then peel off the freezer paper carefully.
- To make sure your painted design stays vibrant after washing, allow the paint to dry completely, then heat-set it using an iron. Place a cloth or parchment paper over the painted area and iron it on a low to medium setting for a few minutes. Always follow the paint manufacturer’s instructions for best results.
- Your two upper bibs are good and ready to go.
Step 3: Assembling the Aprons
- I went back to the sewing. Here’s where I’ll show you some of the things I did differently than the original apron design.
- I started with the bib. Stitched every piece for front and back following the instructions. Always respecting the seam allowance and pinning in place on every step so I could have an idea of how it was turning out.
- I used a strip of grosgrain ribbon to hide the union between both fabrics on the front side.
- I pinned the ties on the front side and placed the front bib and lining bib right sides together.
- Stitched front and back, using a ½” seam allowance along both sides and across the top. Left the bottom open for turning.
- I turned right side out, pushed out the top corners and pulled up the ties.
- Ironed well.
- For the skirt, again I followed the original instructions but used grosgrain ribbon for the hem decoration.
- Folding all the edges I placed the ribbon so it would be visible on the right side. Stitched all along the way.
- I Stitched the pockets, which looked harder than it really was. but did not use any ribbon for them. They are so cute.
- I positioned the pockets on the apron skirt. The pockets are 4½” from the upper edge.
- They are designed to be set at a diagonal, so there is 10″ between the upper corners and 8″ between the lower corners.
- I kept the group of three knife pleats to each side of the center along the upper edge of the apron skirt.
- Then I prepared the waistband and waist ties. This part is so well explained with graphics and pictures on the original tutorial that it’s hard to get lost. I suggest following it to the T.
- I Stitched the whole waistband and waist ties and the Apron as literally done!
- As soon as I finished my Stenciled Apron Pattern, I started with Emma’s.
- I used the bib and measured approximately from where to where it goes in my body and measured the same spot in my girl. I could proportionally reduce it to my girl’s size which was about 50%.
- Each part was reduced using the rule of three to get exact proportions.
- Repeat the exact process used on the adult apron but use the fabric differently so it would be coordinated.
- DIY Mother Daughter Stenciled Apron Pattern ready on the back of a chair
- Tadaaaaa! We have a matching and coordinated Stenciled Apron Pattern, Yayyyy!