DIY Stuffed Animals: Free Stuffed Dog Sewing Pattern
Learn how to make this cute stuffed fabric dog with our Free Stuffed Dog Sewing Pattern. Easy, fun, and totally customizable!
Equipment
- Seam ripper
- Needle and thread (I used only black and white)
- Pins
- Sewing Machine
- Fabric sharp scissors and paper scissors
- Pinking shears *Optional
Ingredients
- Free Stuffed Dog Sewing Pattern
- 4 Coordinated fabrics fat quarters are more than enough
- Black felt for the nose and eyes
- White felt for the eye patch
- Stuffing Polyfill
- Measuring tape
- Fabric erasable marker or chalk
Instructions
Step 1: Download and Prepare the Pattern
- First, download the free sewing pattern and print it at 100% scale (do not scale to fit).
- Cut out all paper pattern pieces using paper scissors.
Step 2: Cut the Fabric Pieces
- Choose your fabrics. You’ll need 4 coordinating fabrics (or 2 for a simpler look).
- Trace the pattern pieces onto the fabric and cut using fabric scissors.
- You should have:
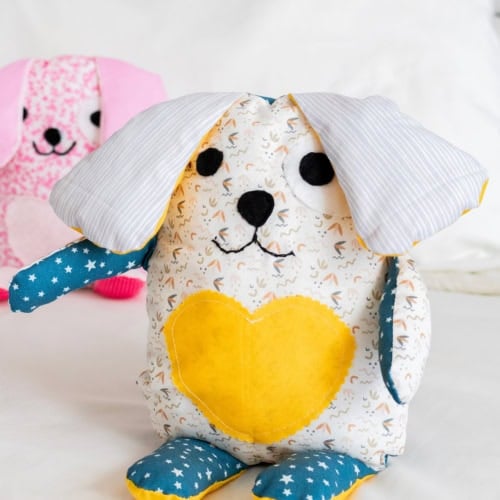
- Body (front and back) – I used different fabrics for each.
- Arms, legs, and ears (front and back) –I used different fabrics for each.
- A heart for the tummy piece (or other embellishments if you like!) cut with pinking shears.
- White felt eye patch
- Don’t forget to cut 2 small felt circles for the eyes, a rounded triangle for the nose, and the tail from the black felt.
- Before sewing, lay out all pieces to make sure all the pieces go together and nothing is missing.
Step 3: Add Facial Features, Tummy, and Tail
- Start by working on the front body piece.
- Place all facial elements first to check positioning.
- Stitch the black felt eye onto the white eye patch
- Sew the eye patch onto the body piece
- Sew the felt eyes and nose in place using black thread
- Add the mouth using an embroidery chain stitch
- Thread your needle and knot the end.
- Bring the needle up from the back of the fabric to the front at your starting point.
- Insert the needle back into the same hole and bring it out a short distance along the mouth line, leaving a small loop on the surface.
- Pass the needle through the loop before pulling it tight to form your first chain link.
- Repeat this process along the mouth line, creating a series of connected loops.
- Finish by securing the last stitch with a small knot on the back of the fabric.
- Attach the heart to the tummy area and sew the tail onto the back body piece using a zig-zag or straight stitch.
- (All facial details can be sewn by machine or by hand.)
- Do the same for the tail on the back of the body fabric. I used zig-zag with white thread for this but you can do straight stitch with your sewing machine or by hand.
Step 4: Sew the Arms, Legs, and Ears
- Place each pair of pieces right sides together.
- Sew around the edges, leaving the top open, using a ⅓-inch seam allowance.
- Turn each piece right side out using your fingers, a pencil, or a turning tool.
Step 5: Stuff the Arms, Legs, and Ears
- Lightly stuff each piece with polyfill.
- Arms and legs: stuff more firmly
- Ears: stuff lightly so they stay floppy
- Set pieces aside.
Step 6: Assemble and Sew the Body
- Place the front and back body pieces right sides together.
- Position the arms, legs, and ears between the body layers, aligning raw edges.
- Pin each piece in place, keeping them slightly away from the stitching line.
- Pin the body pieces together and sew around the edges, leaving a small opening on one side for turning and stuffing.
Step 7: Turn and Stuff the Body
- Once the body is sewn, remove pins and trim loose threads.
- Turn the body right side out through the opening.
- Stuff with polyfill until soft and squishy, but not overfilled.
Step 8: Close the Opening
- After stuffing, fold the raw edges inward and pin closed.
- Use an invisible (ladder) stitch to close the opening by hand.
- Insert the needle into the fold of one side and pull it through, hiding the knot inside the seam.
- Insert the needle directly across into the opposite fold, making a small horizontal stitch.
- Repeat, alternating sides and pulling the thread gently after each stitch to create a “ladder” effect.
- Pull the thread gently to hide the stitches, knot, and tuck the thread inside the seam.
Step 9: Add Optional Finishing Touches
- Personalize your stuffed dog with extra details like:
- Fabric markers
- A bow or collar
- Buttons or embroidery
- Your Cute Stuffed dog is ready!