DIY White, Pink and Blue Pompom Wreath for Christmas
Give your holiday decor a soft, snowy look with this DIY Pink and Blue Pompom Wreath. Easy steps perfect for a cozy, Christmas vibe!
Equipment
- scissors
- Pompom maker
Ingredients
- 12- inch Wire wreath form – the size of your choice
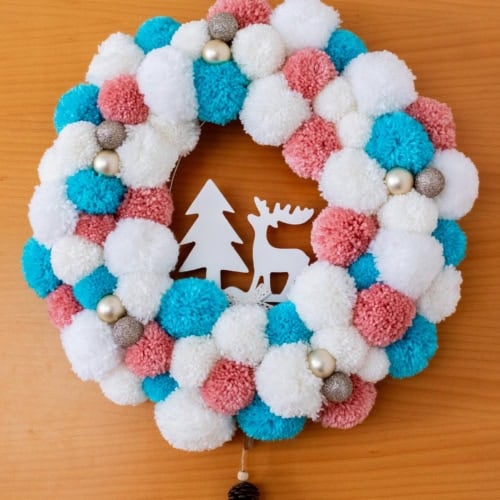
- Yarn in white, pink, and blue – white for most pompoms, with smaller amounts of pink and blue
- Small gold ornaments – I used 10 1-inch ornaments in mate and glitter gold
- A cute wooden decorative piece – I used a tree and a deer hanger. You can use a merry Christmas sign buttlebrush trees, little houses, or anything you like and have handy.
Instructions
Step 1: Make the Pompoms
- Start by creating your pompoms in varying sizes. For a snowy look, make about 60% of the pompoms in white, and the remaining in pink and blue.
- Use a pompom maker to speed things up, or wrap the yarn around your fingers (or a piece of cardboard) to create the pompoms.
- When you use a pompom maker, open one half and start wrapping the yarn around the half-circle until you feel it’s stuffed enough. Then move to the other half and repeat the process. Cut the yarn.
- When you are done, close the pompom maker and cut through the center of each side.
- Then cut a 8-inch string of the same yarn and wrap it around the middle of the pompom maker.
- Make a tight knot. I like to go back and forth knitting on both sides of the pompom maker to secure it well.
- When it’s done, open the half-circle flaps and separate both sides of the pompom maker.
- Once each pompom is created, trim it to a neat, fluffy ball shape.
- Repeat the process with different sizes and colors.
Step 2: Attach Pompoms to the Wreath Form
- Take your wire wreath form and begin attaching the pompoms by tying them onto the frame with a double or triple knot on the back.
- Arrange the white pompoms more densely around the wreath, especially on the outer edge, to create that snowy look.
- Interweave the pink and blue pompoms sparingly for a soft, colorful touch.
- Once you are satisfied with the pompom placements, move on to the next step.
Step 3: Add small gold ornaments
- Tie together 2 small gold ornaments with a string of yarn. I used mate gold and glitter ornaments.
- Place them in between pompoms and tie them on the back.
- Spread them around the wreath as you like.
Step 4: Add the decorative Item
- I used a tree and a deer hanger I already had from past years. Since it has a wire around it, I just had to tie it on the back at the top.
- If you are using a wooden sign, make sure you tie it well either on the back or on the front.
- If you are creating a winter scene, glue some cute trees and little houses on the inner bottom area of the wreath.
- I decided to hang it directly onto the door hanger but you can also use a cute ribbon to hang it and add a little extra cuteness.
Step 5: Final Touches
- Step back and take a look at your wreath. Adjust any pompoms to balance the colors and ensure fullness.
- View from far away of White, Pink and Blue Pompom Wreath for Christmas hanging on the door
- Tweak any elements to make sure they’re securely attached, and make sure your decorations are visible and centered.
- Hang your wreath on your front door, wall, or wherever you want to add that soft, snowy holiday touch!