DIY Winter Scene in a Jar. 2 Easy Snowy Scene Decor Ideas
Learn how to create a dreamy winter scene in a jar with these two easy Christmas decor ideas using a vase, snow, mini trees, and a glowing ceramic house.
Ingredients
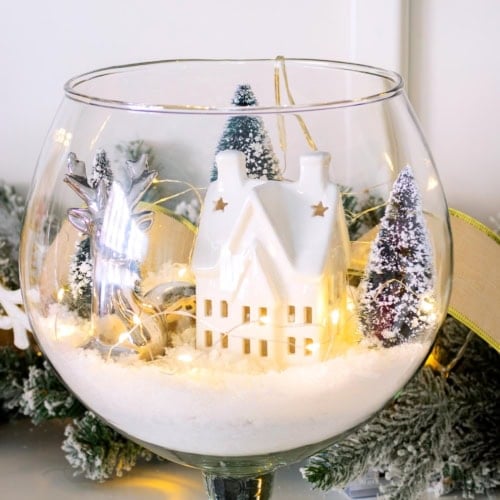
Idea 1: Winter Scene in a Vase (Glass Bowl)
- Glass bowl or wide vase
- Ceramic house or any small winter house
- Bottle-Brush trees or any type of trees that fit your theme
- Glittery deer or small figurines
- Artificial snow
- LED tea lights or micro fairy lights
Idea 2: Winter Scene in a Jar (Cylinder Vase)
- Tall glass cylinder vase or large jar
- Ceramic house preferably with LED tea lights inside (or any small winter house)
- Bottle-brush trees or any type of trees that fit your theme
- Small deer figurine
- Artificial snow
Instructions
Idea 1: Winter Scene in a Vase (Glass Bowl)
Step 1: Prepare your bowl
- Set your glass bowl on a flat surface so it’s easy to build your little winter village. Make sure it’s clean and shiny!
Step 2: Add artificial snow
- Pour a generous layer of artificial snow into the bottom of the bowl. Enough so the house and trees “sit into it” rather than on top of it.
Step 3: Place your ceramic house
- Nestle the house into the snow so it looks grounded and cozy. Turn on your LED tea light or fairy lights first (if they have it) so it glows through the windows.
Step 4: Add Cute trees
- Arrange your snowy trees behind and slightly around the house. Play with height and spacing until it feels balanced.
Step 5: Add the decorative deer
- Place your metallic or glitter reindeer at the side of the house. This little touch adds texture and brightness and just completes the village feel.
Step 6: Add lights (optional! but magical!)
- Tuck fairy lights around the house and trees. The glow bouncing inside the glass makes everything come alive at night.
- Put it in your preferred place and voila!
Idea 2: Winter Scene in a Jar (Cylinder Vase)
Step 1: Set up your jar and materials
- Lay out your pieces so you can see your “mini village” before building.
- Tall cylinder jar filled with artificial snow, ceramic house, and bottle brush trees.
Step 2: Add your artificial snow
- Pour about 1–2 inches of snow into the jar. Enough to bury the bases of the trees and house.
Step 3: Add the Cute house and trees
- Place the house slightly toward the front or center. Turn on your LED tea light so that warm glow shows through the windows. Also, add the taller trees behind the house and smaller ones in front or to the side. Layering creates depth, which looks beautiful through the glass.
Step 5: Add your deer
- This instantly gives it that magical winter village look. Position it facing the house or nestled between the trees.
Step 6: Final Touches
- Sprinkle a little extra snow if needed, and tuck any lights around the base so they don’t show through the glass from the wrong angle.
Step 7: Place it on a tray or shelf
- Now your snowy scene jar is ready to rock! It looks adorable in a vignette with candles, mini ornaments, or pinecones.
- I put it on my vignette on my coffee table!