Personalized DIY Glitter Christmas Ornaments
Craft holiday magic with our Easy DIY Glitter Christmas Ornaments tutorial! Dive into a world of sparkle and personal touch—perfect for festive memories.
Equipment
- Cutting Machine – Silhouette or Circuit will work
- Weeding tool
- Squeegee or scrapper
Ingredients
- Clear plastic ornaments
- Glitter in your favorite festive colors
- Vinyl sheets for the names in your favorite colors that contrast with the chosen glitter
- Transfer tape or contact paper.
- Polyurethane varnish
- Funnel or paper funnel
- Ribbon or twine
- Rubbing alcohol
- Syringe
- Paper towels
- Plastic or glass cups
- Patience the most important ingredient!
Instructions
STEP 1: CLEAN THE ORNAMENTS
- Start by cleaning the inside of the clear plastic ornaments with rubbing alcohol. This ensures a clean surface for the glitter and polyurethane to adhere to. Let it dry completely
- Remove the ornament cap.
STEP 2: APPLY GLUE
- Place your ornament on a plastic or glass cup so it stays put.
- Load the polyurethane glue into a syringe. This allows for precise application without making a mess.
- Carefully insert the syringe into the ornament and inject the polyurethane. Depending on your ornament’s size and your polyurethane density, you might need more or less glue. I added 5 syringes to the large ones and 4, to the smaller ones. Your should test to see how much you need.
- Rotate the ornament to ensure complete and even coverage.
STEP 3: DRIP EXCESS GLUE
- Allow the excess polyurethane to drip out by placing the ornament upside down on the polyurethane can (hold it with a knife) or on a paper towel.
- You can use a plastic or glass cup with the paper towel inside to let it drip while you apply polyurethane to the other ornaments.
- This step prevents clumps and ensures a smooth application.
STEP 4: LET IT SET
- Allow the polyurethane to sit for a few minutes. This brief waiting period allows the glue to reach the right consistency for the glitter application.
STEP 5: ADD GLITTER
- Use a funnel or paper funnel to pour the glitter into the ornament. Add abundant glitter to make sure you cover it all and the excess can go back to the container.
- Swirl and shake the glitter around, covering the entire interior.
- Adjust the amount based on your desired level of sparkle.
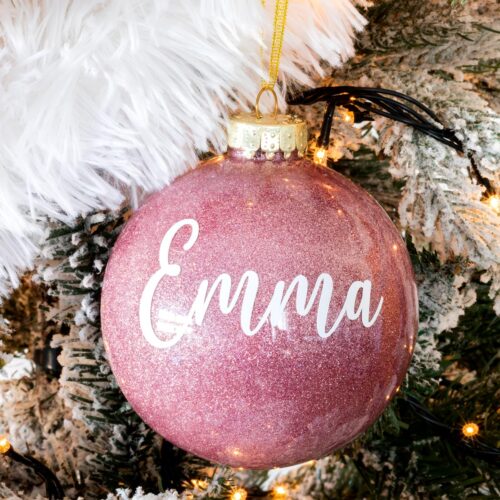
- You can make them all in the same color or color combinations. I made mine some in pink and some in gold.
- Let all the ornaments dry.
STEP 6: PREPARE VINYL NAMES
- Open your design software (like Silhouette Studio). Type the names using your chosen font and size. Adjust spacing and alignment as needed.
STEP 7: LOAD VINYL
- Choose your vinyl colors that would match and contrast with your glitter color. I used white because my Christmas theme this year was white, pink and gold.
- Place a sheet of vinyl onto the cutting mat making sure it’s the right size for all the names you are cutting. Smooth out any air bubbles or wrinkles to ensure accurate cutting.
- In the software, select the material settings for vinyl. On the machine, use the recommended settings for vinyl or consult your machine’s manual.
- Load the cutting mat with vinyl into the Silhouette Cameo. Align it properly and secure it in place.
STEP 8: SEND TO CUT
- Send the design to cut. The Silhouette Cameo will precisely cut the vinyl, creating your personalized cute names.
STEP 9: WEEDING AND TRANSFER TAPE
- Carefully weed (remove) the excess vinyl around and inside the letters. A weeding tool is handy for intricate designs.
- Cut a piece of transfer tape slightly larger than the vinyl names. You can also use cheap contact paper like I did. It works perfectly!
- Peel the backing off the transfer tape and carefully place it over the vinyl names.
- Use a scraper tool to ensure good adhesion.
STEP 11: APPLYING VINYL NAMES ON THE ORNAMENTS
- Make sure the exterior of the ornament is clean and dry. Wipe it down with rubbing alcohol for optimal adhesion.
- Lift the transfer tape with the vinyl names attached from the backing.
- Position it on the outside of the ornament where you want the names.
- I recommend starting with the center of the name and then smoothing it out to the right and then to the left. This helps avoid distortions, wrinkles, and bubbles.
- Use the scraper tool to smooth out the vinyl, ensuring it adheres well to the ornament’s surface.
- Slowly peel off the transfer tape at a sharp angle. This leaves the vinyl names securely on the ornament.
- Gently press down any edges or corners that might need extra attention. Ensure the vinyl is securely applied.
STEP 12: LET IT DRY COMPLETELY
- Let the ornament sit for several hours to ensure everything is completely dry. If possible leave them near a window or where fresh air flows.
- Patience is key!
STEP 13: PUT THE CAP BACK ON
- Once the ornaments are completely dry, put the ornament cap back on. This step completes the process.
STEP 14: ADD RIBBON OR TWINE IF NEEDED
- Tie a festive ribbon or twine around the top of the ornament for hanging.
STEP 15: HANG YOUR ADORABLE ORNAMENTS
- We couldn’t just make the ornaments and leave them around! It’s time to hang them on your tree and make it magical and gorgeous!
Notes
Note: Each polyurethane brand in each country may vary in density. So make sure you test with one ornament to figure out how long you should let the polyurethane sit. In my case, in Spain with the brand Isaval, I had to wait for an hour before adding the glitter. The brand Minwax in the USA, it takes around 5-10 minutes.