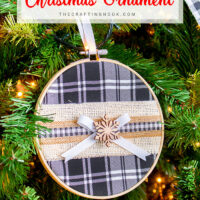
Buffalo Plaid Embroidery Hoop Christmas Ornaments DIY
These Buffalo Plaid Embroidery Hoop Christmas Ornaments are the easiest DIY embroidery hoop craft you can create to add some elegant yet festive cheer to your tree.
Equipment
- scissors
- Hot glue gun and glue sticks
Ingredients
- Embroidery hoop the size of your choice, I used big and small embroidery hoops to make it fun
- Buffalo plaid fabric or your favorite one, even scrap fabric works too
- Burlap Ribbon light beige, almost white
- Different Ribbons of your choice in different sizes I used darker burlap with buffalo check and white grosgrain.
- Snowflake embellishment.
- Optional greenery berries or any extra decoration you love.
Instructions
STEP 1: PREPPING YOUR SUPPLIES
- Firstly, measure your embroidery hoop and cut your fabric about an inch larger. You can use any type of fabric, what’s important is that you love it.
- I’ve even seen some ornaments made with old sweaters and I think it’s so cute!
- Take the embroidery hoop apart and for now, place the inside hoop on a flat surface.
STEP 2: ASSEMBLING YOUR EMBROIDERY HOOP ORNAMENT
- Place the fabric on top of the ring as centered as possible.
- Then cut a piece of your light burlap and place it over the fabric centered.
- Cut a piece of the next size ribbon, the same width as the previous one. Please it over the burlap ribbon also centered.
- Press the outside hoop in place over the fabric.
- Tighten the screw on the embroidery hoop and pull fabric until the fabric is tight. Be careful in this step to not distort the plaid pattern.
STEP 3: DECORATING THE ORNAMENT
- With the ribbon (in my case, white grosgrain ribbon) make a cute ribbon bow.
- Glue the snowflake of your favorite embellishment in the center of the bow. Set aside for a moment.
- Cut carefully all the remaining fabric from the back of the embroidery hoop
- Now glue the bow to the center of your embroidery hoop design.
STEP 4: MAKE THE HANGER
- Cut a piece of ribbon bow ribbon (the same one used for the bow) and pass it through the embroidery hoop screw space. Make a tight knot with the ends to create the hanger.
- There you go! You got yourself a super cute embroidery hoop Christmas ornament!
- You can make as many as you want with as many different sizes as you desire!