Christmas DIY Mitten Ornaments Tutorial
Make your own cute Christmas DIY Mitten Ornaments this holiday season to hang on your tree, as a family craft night or give as gifts. Here’s what you need to do.
Equipment
- Hot glue gun
- Matching thread needle, pins, and scissors
Ingredients
- Plaid Tartan Wool fabric Or the fabric of your choice
- Polar polyester fleece
- Cute buttons
- Twine
- Polyester Fiber Fill
- A Mitten Pattern Free. Personal use only
Instructions
STEP 1: PREP WORK
- Get your Template from the link in supplies, print it and cut it. No cutting machine is needed, you can easily cut it with scissors.
- You can also print it in different sizes so your ornaments don’t look all the same. Don’t worry if the title or the footer of the template gets cut off.
- Gather all your supplies and let’s start
STEP 2: CUTTING YOUR MITTEN PIECES
- Using your mitten pattern cut it twice on the fabric. I usually fold the fabric to cut both at once.
- Pin the pattern in place and then cut around leaving about 1/4 inch seam allowance.
- For the fluffy cuffs, cut 2 pieces of fleece the same width as the plaid mitten cuffs and the height should be from the edge to about where the thumb would start. You can make it slightly taller if you would like.
STEP 3: HAND SEW MITTEN ORNAMENTS
- Place right sides together and pin. Sew all the way around the ornament leaving only the cuffs open for stuffing.
- Stitch the fleece cuff on both shortest sides.
- Turn your cuff right side out.
- Inset it into the mitten right sides together aligning the edges and sides seams.
- Stitch along the raw edges.
- Pull out the cuff.
- Turn the whole mitten inside out and make sure you stretch a little bit all the edges so the shape looks good.
STEP 4: STUFFING AND CLOSING YOUR ORNAMENT
- Lightly stuff the ornament with fiberfill – do not overstuff, they are supposed to look casual and relaxed!!!
- Sew the opening shut right between the plaid fabric and the fleece. Make sure the previous stitches stay inside the plaid mitten.
- Turn the cuff over the mitten.
- There you go. The first mitten is ready!
- Repeat the process with a second mitten and let’s decorate them!
STEP 5: STYLING AND DECORATING YOUR DIY MITTEN ORNAMENTS
- I kept it simple.
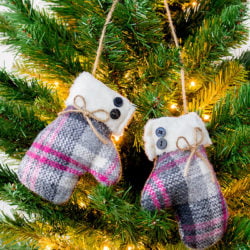
- As embellishments, I just added 2 buttons on the side of the cuffs and a twine bow in the middle right below the fleece cuff.
- But if you feel like adding a more festive touch you can use snowflakes, cute mini Christmas trees, jingle bells, and ribbon bow instead of twine, imagination is the limit. There’s no right or wrong here!
- I stitched the buttons but I hot glued the bow (I felt lazy).
- I didn’t decorate the back of the mitten but it’s totally optional if you want to do it.
- Then I cut a long thread of twine, made a knot on each end, and tied a bow in the middle.
- Then using hot glue, I glued each end of the twine on the opposite side of the cuff at the top of the mitten. See below.
- That’s it!
- The Christmas diy mitten ornaments are ready to rock your Christmas Tree!