Christmas DIY Mitten Ornaments – Free Mitten Template
This post may contain affiliate links. Please read our Disclosure Policy.
Make your own cute Christmas DIY Mitten Ornaments this holiday season to hang on your tree, as a family craft night or give as gifts. Here’s what you need to do.
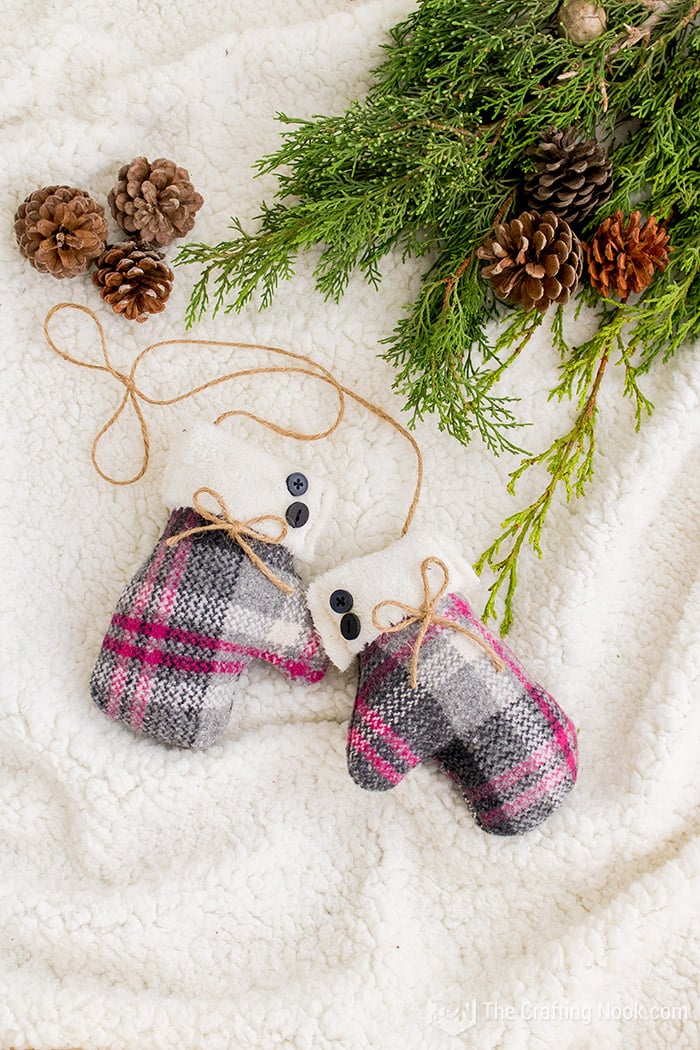
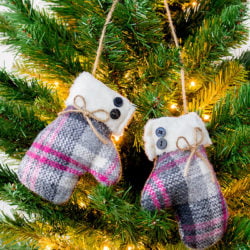
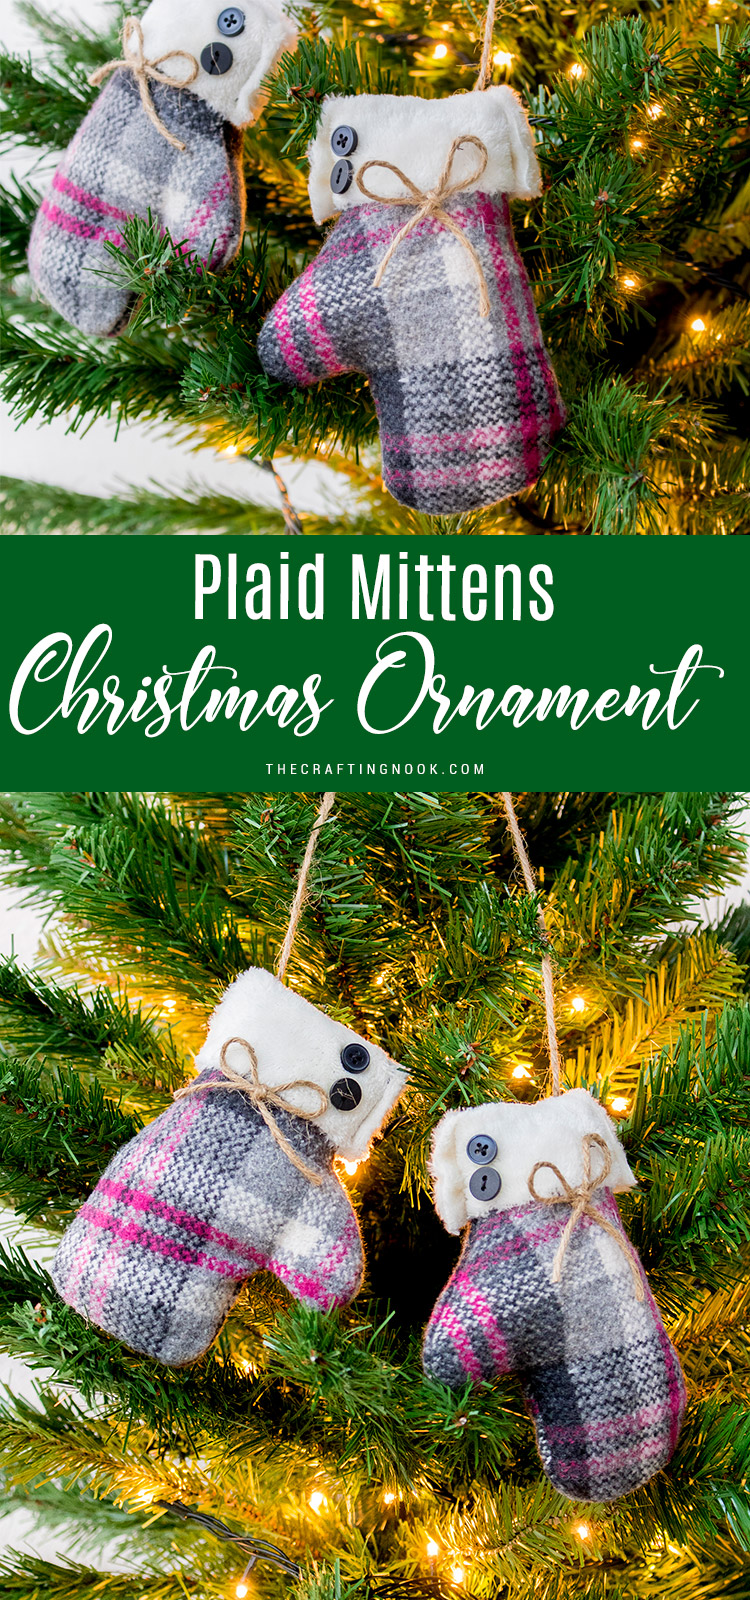
These diy Mitten Ornaments are just so adorable. I love how unique and warm they are and perfect for using up fabric scraps. Adding a couple of details like buttons and bows gives a fun finish to a beautiful DIY Mittens Christmas Ornament.

Table of Contents
Make DIY Mitten Ornaments for Your Christmas Tree
That time of the year is rapidly approaching. Time to use cozy warm outfits and begging to decorate our homes with hopes, joy, and love. Because that’s the truth.
Beyond the actual decoration, when Fall hits and we are done with all the fall decor and even Halloween, we are already eager to start enjoying Christmas, and the first thing we start thinking about is what new ornaments and decorations are we going to make this year, right?
Today I’m excited to share with you my very first Christmas ornament of this year. Because I love cozy feelings, I made these cute Plaid Mitten Ornaments.
I’m a part of an amazing group of creative blogger ladies who gather every year to share with you 12 Days Of Handmade Christmas Ornaments during the month of October.
And no, it’s never too soon to start decorating for Christmas LOL. It’s crazy to think that it’s been 4 years already with this tradition and I’m so honored to have been part of it this long!
Why mittens?
Well, last year I put on my Christmas tree some cute wooden ice skates that I found in a store. I fell in love right away and I saw them.
This year I thought that the best companion for ice skates is some cute cozy warm mittens. These Mitten Ornaments are fun to make and not hard at all.

You can either hand-sew them or use a sewing machine if you got one.
I made the tutorial hand-sewing to show you it’s possible to create these Christmas Mitten Ornaments without any fancy tools or supplies.

Kids can easily join and make some too. My girl was super eager to help and she will. I was in rush to make it in time for this post, so I couldn’t have her join but she’ll definitely be helping me make the rest of them.
I think that since I have 3 pairs of skates I’ll make 2 more pairs of mittens to have a total of 3 pairs.
If you don’t want these cuties for your Christmas tree, you can always use them for a Christmas wreath and put them on your front door. Also as a part of a garland, on your mantel, so many ways you can use them.
How to Make Christmas DIY Mitten Ornaments
Before we begin, be sure to follow us on Pinterest, Facebook, Instagram, and YouTube, and also sign up for our email list (at the end of this post), so you’ll never miss a post!
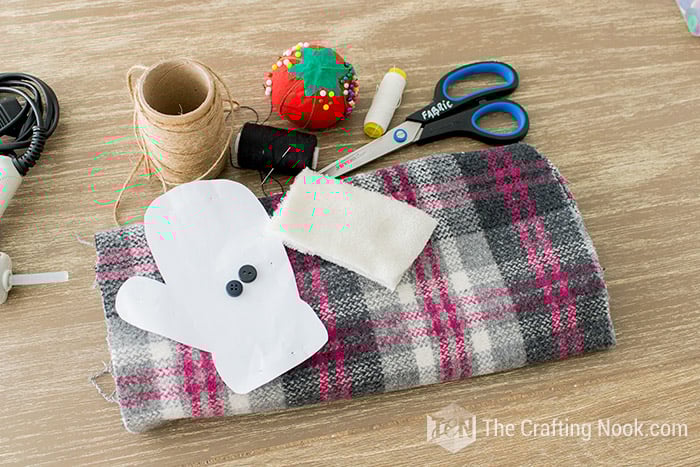
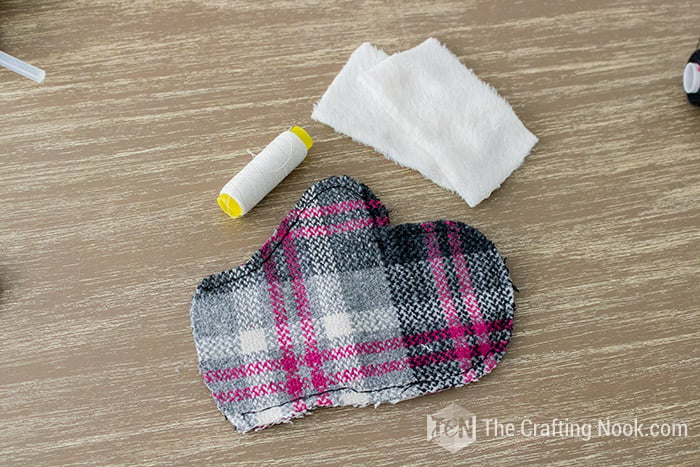
Supplies:
- Plaid Tartan Wool fabric (Or the fabric of your choice)
- Polar polyester fleece
- Cute buttons
- Twine
- Polyester Fiber Fill
- A Mitten Pattern (Free. Personal use only)
Tools:
- Hot glue gun
- Matching thread needle, pins, and scissors
Mitten Template
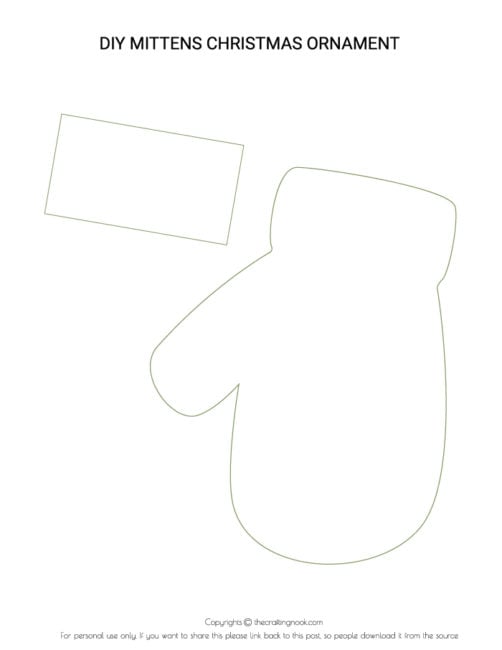
Snag your Mitten Ornament Template HERE
Instructions:
I made a quick video tutorial to make it easy to understand the steps but if you are more of a step-by-step photo kind of person just scroll down a bit and keep reading.
Step 1: Prep Work
Get your Template from the link in supplies, print it and cut it. No cutting machine is needed, you can easily cut it with scissors.
You can also print it in different sizes so your ornaments don’t look all the same. Don’t worry if the title or the footer of the template gets cut off.
Gather all your supplies and let’s start
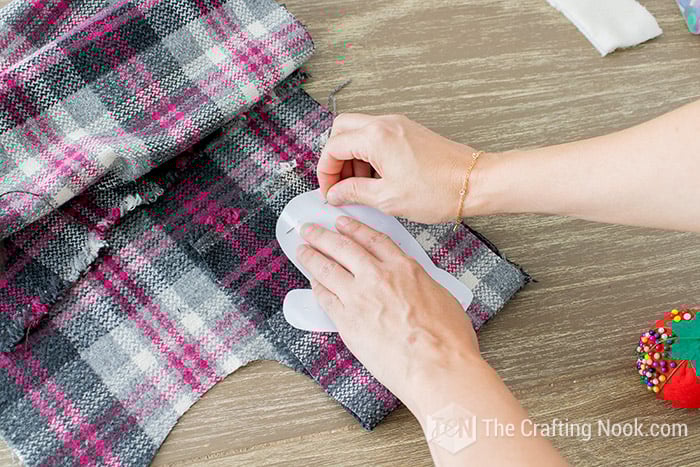
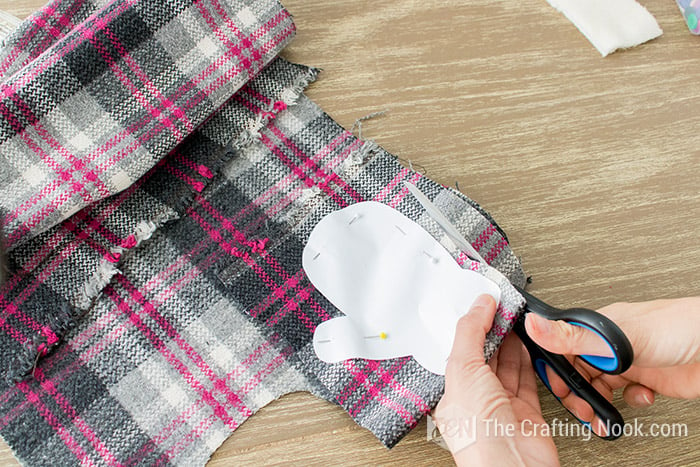
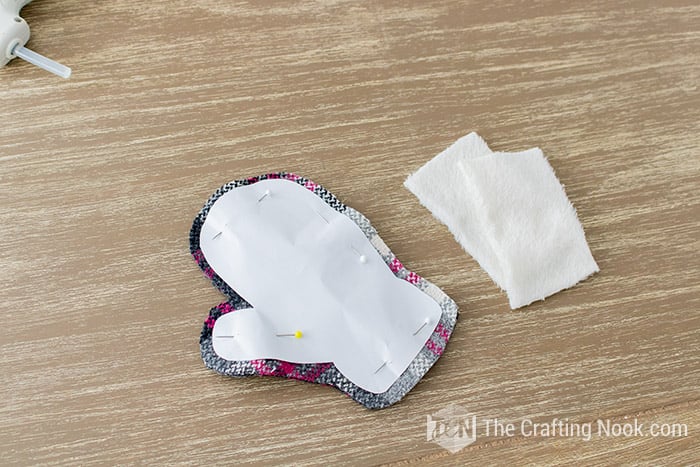
Step 2: Cutting your Mitten Pieces
Using your mitten pattern cut it twice on the fabric. I usually fold the fabric to cut both at once.
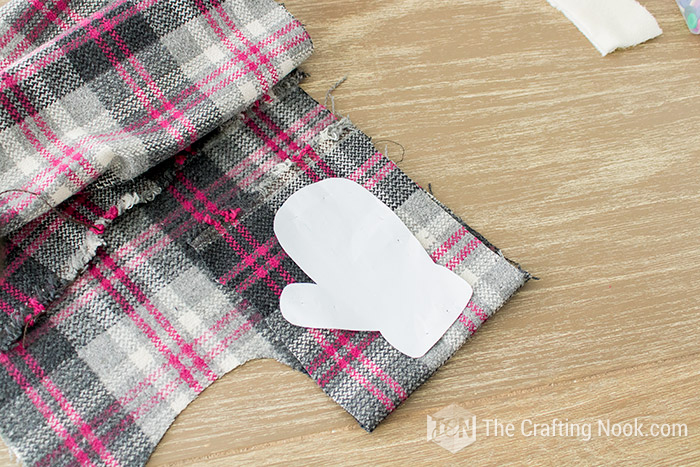
Pin the pattern in place and then cut around leaving about 1/4 inch seam allowance.
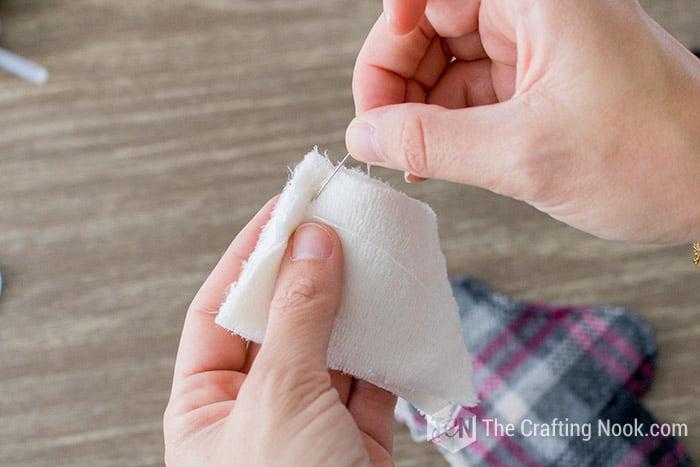
For the fluffy cuffs, cut 2 pieces of fleece the same width as the plaid mitten cuffs and the height should be from the edge to about where the thumb would start. You can make it slightly taller if you would like.
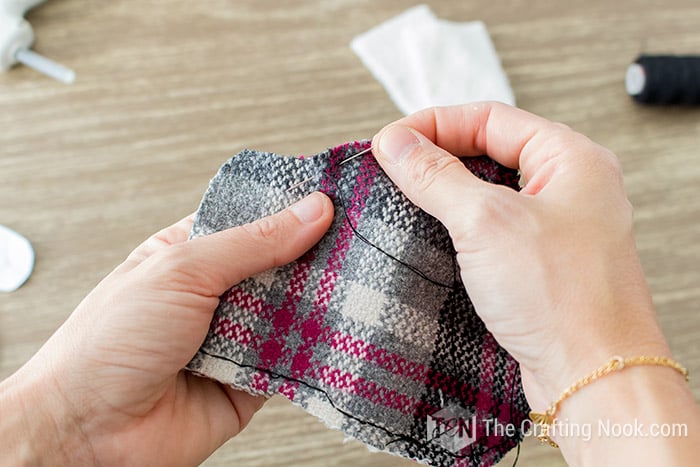
Step 3: Hand Sew Mitten Ornaments
Place right sides together and pin. Sew all the way around the ornament leaving only the cuffs open for stuffing.
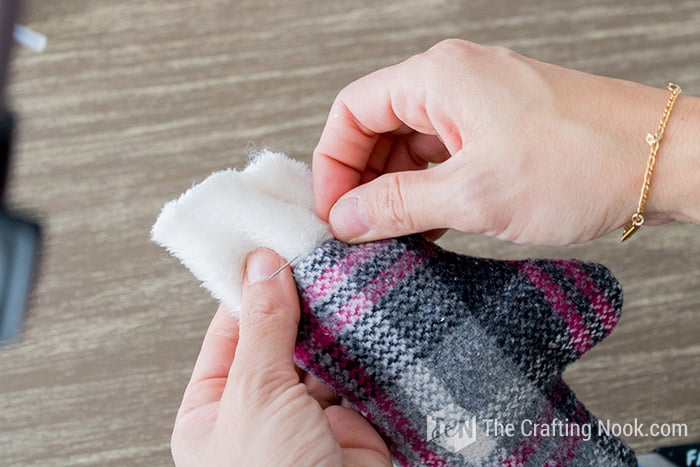
Stitch the fleece cuff on both shortest sides.

Turn your cuff right side out.
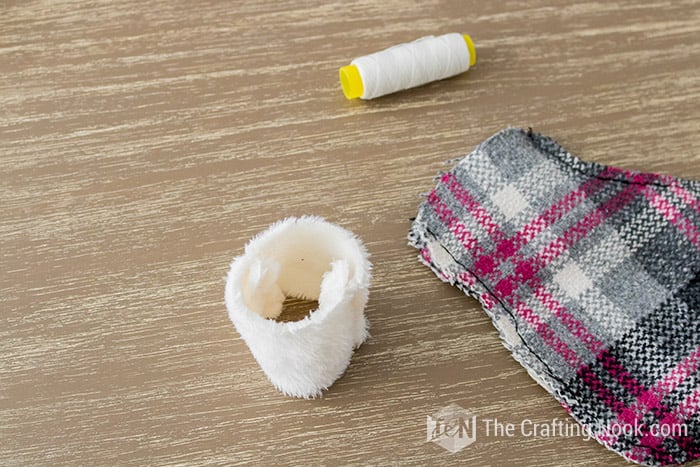
Inset it into the mitten right sides together aligning the edges and sides seams.
Stitch along the raw edges.
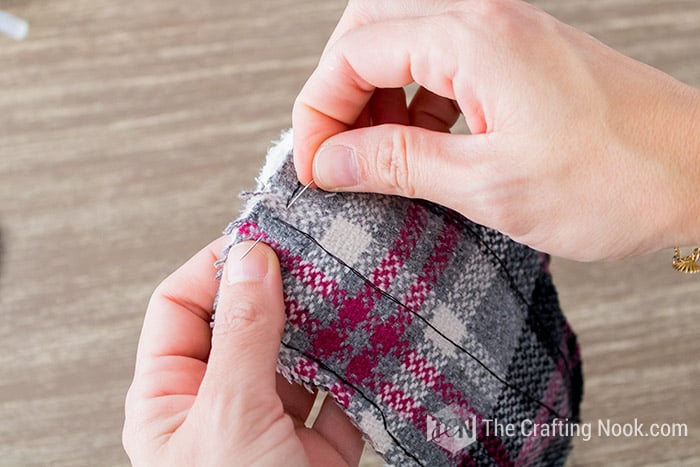
Pull out the cuff.

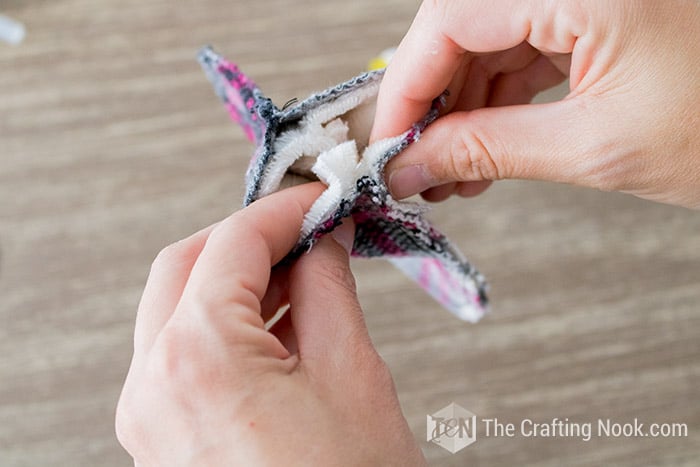
Turn the whole mitten inside out and make sure you stretch a little bit all the edges so the shape looks good.

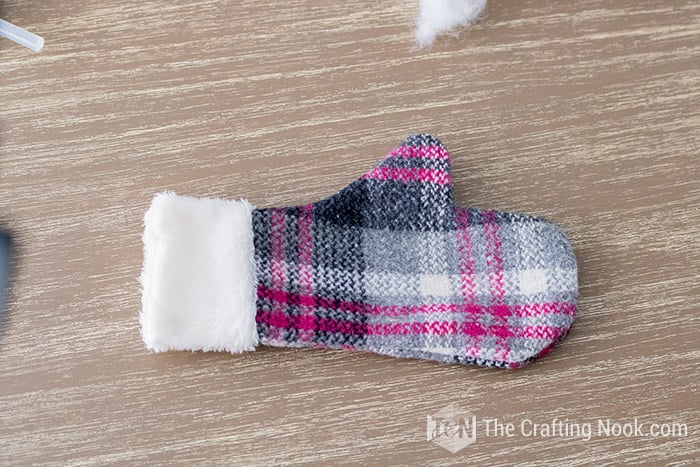
Step 4: Stuffing and closing your Ornament
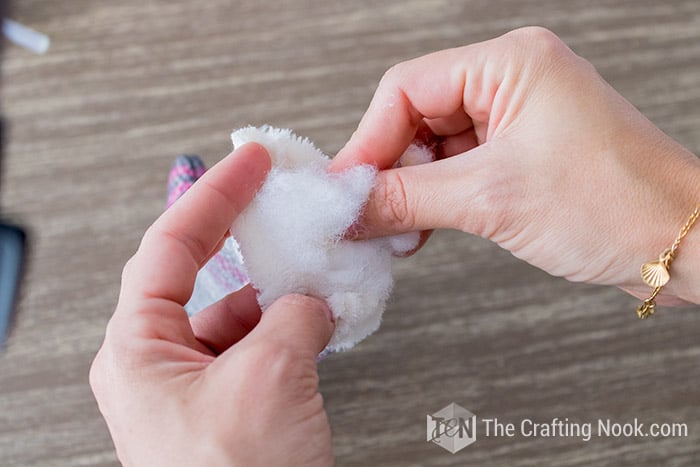
Lightly stuff the ornament with fiberfill – do not overstuff, they are supposed to look casual and relaxed!!!
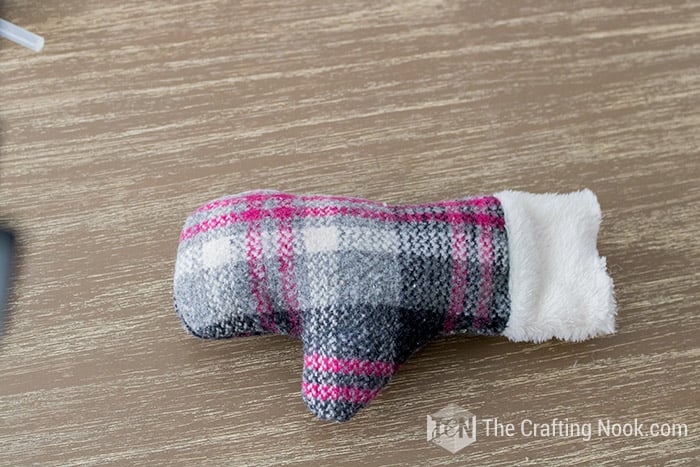
Sew the opening shut right between the plaid fabric and the fleece. Make sure the previous stitches stay inside the plaid mitten.
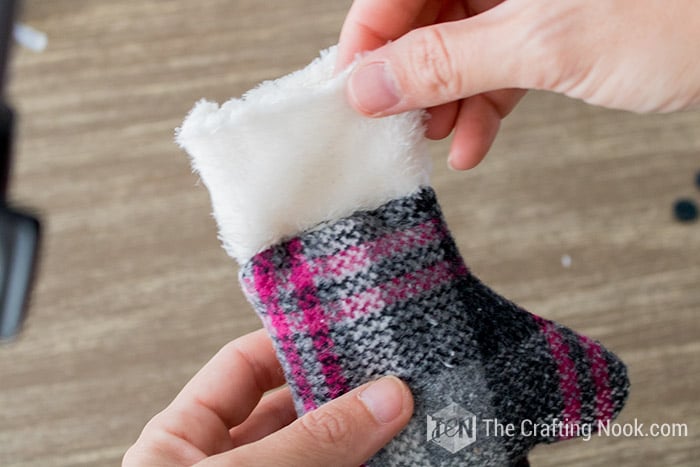
Turn the cuff over the mitten.

There you go. The first mitten is ready!

Repeat the process with a second mitten and let’s decorate them!
Step 5: Styling and decorating your diy Mitten Ornaments
I kept it simple.
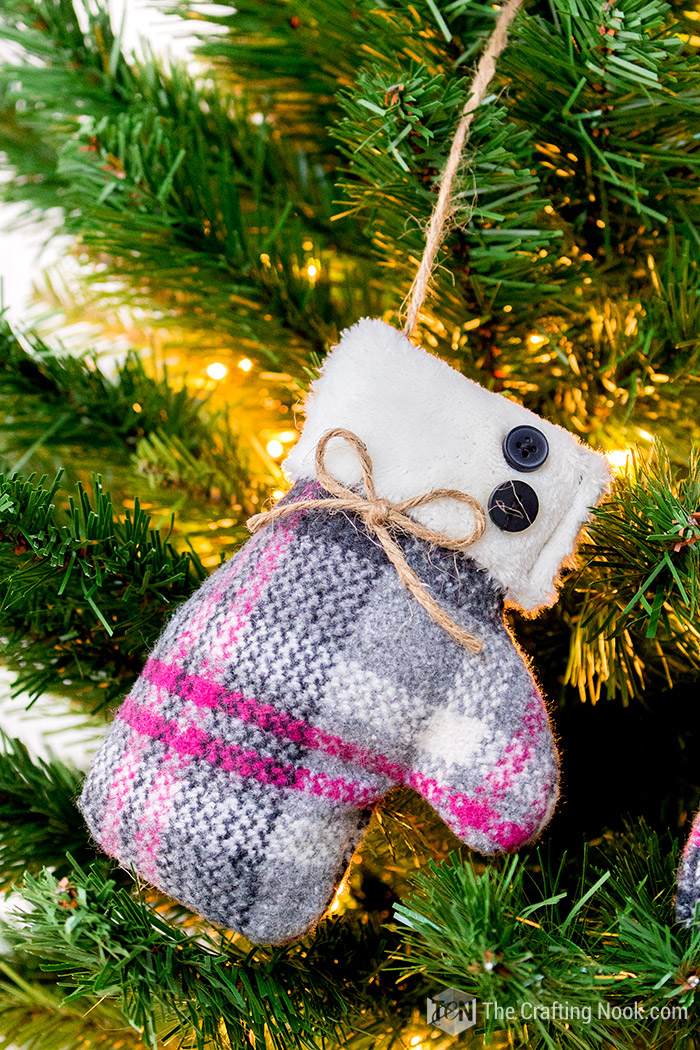
As embellishments, I just added 2 buttons on the side of the cuffs and a twine bow in the middle right below the fleece cuff.
But if you feel like adding a more festive touch you can use snowflakes, cute mini-Christmas trees, jingle bells, and ribbon bow instead of twine, imagination is the limit. There’s no right or wrong here!
I stitched the buttons but I hot glued the bow (I felt lazy).
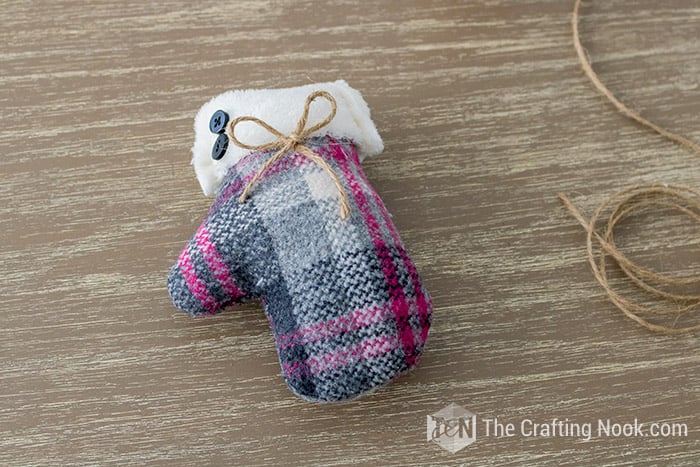
I didn’t decorate the back of the mitten but it’s totally optional if you want to do it.
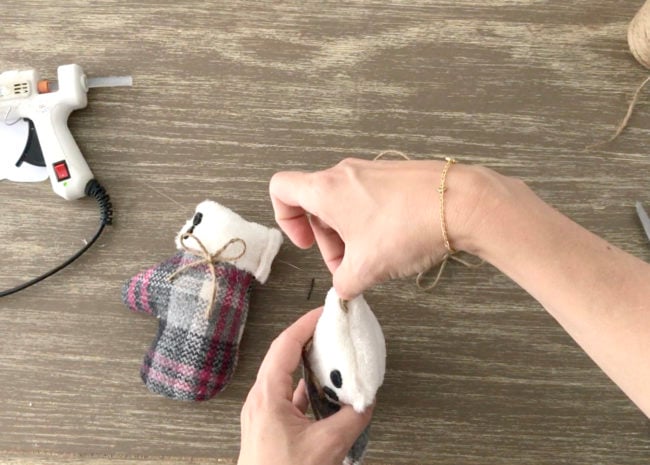
Then I cut a long thread of twine, made a knot on each end, and tied a bow in the middle.
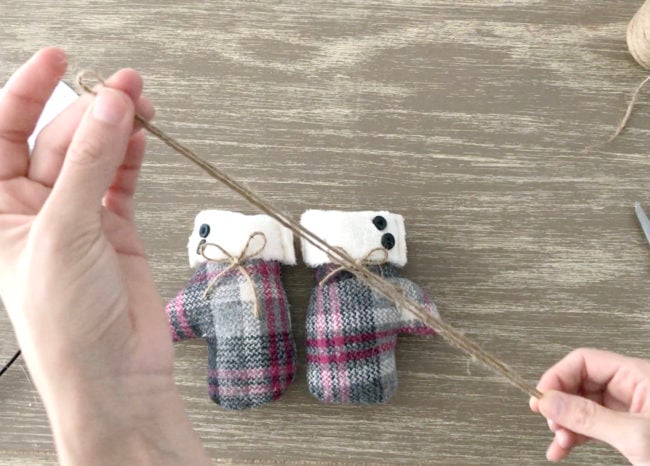
Then using hot glue, I glued each end of the twine on the opposite side of the cuff at the top of the mitten. See below.

That’s it!
The Christmas mitten ornaments are ready to rock your Christmas Tree!


It took me about 20 minutes to make one mitten (without shooting a video and photos). If you have a sewing machine you will probably make them in less time.
They look so cute on the Christmas tree. I’m in Love!

What do you think??? Tell me in the comments!
Frequently Asked Questions
That’s an easy question. You definitely can and you are more than welcome to.
You can use any type of fabric that you love. I just love the plaid fabric but even burlap will look amazing! Your taste and style are the limits. You can use any fabric you like.
-Are you into rustic? you can use, burlap, linen, and tablecloth fabric.
-Or maybe you like elegant, you can use cotton, silk, etc
-If you like neutral, use plain linen, or solid cotton f
Absolutely! You can go for pretty ribbons, yarn, and anything else your creativity calls!
I think you could but since I haven’t personally done it, I don’t know the result. If you have a sewing machine, you can use it but to make these ornaments you don’t need to be a sewer, the stitches are super simple, enough to hold the stuffing. In the crafting world, it’s all about trying and testing. Don’t be scared and just try, there’s no perfection expected!
More Christmas Ornaments to Try
If you enjoyed these cute DIY mitten ornaments tutorial, you might also love these other Christmas projects too:

✂️ Tutorial
Christmas DIY Mitten Ornaments Tutorial
Tools
- Hot glue gun
- Matching thread needle, pins, and scissors
Supplies
- Plaid Tartan Wool fabric Or the fabric of your choice
- Polar polyester fleece
- Cute buttons
- Twine
- Polyester Fiber Fill
- A Mitten Pattern Free. Personal use only
Instructions
STEP 1: PREP WORK
- Get your Template from the link in supplies, print it and cut it. No cutting machine is needed, you can easily cut it with scissors.
- You can also print it in different sizes so your ornaments don’t look all the same. Don’t worry if the title or the footer of the template gets cut off.
- Gather all your supplies and let’s start
STEP 2: CUTTING YOUR MITTEN PIECES
- Using your mitten pattern cut it twice on the fabric. I usually fold the fabric to cut both at once.
- Pin the pattern in place and then cut around leaving about 1/4 inch seam allowance.
- For the fluffy cuffs, cut 2 pieces of fleece the same width as the plaid mitten cuffs and the height should be from the edge to about where the thumb would start. You can make it slightly taller if you would like.
STEP 3: HAND SEW MITTEN ORNAMENTS
- Place right sides together and pin. Sew all the way around the ornament leaving only the cuffs open for stuffing.
- Stitch the fleece cuff on both shortest sides.
- Turn your cuff right side out.
- Inset it into the mitten right sides together aligning the edges and sides seams.
- Stitch along the raw edges.
- Pull out the cuff.
- Turn the whole mitten inside out and make sure you stretch a little bit all the edges so the shape looks good.
STEP 4: STUFFING AND CLOSING YOUR ORNAMENT
- Lightly stuff the ornament with fiberfill – do not overstuff, they are supposed to look casual and relaxed!!!
- Sew the opening shut right between the plaid fabric and the fleece. Make sure the previous stitches stay inside the plaid mitten.
- Turn the cuff over the mitten.
- There you go. The first mitten is ready!
- Repeat the process with a second mitten and let’s decorate them!
STEP 5: STYLING AND DECORATING YOUR DIY MITTEN ORNAMENTS
- I kept it simple.
- As embellishments, I just added 2 buttons on the side of the cuffs and a twine bow in the middle right below the fleece cuff.
- But if you feel like adding a more festive touch you can use snowflakes, cute mini Christmas trees, jingle bells, and ribbon bow instead of twine, imagination is the limit. There’s no right or wrong here!
- I stitched the buttons but I hot glued the bow (I felt lazy).
- I didn’t decorate the back of the mitten but it’s totally optional if you want to do it.
- Then I cut a long thread of twine, made a knot on each end, and tied a bow in the middle.
- Then using hot glue, I glued each end of the twine on the opposite side of the cuff at the top of the mitten. See below.
- That’s it!
- The Christmas diy mitten ornaments are ready to rock your Christmas Tree!
Do you have more handmade Christmas Ornaments ideas?
Yes indeed! Check out these amazing ladies’ Handmade Ornaments ideas for a boost of inspiration!
Before I send you off to visit all the other participating bloggers, I want to express my appreciation to Dianne Miller of An Extraordinary Day, Mary Beth of The How to Home and Jennifer of Celebrating Everyday Life. Thank you, ladies, for all your help and encouragement in hosting this amazing blog hop. I couldn’t do it without you!
Here are all 12 Bloggers in order of their appearance:
- An Extraordinary Day – Day 1
- The how to Home – Day 2
- Celebrating Everyday Life – Day 3
- Atta Girl Says – Day 4
- Hunt and Host – Day 5
- Lovely Etc. – Day 6
- Pet Scribbles – Day 7
- Sweet Pea – Day 8
- I Should Be Mopping the Floor – Day 9
- Remodelando la Casa – Day 10
- Live Laugh Rowe – Day 11
- The Crafting Nook (that’s me!) – Day 12
If you like this fun Christmas project don’t forget to share it with your friends!
Til’ next time…


FREE WORKBOOK
Keeping your Sweet Home Organized
Learn how to create intentional habits and simple routines to Keep Your Home Organized. Plus freebies, printables, exclusive content, and tips.
Disclaimer: By clicking on the “Yes” button above you are giving me your consent to collect and use your information according to the law and My Policy Privacy. Zero Spam I promise!