DIY 3-Pieces Envelope Pillowcase for Christmas
If you want to try something new or just want a simple sewing project to enjoy, then this step-by-step tutorial on how to make an envelope pillowcase is right for you! Simple to make, wash, and reuse, these 3-piece envelope pillowcases are easy to make. Could there be anything better?
Equipment
- Sewing Machine
- Cutting machine *optional if you want to decorate the pillows.
- Measuring tape, plastic ruler, scissors or rotary cutter.
Ingredients
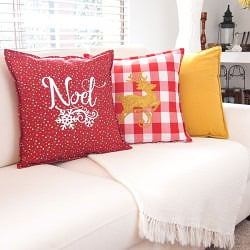
- 1 yard of your favorite fabrics or more depending on the size of your pillows {I used red with stars and a buffalo check plaid white and red}
- Stencil material {I confess I used contact paper}
- White heat transfer vinyl
- Gold fabric paint
- Gold glitter
- Fabric Glitter glue.
- Matching thread
- Pillow insert
Instructions
STEP 1: CUT THE ENVELOPE PILLOWCASE PIECES
- As I said this project involves only 3 fabric pieces. so first, cut the pieces of your fabric. In my case, my pillows were squared which made the job easier.
- I also decided I wanted to make them with a french seam finish which means I need to add the extra seam allowance to create it.
- Or course the first thing to do is define the size of your pillow.
For a pillow’s size 46X46 cm (18×18 Inches), cut:
- Front: 1 piece 50×50 cm (19.5×19.5 Inches).
- Back: panels 2 pieces 50x 35 cm (19.5×14 Inches).
- These measurements include 1/2 inch seam allowance and the french seam.
- Laying out the 3 pieces needed for the envelope pillowcases I'm making
- Once the pieces of all your pillows are cut, it’s time to decorate them before sewing the pieces together.
STEP 2: CREATE THE ENVELOPE PILLOWCASE DESIGN
- This is a totally optional step. If you are not planning on decorating your pillows, you can skip this step and move on to the assembling part.
- Also, if you want to decorate your pillow but don’t have a cutting machine that’s cool too. You can find numerous designs on the internet to purchase or in craft stores. Some are heat transfer vinyl and others are stencils for you to paint on the fabric.
TECHNIQUE #1: HEAT TRANSFER VINYL DESIGN
- The design for the pillocases made on Silhouette Studio App
- I made a design for heat transfer using the words Joy and Noel using my own fonts for it and a cute winter design from the Silhouette store.
- Then I weld them together to make one single design ready to cut.
- It’s also important that you make sure you have you define the size of the pillow decorating area so you set the right width and height on the cutting machine app.
- For cutting, since I’ll be using heat transfer, I mirrored the image and set the knife according to Silhouette settings.
- Send to cut.
- Once cut, use the hook tool to remove all the unwanted pieces. Including all the surrounding HTV.
- Place the Image centered on your fabric front panel, right side up and laid a t-shirt piece of fabric on top of the design.
- Iron in cotton settings pressing down firmly for about 40-60 seconds {it might vary between irons} until you make sure the image is really stuck to the fabric. If you peel away the plastic and the vinyl is not set, continue ironing for a few more seconds.
- I let it cool for a few seconds and started peeling away the plastic very carefully.
- To wash it you can just machine wash and dry inside out {the lower the heat the better}.
- There you go, your pillow design is ready!
- I did this with the other pillow.
TECHNIQUE #2: THE STENCIL PAINTED DESIGN
- I used a reindeer design from the silhouette store for the painted pillow. In this case, there is no need to mirror it.
- Just send to cut and set the knife to the suggested settings.
- Protect with plastic the surface where you are going to work.
- Place your fabric over the plastic, right side up.
- Place your design stencil centered in the fabric.
- Start painting. In my case seems like the type of fabric rejected the contact paper. But didn’t let this stop me.
- I just had to be extra careful to paint it. Using a sponge I painted only tapping over the design. I applied 2 layers of paint. Let it dry a bit. I waited about 20 minutes.
- Protect the surroundings of your design and applied carefully the glitter glue for fabric with a clean sponge and spread the glitter all over the design.
- Then, wait at least 25 minutes before removing the excess of glitter.
- After removing the glitter you will still have some glitter around, leave it and take it outside {if your weather allows it} or close to a window to let it completely dry. It would take a couple of hours.
- After a couple of hours had passed, it was completely dry and with the help of a brush, I remove any remaining glitter from the design leaving only the stuck glitter.
- Importantly, I suggest doing this outdoors or over a protected surface so you don’t get glitter all over your house!
STEP 3: SEW THE PILLOW CASES.
- Firstly, start making the hems on the back panels.
- Double fold over one of the long edges of your back pieces about 1/8 inch each and stitch. Do this for both back pieces.
- Hemming the reaw edges of the back pannels of the envelope pillowcase
- Then, with your front piece facing up, place both back pieces facing down (right sides together) on top of it as shown. Make sure they overlap correctly.
- Pin all the way around and stitch all the way around the edges respecting the seam allowance.
- I love to zig-zag stitch after stitching to avoid fraying on the raw edges. This is more than enough and you don’t a serger for this.
- The sewing machine stitching along the edges of the fabric respecting the seam allowance
- The cute envelope pillowcase design seen through the opening of the cover
- For best results, Iron your pillowcase to flatten the edges and remove wrinkles.
- Flip your pillow cover inside out (wrong sides together) and straight stitch all the way around the edges again leaving 1/4 inch to create the french seam.
- That’s it! How easy right?
- Making these pillow covers without any design should take you no more than 20 minutes each. I made all 4 pillow covers in about 3 hours including designs and photos LOL.
- Finally, insert your pillows inside your covers and voila!
- Of course, do the same with the rest of the covers you might want to make.
STEP 4: DECORATE YOUR COUCH!
- Put them on your couch along some cozy blankets and you are good to go!