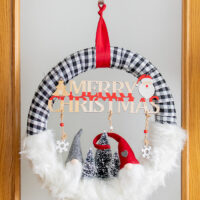
DIY Buffalo Check & Gnome Christmas Wreath
Nothing says holiday season quite like buffalo check, so we’re giving it a little twist for the holidays! See the step-by-step tutorial for creating this festive Gnome Christmas Wreath. This is one you won’t want to miss! Get the details here.
Equipment
- scissors
- Hot glue gun
Ingredients
- Black and white buffalo check ribbon
- Red ribbon
- Foam wreath form size of your choice.
- Faux Fur ribbon or garland or anything you like to simulate snow
- Bottle brush Trees.
- Merry Christmas Wooden sign
- 2 cute gnomes I used these cute Christmas gnome ornaments.
- Pins
- Twine.
Instructions
- Before we begin, be sure to follow us on Pinterest, Facebook, Instagram, and YouTube, and also sign up for our email list (at the end of this post), so you’ll never miss a post!
- Get your foam wreath form (I created mine with pool noodle if you are interested in making it yourself) and start wrapping it with your buffalo check ribbon.
- If like me, you don’t want to use glue, fold the end of the ribbon and secure it with a piece of twine or a pin. This is the best way to make your wreath form last for years!
- Then decide where will be the bottom of your wreath, wrap it with the fur ribbon. In this case, you can’t find a fur ribbon, you can use any faux fur fabric and cut strips 2 inches wide and as long as you need.
- Secure the end of your ribbon with a pin.
- Once done, start gluing your bottle brushes trees. I recommend using a low-temperature glue gun for this.
- I sugest one large tree in the middle and 2 medium ones on both sides of the large tree.
- Then depending on the type of gnomes, you are using I would suggest securing them with pins.
- In my case, my gnomes were only heads so I secure them with pins on the back of the hat and made sure the gnome’s beard would blend in with the fur.
- Next, I placed the Merry Christmas sign on the top of the wreath and secure it with some black and white twine trying my best to camouflage among the black and white from the ribbon.
- Finally, with a Red Ribbon, I created a hanger for my pretty and easy Buffalo Check Gnome Christmas Wreath.
- That’s it. You got yourself a gorgeous gnome Christmas wreath!