DIY Crafts and Food Photography Backdrops with real wood
Do you love DIY projects, food photography, and photography backdrops? Well, here are a couple of tips for making your own unique crafts and food photography backdrops with real wood, for cheap, complete with photography examples!
Equipment
- Drill/screwdriver
- Hammer
Ingredients
- Wood boards {the size will depend on your taste and the design you wish}
- 3 wood planks for the back. {the size would be a couple of inches shorter than your whole backdrop}
- White paint
- Nails and screws
- Flat joints
- White mate indoors and outdoors paint.
- Transparent mate sealant spray.
- Thick brush.
- A Towel {one that you can throw away later}
- Wood sandpaper.
Instructions
STEP 1: PREP WORK
- Firstly, I started by cutting the wood boards I had left in half lengthwise. You can do this at your local hardware store like home depot or such.
- I wanted to have more lines in the backdrop design. So I added short pieces that I put to use by placing them in between the larger pieces.
STEP 2: SAND THE WOOD BOARDS
- Once I got them all as I wanted, it was time to sand each piece. The idea is to sand down the edges and corners of each board so it won’t be so sharp and it kind of gives a small rustic look.
- As each board was done, I clean them well using a damp towel to remove all the dust.
STEP 3: PAINT THE BOARDS WITH A WHITEWASHED TECHNIQUE
- I wanted the wood marks to be visible and yet have a white look. So I chose to go for a whitewash technique.
- You can create this effect by watering down the paint. I made it a 1:1 proportion of paint and water. You could say, you create a white stain for your boards.
- I started painting each board. To get the look I wanted, it took 3 coats of paint letting each coat dry for a few minutes.
- When you water it down, the wood slowly absorbs the paint and water from each coat and reveals the wood marks. You measure how much you want the white to show up so add fewer or more coats as you see fit.
- Let the paint dry for a couple of hours.
STEP 4: WASH OUT SOME PAINT
- Then with a damp towel rub lightly each board. This makes the paint more evenly and allows you to reveal more wood marks in specific places that might have too much paint.
- Let it dry again completely
STEP 5: SEAL THE BOARDS
- Spray the transparent sealant. It dries really quickly so this is an easy process. Just to be sure let it dry for about 30-60 min so the smell goes away a bit too.
STEP 6: FINALLY, ASSEMBLE THE CRAFT AND FOOD PHOTOGRAPHY BACKDROPS
- Lay all the boards together in the order you want them. I made it 2 full boards and then in-line 3 short ones, 2 full, 3 in-line shorts, and 2 full. You get the idea.
- This step could be easier with pocket holes to attach each board together but I didn’t have that tool so I used what I had.
- Place the 3 boards on the back. It should be one in the center and one on each end. If everything looks as it should then put the planks aside.
- Place and screw the metallic joints on the in-line woods so they stay together.
- At first, you will notice that the ones that are ends will bend up a little. That’s fine, you will fix it with the support boards.
- Nail in place the support boards.
- If you don’t want nails to be visible, then I would suggest nailing from the back. And use as many as you think it’s best. I end up also adding a few screws too just to make sure everything stays in place.
- I started with the center plank and then the side ones.
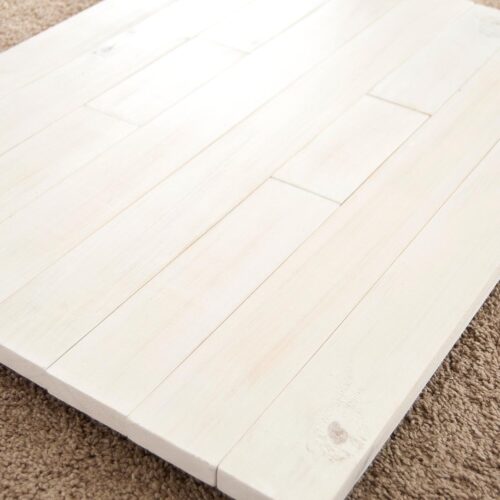
- OUR FOOD PHOTOGRAPHY BACKDROP IS ALMOST DONE!
- Because I knew avoiding scratching any surfaces in the house was really important, I placed some self-adhesive felt foams on the support boards.
- Now, there you go! The wooden photography backdrop is finished and ready to rock some photos!