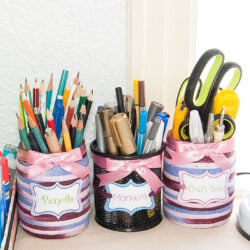
DIY Decorative Pencil Holder from Upcyced Jars
A decorative pencil Holder is an easy and inexpensive craft that will add character and color to a desk or any other place. I’m also sharing some cute free printable tags for you to create your own Decorative Pencil Holders.
Equipment
- Hot glue gun
- scissors
- Hole punch
Ingredients
- Jars
- Multicolor Yarn any kind will do, I used one that my mother-in-law gave me
- White glue or mod podge
- Thick brush
- Ribbon your favorite one
Instructions
STEP 1: PREP WORK
- Firstly, clean well your jars and make sure they are grease and dust-free.
- Since I used white glue, I diluted it a little bit with water about 60/40 glue-water. If you are using mod podge don’t dilute it.
STEP 2: WRAP THE JARS
- If it fits, insert your hands inside the jar and start applying the glue from the jar-neck to the end of the sides (right before the base starts)
- Starting right where the jar body starts, secure with your fingers one end of your yarn and start wrapping it. I recommend tightening it a little bit and make sure you don’t leave spaces between loops.
- When you get to the end, it gets tricky as most jars have a rounded curve to the base. Be careful as you wrap it so it doesn’t come out.
- I didn’t want to cover the base with yarn so I stopped there.
- When you are done, cut your yarn, secure the end with glue and then seal the whole jar with your glue again. This will help to harden the yarn and protect it and even clean it later on.
- For the base, I preferred leaving it as is because Where I used to work I always had a tablecloth. But you can cut a piece of felt and glue it to the base so it won’t scratch or make squeaky sounds when you move it.
- Let it dry about 45 minutes, best overnight and move on to the next if you are making more than one.
STEP 3: PENCIL HOLDER DECORATION
- I used ribbon to decorate and cover the jar thread (not sure how it’s called the area where you screw the lid).
- With your hot glue gun, glue your ribbon around it, leave a little bit extra to fold inwards, and have a clean finish.
- To make my decorative pencil holder one step prettier, I made a cute ribbon bow and glued it to the ribbon right where it ended.
- Voilà That’s how I got it so far.
- It’s time for the last touch.
STEP 4: ADD THE CUTE LABELS.
- I wanted to give it an extra touch and thought some cute labels would do the trick. So I created them. If you like them you can snag them, print them, and cut them for yourself.
- So print your tags, and cut them carefully (if you have a cutting machine you can print and cut, so much easier).
- With a hole punch make holes on both sides of your labels.
- With the same yarn you used to warp your jars, insert them from the back to front like this:
- Then place it where you like best and tie a knot on the back of your jar.
- There you go! One pretty decorative pencil holder!