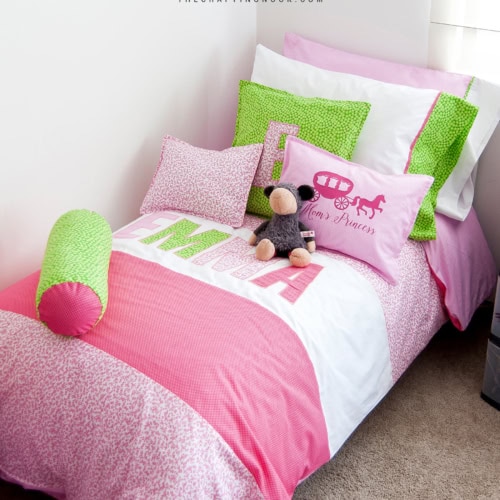
DIY Duvet Cover for Kids
Make a cozy DIY duvet cover for a twin-size bed with this fun tutorial! Easy steps, fabric tips, and lots of love for your little one!
Equipment
- Sewing Machine
- Sharp Fabric Scissors
- Pins
- Measurement tape
- Ruler
Ingredients
- 2 yards of white sheet fabric {the name might change between countries}
- 3 yards of a patterned cotton fabric for the bottom layer of the duvet cover
- 1.5 yards each of 3 different but coordinated patterned fabrics.
- Color matching threads
- 6 Buttons
- Lace ribbon {4 strips of 20 cm or 8 Inches}.
- Fabric Marker
Instructions
Prep work
- This cover was made for a twin-sized duvet. You might need to adjust the amount of fabric you need according to the size of duvet cover you will be making.
- The first thing is to check the duvet’s exact measures in the duvet’s tag. Mine says 140 cm X 200 cm (55×80-inch). I added 2 cm and 5 cm (1 inch and 2 inches) just to be sure it would fit in fine on the new cover.
- Now I’m going to start with the pieces you need for the duvet cover and then I’ll show how made my girl’s name on one of the cover sections.
- For the top layer of the duvet cover you need:
- 2 pieces white fabric 33 cm X 142 cm {13 X 56 Inches} + seam allowance
- 2 pieces of patterned fabric 1, 33 cm X 142 cm {13 X 56 Inches} + seam allowance
- 2 pieces of patterned fabric 2, 33 cm X 142 cm {13 X 56 Inches} + seam allowance
- For the Back of the duvet cover you need:
- 1 piece of patterned fabric 3, 142 cm X 205 cm {56 X 81 Inches} + seam allowance
- Additional pieces:
- 1 piece of patterned fabric 3, 142 cm X 15 cm {56 X 6 Inches}
- 1 piece of patterned fabric 3, 142 cm X 5 cm {56 X 2 Inches}
- Fabric scraps for letters.
- The order in which I made to top layer:
- Pattern 1 – White – Pattern 2 – White – pattern 1 – Pattern 2.
The Applique Letteres
- We are using one of the white rectangles to create the name. Due to the piece size, the name shouldn’t be larger than 60 cm X 20 cm (24 X 8 Inches). But’s actually up to you; you can play with these measurements.
- Print the name you want to place on the duvet cover in the actual size. Use any font that is bulky and bold so it’s easier to cut and sew.
- Cut the printed letters and then use them as patterns to trace them onto the fabric pieces and cut them in different fabrics. You can if you want, make all letters in one fabric.
- Ideally, the best way to work with fabric appliques is to use interfacing to make it easier to stitch the letters to the white fabric panel. I didn’t have it at the moment so here I’ll show you how I did it without interfacing.
- Place each letter in the white fabric panel. Once you are satisfied with the letters’ placement, pin them in place. Make sure they are well pinned so they won’t move.
- To make sure the letters don’t move around while zig-zaging, stitch them first with a straight seam really close to the letter edges.
- Then using the tighter zigzag stitch the sewing machine allows, zigzag all around the edges.
- closer view of Using the tightest zigzag stitch that the sewing machine will allow, around the edges.
- When all the letters are done stitching, iron the whole piece so the fabric fits into place. Usually it gets wrinkled because of the zigzag.
Assembling the Duvet Cover
- Take the pieces pattern 1 and plain white. With the right sides together stitch with a 1 cm seam and then serge the edges so that it won’t come fray apart in the wash.
- If you don’t have a serger like me, simply run it through the machine again with the zig-zag stitch making sure that it catches the fabric on the outer edges.
- Then do the same but add the pattern fabric 2 with the right sides together, stitch and then zig-zag edges. Then the white fabric with the name on it, and then fabric pattern 1, and the last panel would be fabric pattern 2.
- Iron the whole front panel of the cover so it will be easy to manage. This is more or less what you would have so far – the other half is there I promise, just didn’t have enough space.
- Now lay your top layer onto the back layer right sides together and pin all the way around on 3 sides (top, right, and left), not pinning on the side with the hem and pocket.
- On each top corner pin in place one strip of lace ribbon. Make sure the middle of the ribbon is right over where the stitch will go through.
- Stitch all around the edges of the cover except for the last panel where the opening of the duvet cover will be.
- Also, make sure to stitch back and forth on top of the ribbon to secure it. These strips secure the cover onto the duvet so it won’t move around inside.
- I wanted to create kind of a pocket in the inside of the cover, so the duvet wouldn’t show through the opening. This is where the additional pieces come in and it’s a bit tricky.
- Take your rectangle of 142 cm X 15 cm (56 X 6 Inches). Make a hem on one of the largest edges.
- Place the front panel the bottom edge and this piece with the right sides together and pin them in place.
- Stitch them together leaving 20 cm (8 inches) from each end with a 1 cm seam allowance.
- Take your back layer piece and your strip of 142 cm X 5 cm (56 X 2 Inches). With right sides together lengthwise, stitch along the edge also leaving 20 cm (8 inches) from each end with 1 cm seam allowance.
- Turn it back with the wrong sides together. Press.
- Fold the opposite edge inwards (like a hem), press, and pin in place.
- Stitch along the edge from end to end.
- Having front and back layers right side together, hold the part where you didn’t stitch on the back layer and twist the fabric a little where the seam starts and pin together.
- Lift the pocket piece and get the top layer edge joining the bottom ones.
- Finally lay the pocket piece on top of everything. You should have a 4 layer edge to stitch.
- Pin right where the cover opening starts (20 cm /8 In.) so you don’t stitch more than you should. Also, pin in place the 4 layers to make sure you don’t miss any.
- Pin the other 2 lace strips on each corner.
- Stitch along from the limit pin until you meet the rest of the duvet cover seam.
- When you lift the pocket piece you should see something like this:
- Serge or zigzag all the edges. Then cut all the frayed remains so the zigzag is clean.
- Make a cut on each corner so it’s easier to manage the corners when turning inside out.
- Now it is time to turn that sucker inside out!!!
Adding the Closing buttons.
- I used medium size buttons and placed them 20cm (8 Inches) apart.
- I Made the buttonholes using the attachment that came with my sewing machine and followed its instructions.
- I also didn’t want the buttons to be visible, so I sew them on the inside pocket fabric and the buttonholes on the bottom layer.
- The duvet cover is ready.
Notes
NOTE: Before I start, I wanted to make sure you understand that duvet measurements in different countries are different, In my case this duvet us smaller than most. So these measurements I’m providing are not definite and you should make your pieces according to your own Duvet measurements.
The basics are: For the back is the duvet size + 1 inch + seam allowance, for the front is the same as the back + 1 inch but divided by 6 + seam allowance.
Try making the buttonholes on another piece of fabric first so you are sure the size and style are fine before doing it in the actual cover.