DIY Easter Bunny Onesie Heat Transfer Vinyl Tutorial
This cute heat transfer vinyl tutorial for this DIY Easter Bunny Onesie is the easiest craft and the perfect gift for a new mom and baby! you have to try it, it’s super cute!
Equipment
- A cutting machine like Cricut or Silhouette Cameo
- A household Iron or a heat press
- Weeding tool
Ingredients
- 1 onesie {or more depending on how many you plan on making}
- Heat transfer vinyl the color of your choice.
- Yarn the color of your choice
- Thread and needle
Instructions
STEP 1: THE DESIGN
- Before we begin, be sure to follow us on Pinterest, Facebook, Instagram, and YouTube, and also sign up for our newsletter (at the end of this post), so you’ll never miss a post!
- Firstly, I made my design within the silhouette studio, you can snag the simple bunny silhouette template if you’d like HERE.
- Apply the suggested settings for the heat transfer vinyl and cut. In this case, I didn’t mirror the image because it was the same either way. But if your design is different especially if it has something written, you need to mirror or flip the image before sending it to cut.
STEP 2: CUT THE DESIGN
- Next, you need to load the blades (with the recommended setting) and cutting mat into the machine
STEP 3: WEEDING THE HTV DESIGN
- Then carefully, using the weeding tool (hook) weed out excess vinyl and all the unwanted pieces. Including all the surrounding HTV.
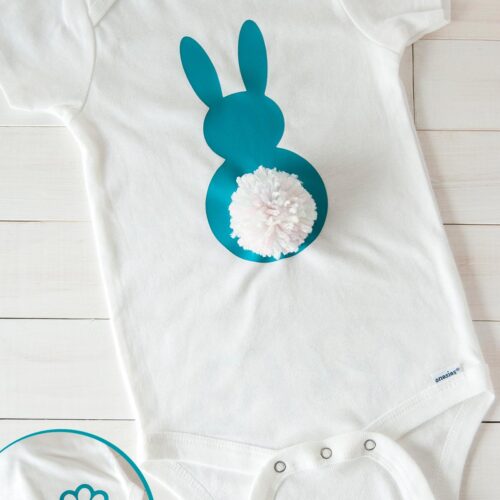
- I cut it into two pieces the bunny and the paws.
STEP 4: TRANSFERRING THE DESIGN TO THE ONESIE
- I decided the position of the bunny on the onesie and laid a t-shirt piece of fabric on top of the design, I ironed in cotton settings Pressing down firmly for about 40-60 seconds {it might vary between irons} until I made sure the image was really stuck to the onesie.
- If you peel away the plastic and the vinyl is not set, continue ironing for a few more seconds.
- I let it cool for a few seconds and started peeling away the plastic backing very carefully. I also laid the t-shirt fabric on top of the bunny again and ironed it for a few more seconds.
- Then did the same process for the paws in the booty area… Not sure if I got it right but I tried the best I could, right? LOL
- To wash it you can just machine wash and dry inside out {the lower the heat the better}.
STEP 5: PUTTING THE POMPOM
- Now the finishing touch is the Pompom tail. If you don’t know how to make a pompom you can follow this tutorial.
- Then using a long thin needle stitch the pompom to the onesie. I made sure I made long stitches so I would grab as many yarn threads as possible to make sure it won’t come off.
- Also, do many stitches just to make sure.
- Update Note: I recommend attaching the pompom with Velcro rather than stitching it to the onesie. Later on, I realized that sewing the pompom was not the best approach. I then removed the stitches and stitched velcro to both, the onesie and pompom. That way you can remove it whenever you need to hold the baby or wash it.
- Now your cute Pompom Bunny Tail Onesie is ready to rock!!!!