DIY Easter Bunny Onesie Heat Transfer Vinyl Tutorial
This post may contain affiliate links. Please read our Disclosure Policy.
This cute heat transfer vinyl tutorial for this DIY Easter Bunny Onesie is the easiest craft and the perfect gift for a new mom and baby! you have to try it, it’s super cute!
Babies make me so excited! Maybe it’s because I’m a mom myself but making things for babies and kids is so much fun and also so gratifying! I get great pleasure when I make cute things for them.

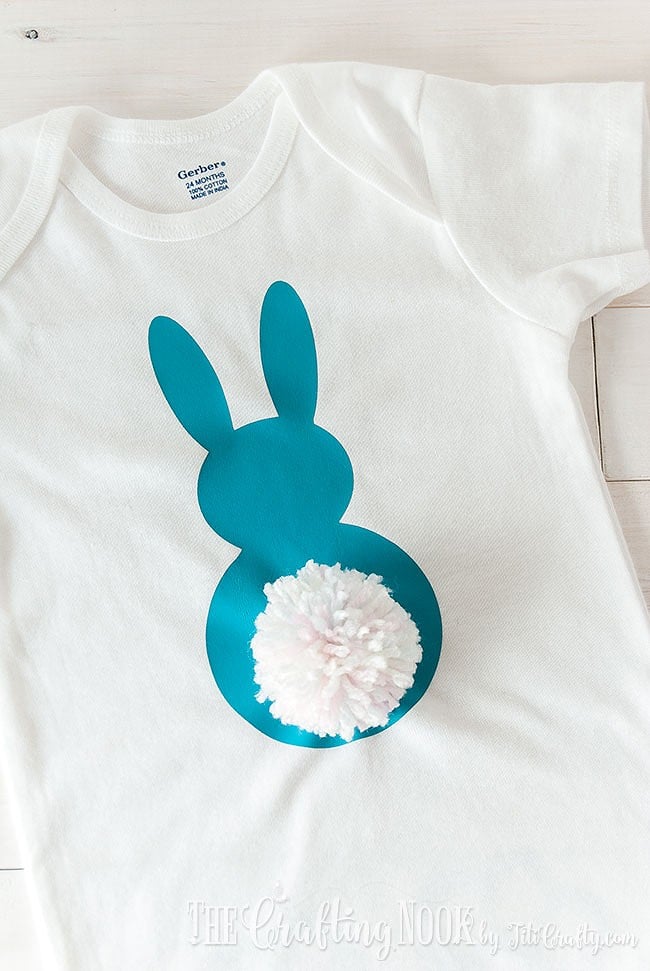
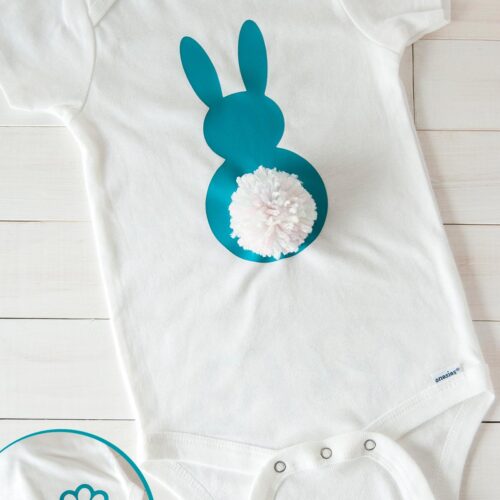
This time I’m making this cute DIY Pom-pom Bunny Tail Easter Bunny Onesie as a gift for a friend’s baby girl that was born recently. Right in time actually for Easter and what can be cuter than a pompom bunny tail, right????
You might also love these other Easter crafts ideas: DIY Easter egg Shaker Card, DIY Reversible Rustic Easter Bunny Butt Wood Sign, and DIY Milk Carton Easter Treat Box.
Table of Contents
Using Heat Transfer Vinyl to Make a DIY Easter Bunny Onesie
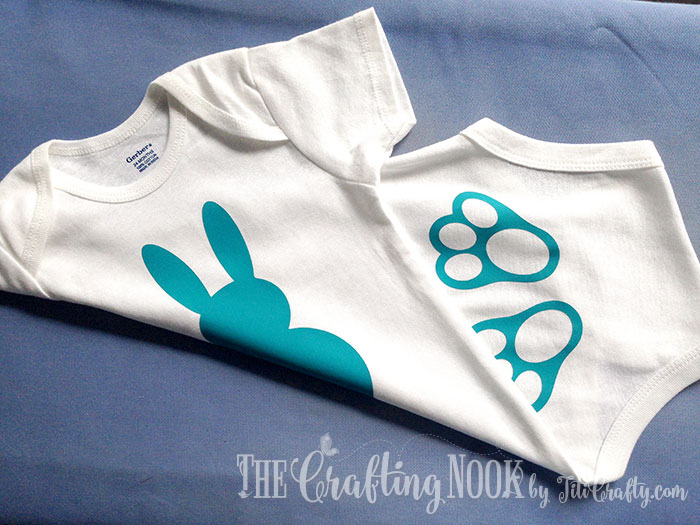
I used heat transfer vinyl for the simple bunny silhouette and also for a couple of paws in the onesie’s booty. I always find so cute baby booties when using diapers so I love making something cute for that area on onesies or pants.
There have been lots of new baby girls in the family. I must confess it get easier for me to get inspired since I have a girl myself. Actually, she couldn’t be more girly in her ways!
This project is a really simple one if you have a cutting machine, and if not I think there might be places that offer vinyl cutting services!!!
But let’s start with some basics first.
Some HTV Usages
Heat Transfer Vinyl is usually used on soft items (like fabric shirts, pillowcases, blankets, overall textil things) that can withstand high heat but is sometimes also found on some pretty unexpected projects. Here are some things you can apply HTV to:
- Textile: Tee shirts, onesies, tote bags, shoes, throw pillows…
- Paper: Books, gift tags…
- Wood
- Polyester: backpacks, etc.
- Dishware: mugs, canisters…
- Acrylic Blanks: keychains, sheets, Christmas ornaments…
- Art Canvas
- Some types of nylon
types of heat transfer vinyl
There are many types of htv but the most popular can be found at Siser Easyweed htv, Cricut Everyday Iron On, and Silhouette. Most of the popular brands can be found on Amazon, Expressions Vinyl and on each brands’ store.
- Solid Color
- Holographic
- Blackboard
- Flocked
- Glitter htv
- Glow-in-the-Dark
- Metallic
- Patterned
- Stretch
What tools do you need to cut and apply HTV to a project?
- Cutting machine: There’s a wide range of machines from Cricut (cricut maker, cricut explore), Silhouette Inc (Silhouette Cameo, Portrait, Pro), and Brother.
- Cutting Mat: More often than not when using HTV you will need to use your cutting machine’s cutting mat. But depending on the design you can go matless.
- Weeding Tools: These are the little hooks in a pen-like format that helps you weed out the unwanted pieces of htv.
- Heat Transfer Tools: You can use from your household iron to a more professional heat press machines. These come in a variety of formats but the investment will depend on how often you are planning on making htv projects. For example Cricut has different sizes for different purposes such as cricut easypress.
- Protective Top Sheet (cover sheet): I usually use a piece of fabric or unfolded towel but I’ve heard that teflon sheet and parchment paper work great too.
How to make an HTV DIY Easter Bunny Onesie with cute Pompom Tail
This tutorial is super basic which is great for beginners. If you have never used heat transfer vinyl before this project can be the perfect one to get you started.
Here we go!
Supplies:
- 1 onesie {or more depending on how many you plan on making}
- Heat transfer vinyl, the color of your choice.
- Yarn, the color of your choice
- Thread and needle
Tools
- A cutting machine like Cricut or Silhouette Cameo
- A household Iron or a heat press
- Weeding Tool
Instructions:
Step 1: The design
Before we begin, be sure to follow us on Pinterest, Facebook, Instagram, and YouTube, and also sign up for our newsletter (at the end of this post), so you’ll never miss a post!
Firstly, I made my design within the silhouette studio, you can snag the simple bunny silhouette template if you’d like HERE.
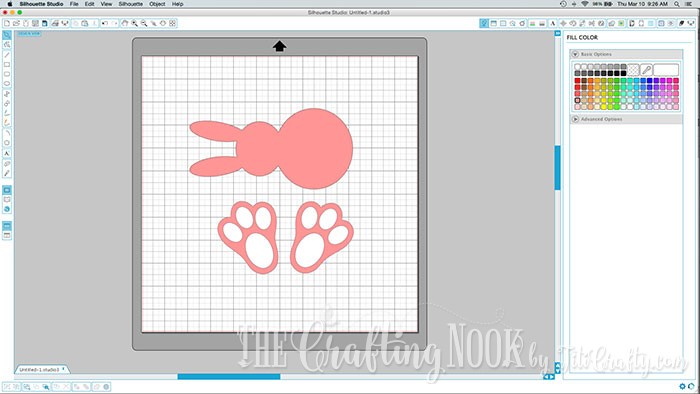
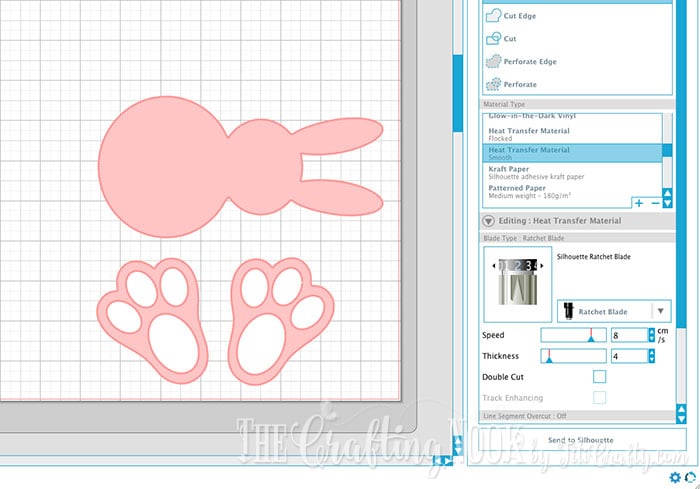
Apply the suggested settings for the heat transfer vinyl and cut. In this case, I didn’t mirror the image because it was the same either way. But if your design is different especially if it has something written, you need to mirror or flip the image before sending it to cut.
Step 2: Cut the design
Next, you need to load the blades (with the recommended setting) and cutting mat into the machine

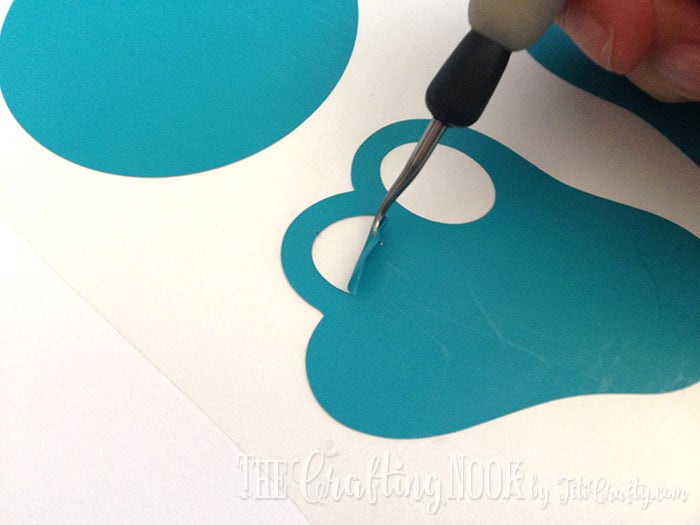
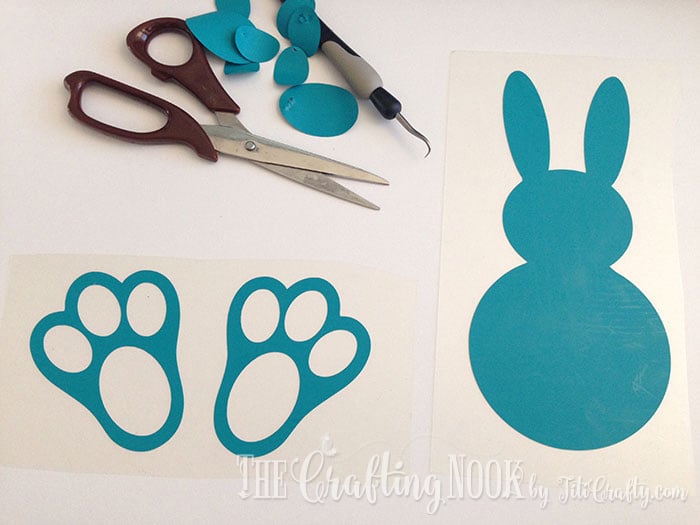
Step 3: Weeding the HTV design
Then carefully, using the weeding tool (hook) weed out excess vinyl and all the unwanted pieces. Including all the surrounding HTV.

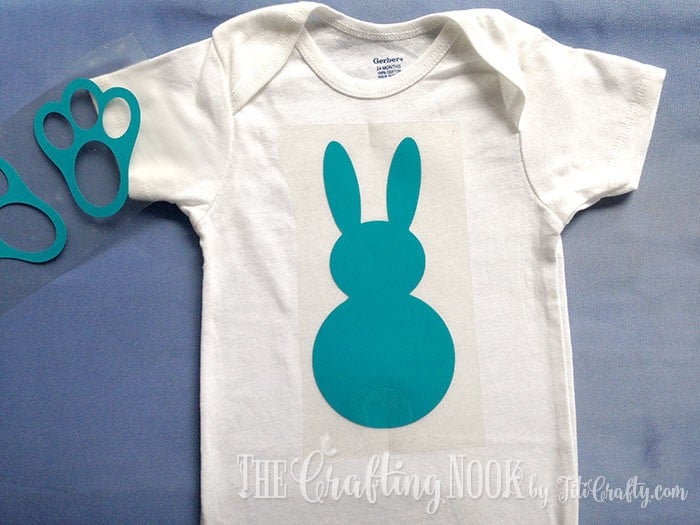
I cut it into two pieces the bunny and the paws.
Step 4: Transferring the design to the onesie
I decided the position of the bunny on the onesie and laid a t-shirt piece of fabric on top of the design, I ironed in cotton settings Pressing down firmly for about 40-60 seconds {it might vary between irons} until I made sure the image was really stuck to the onesie.
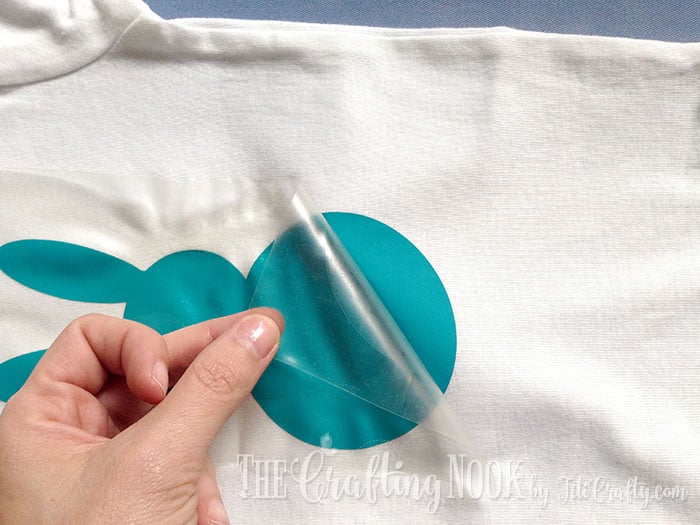
If you peel away the plastic and the vinyl is not set, continue ironing for a few more seconds.
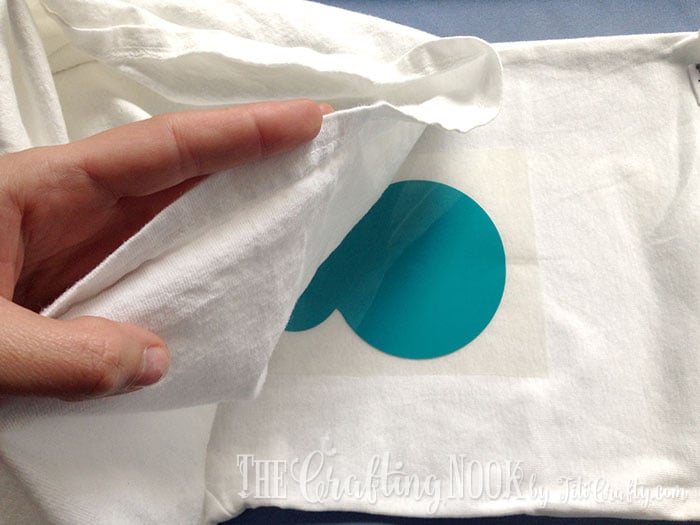

I let it cool for a few seconds and started peeling away the plastic backing very carefully. I also laid the t-shirt fabric on top of the bunny again and ironed it for a few more seconds.
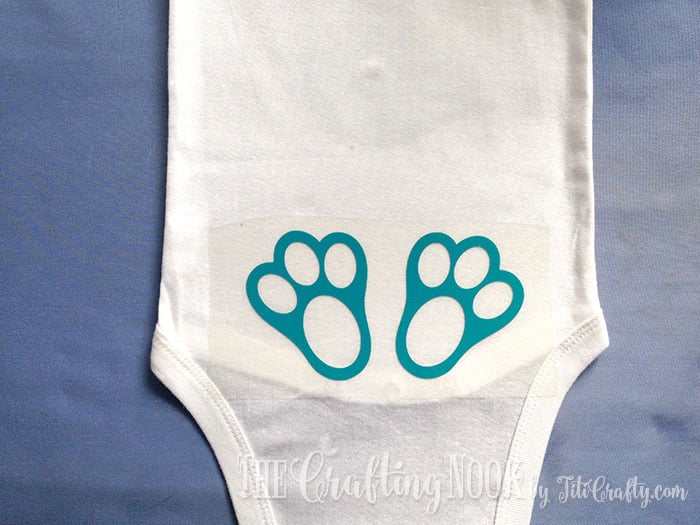
Then did the same process for the paws in the booty area… Not sure if I got it right but I tried the best I could, right? LOL
To wash it you can just machine wash and dry inside out {the lower the heat the better}.
There you go!
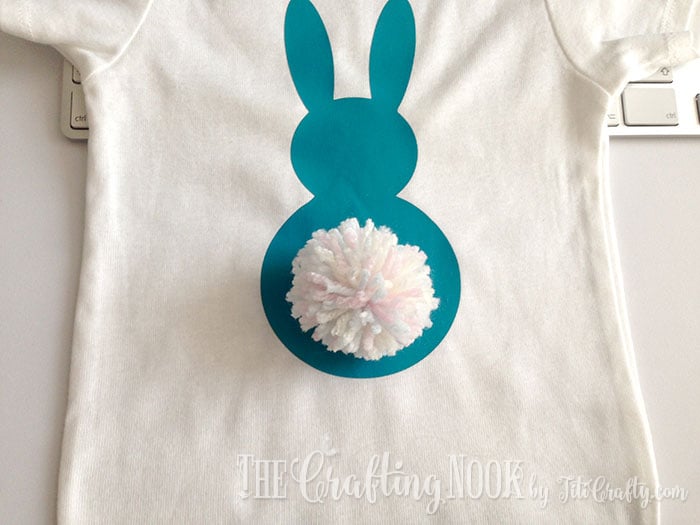
A super cute and lovely Pompom Bunny Tail Onesie for a gift of your own kid!
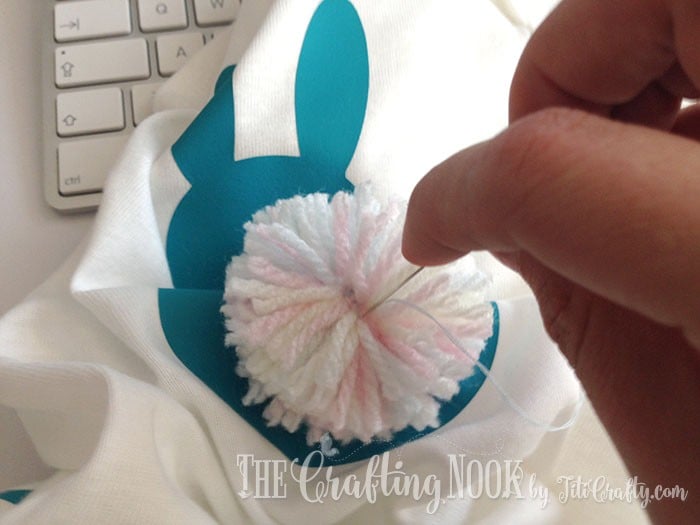
Step 5: Putting the pompom
Now the finishing touch is the Pompom tail. If you don’t know how to make a pompom you can follow this tutorial.
Then using a long thin needle stitch the pompom to the onesie. I made sure I made long stitches so I would grab as many yarn threads as possible to make sure it won’t come off.
Also, do many stitches just to make sure.
Update Note: I recommend attaching the pompom with Velcro rather than stitching it to the onesie. Later on, I realized that sewing the pompom was not the best approach. I then removed the stitches and stitched velcro to both, the onesie and pompom. That way you can remove it whenever you need to hold the baby or wash it.

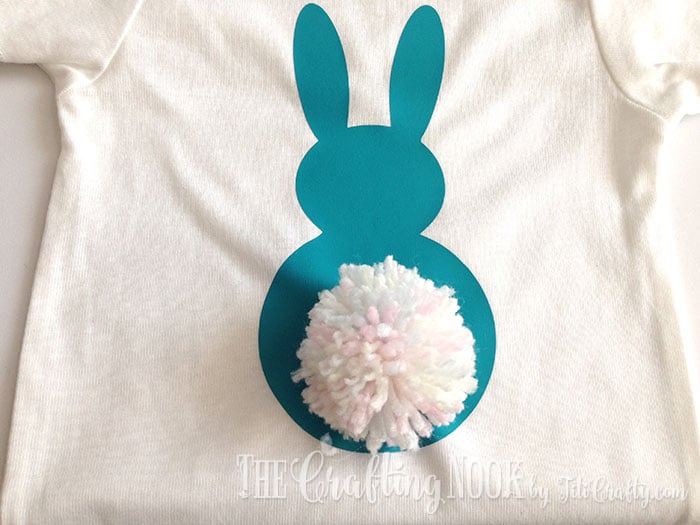
Now your cute Pompom Bunny Tail Onesie is ready to rock!!!!
Crafting Tips
* For better use of heat transfer, I usually cut the necessary material and use the silhouette cutting mat to send to cut but you can always use the heat transfer directly on your cutting machine as they recommend.
* Be sure to place the shiny side of the HTV down on the cutting mat before you cut.
* Try weeding on top of a warm surface. It allows the heat transfer vinyl to peel away from the carrier easier. Just keep in mind that, this trick only works for products with a sticky carrier.
* I recommend attaching the pompom with Velcro rather than stitching it to the onesie. Later on, I realized that sewing the pompom was not the best approach. I then removed the stitches and stitched velcro to both, the onesie and pompom. That way you can remove it whenever you need to hold the baby or wash it.
* Wash the Onesie before using it is always a good idea as some materials could shrink.
* Always use high-quality HTV, this ensures the long-lasting life of the onesie.
As a side note, I wanted to let you know that since this onesie was meant as a gift I don’t know for sure how it went after washing it. I think that if you hand wash it carefully it will do ok.


Isn’t it super cute???
Since this is a gift, I would love to hear ideas for gift wrapping! Want to share some??? I would love to hear them all in the comments!
Love y’all and hope you liked my quick craft today!!!
Frequently Asked Questions
Heat transfer vinyl, also called HTV is a special type of vinyl material, a type of permanent vinyl that can only be applied with high heat.
When properly applied to a surface with heat and pressure, it is a permanent transfer and can withstand washing and drying.
Heat Transfer Vinyl is usually used on soft items (like fabric shirts, pillowcases, blankets, overall textil things) that can withstand high heat but is sometimes also found on some pretty unexpected projects. Here are some things you can apply HTV to Textile: Tee shirts, onesies, tote bags, shoes, throw pillows; Paper: Books, gift tags; Wood; Polyester: backpacks; Dishware: mugs, canister; Acrylic Blanks: keychains, sheets, Christmas ornaments; Art Canvas, and some types of nylon
Heat transfer vinyl comes with a clear plastic carrier sheet on top (very similar to transfer tape) that can withstand high heat from an iron or heat press. Whenever you cut heat transfer vinyl the carrier sheet (shiny side) will be facedown on your mat and the mate side up.
In most cases, especially if you have text on the design, you have to mirror the design before you hit cut otherwise, your design will be backward when you go to place it on your surface.
Each cutting machine usually comes with its own software. For example, Silhouette has its Silhouette Studio software which comes with free, designer, and business edition plans. You need to purchase Designer and Business edition separately from the machine itself as it comes with only the free one.
Cricut has its Cricut design space and Brother has its Canvas Space.
Most cutting software uses SVG file extensions while Silhouette has its own called .studio. However, you can use other types of files such as PNG, JPEG, or DXF.
The carrier side (the shiny backing surface) goes face down on the cutting mat because we need it to stay intact for heat application. So the duller, adhesive side of the material is the side that gets cut. During heat application, the carrier side will be face up.
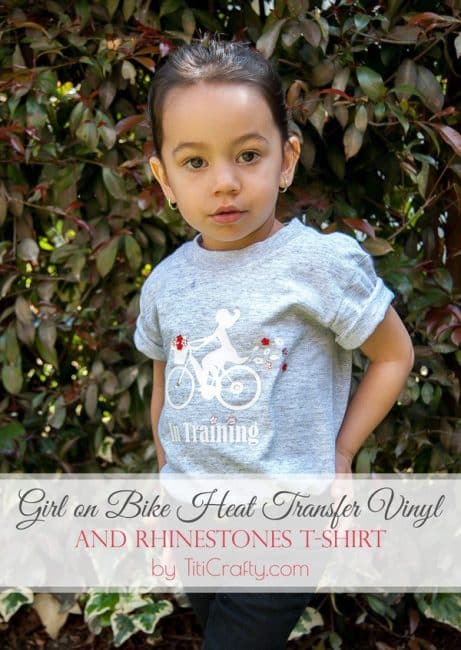
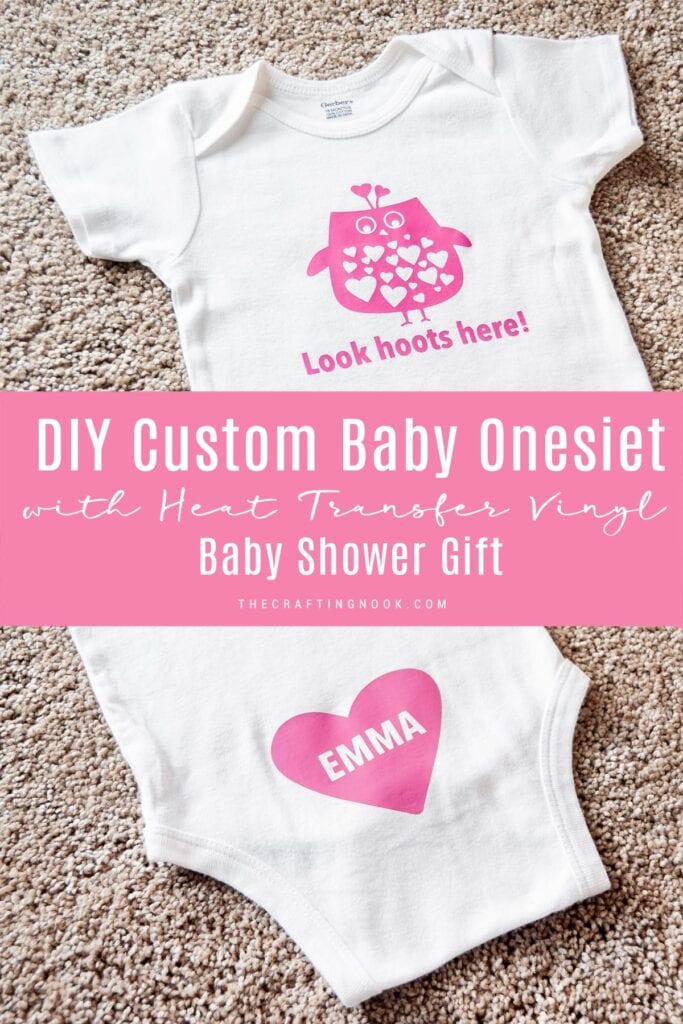
More Heat Transfer Vinyl Projects to Try
If you like this HTV Easter Bunny Onesie tutorial you might also love these other HTV project ideas too:

Want to Check Out More Silhouette Projects?
My Silhouette Challenge buddies and I are all sharing projects on our blogs today, so peruse the projects below for a wealth of Silhouette inspiration!
1. Cutesy Crafts // 2. Mama Sonshine // 3. Morena’s Corner // 4. Simply Kelly Designs // 5. Coral + Mint Design Co. // 6. A Time For Seasons // 7. Architecture of a Mom // 8. Where The Smiles Have Been // 9. Haberdashery Fun // 10. The Thinking Closet // 11. The Crafting Nook // 12. Get Silvered // 13. Tori Grant Designs // 14. From Wine to Whine // 15. Create & Babble // 16. Curly Crafty Mom // 17. unOriginal Mom // 18. The Small Stuff Counts // 19. The Experimental Home // 20. Creative Ramblings // 21. Adventures in All Things Food // 22. Minted Strawberry
✂️ Tutorial
DIY Easter Bunny Onesie Heat Transfer Vinyl Tutorial
Tools
- A cutting machine like Cricut or Silhouette Cameo
- A household Iron or a heat press
- Weeding tool
Supplies
- 1 onesie {or more depending on how many you plan on making}
- Heat transfer vinyl the color of your choice.
- Yarn the color of your choice
- Thread and needle
Instructions
STEP 1: THE DESIGN
- Before we begin, be sure to follow us on Pinterest, Facebook, Instagram, and YouTube, and also sign up for our newsletter (at the end of this post), so you’ll never miss a post!
- Firstly, I made my design within the silhouette studio, you can snag the simple bunny silhouette template if you’d like HERE.
- Apply the suggested settings for the heat transfer vinyl and cut. In this case, I didn’t mirror the image because it was the same either way. But if your design is different especially if it has something written, you need to mirror or flip the image before sending it to cut.
STEP 2: CUT THE DESIGN
- Next, you need to load the blades (with the recommended setting) and cutting mat into the machine
STEP 3: WEEDING THE HTV DESIGN
- Then carefully, using the weeding tool (hook) weed out excess vinyl and all the unwanted pieces. Including all the surrounding HTV.
- I cut it into two pieces the bunny and the paws.
STEP 4: TRANSFERRING THE DESIGN TO THE ONESIE
- I decided the position of the bunny on the onesie and laid a t-shirt piece of fabric on top of the design, I ironed in cotton settings Pressing down firmly for about 40-60 seconds {it might vary between irons} until I made sure the image was really stuck to the onesie.
- If you peel away the plastic and the vinyl is not set, continue ironing for a few more seconds.
- I let it cool for a few seconds and started peeling away the plastic backing very carefully. I also laid the t-shirt fabric on top of the bunny again and ironed it for a few more seconds.
- Then did the same process for the paws in the booty area… Not sure if I got it right but I tried the best I could, right? LOL
- To wash it you can just machine wash and dry inside out {the lower the heat the better}.
STEP 5: PUTTING THE POMPOM
- Now the finishing touch is the Pompom tail. If you don’t know how to make a pompom you can follow this tutorial.
- Then using a long thin needle stitch the pompom to the onesie. I made sure I made long stitches so I would grab as many yarn threads as possible to make sure it won’t come off.
- Also, do many stitches just to make sure.
- Update Note: I recommend attaching the pompom with Velcro rather than stitching it to the onesie. Later on, I realized that sewing the pompom was not the best approach. I then removed the stitches and stitched velcro to both, the onesie and pompom. That way you can remove it whenever you need to hold the baby or wash it.
- Now your cute Pompom Bunny Tail Onesie is ready to rock!!!!
Share and PIN ME!

Til’ next time…


FREE WORKBOOK
Keeping your Sweet Home Organized
Learn how to create intentional habits and simple routines to Keep Your Home Organized. Plus freebies, printables, exclusive content, and tips.
Disclaimer: By clicking on the “Yes” button above you are giving me your consent to collect and use your information according to the law and My Policy Privacy. Zero Spam I promise!
Camila this is sooo cute! What a great idea for a homemade baby shower gift! I love using my Cricut to make cute personalized clothing. The paw prints on the bottom are too adorable! Love it!
Thank you so much Kelly, I don’t have a cricut but I do have my Cameo and I enjoy so much cutting things and creating! So much fun! one of my favorite things is Onesies. LOVE decorating them! I’m so glad you like this project!
Hugs
Cami
Oh Cami, this is way tooo damn cute and those paw prints on the pom – perfect!!! You could easily alter the animal too, but I do love that shiny transfer material that you used! Might need to make one of these for my bub’s first easter next year :)
Very, very cute!
This is just so darling!! I love the little pom pom!
think I would just sew a small piece of velcro on the onesie and then attach the other part to the pompom. Then it is easy to wash!
I think that’s a wonderful and perfect idea! I should have thought of that! When I make another one I’ll do just that! THANK YOU for sharing your ideas!
Hugs
Love this! How did you attach the Pom Pom? Did I miss that step? Thanks!
Oh my! Jessica, you are completely right! I never explained that and I didn’t even noticed, you are the first who pointed it out. I’ll update this post ASAP. Thank you so much. It’s crazy I even had pictures of that part of the tutorial.
I just stitched it to the onesie. I used a thin but long needle and regular white thread. I made sure I stitched big amount of pompom threads so it wouldn’t come off. Many stitches for sure.
Again thank you for letting me know!
Hugs
This is absolutely adorable! My 9 year old daughter would love it on a t-shirt!!! Pinning this!
This is so cute! Really fun!
This is so stinking cute, especially with the added pom pom! Thanks for sharing!
Carrie
curlycraftymom.com
This is probably the cutest onesie I have EVER seen! That little pom pom is just adorable..