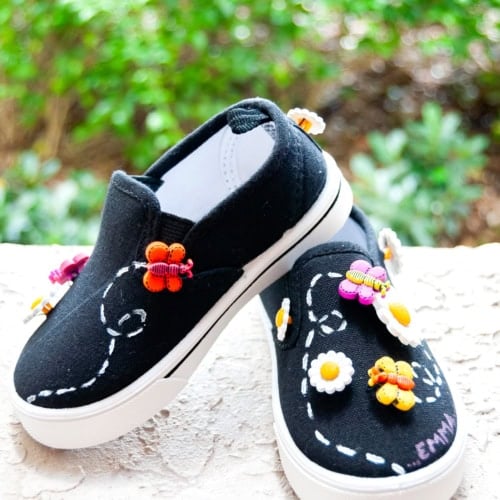
DIY Embellished Shoes with Daisy and Butterfly Buttons
Learn how to transform plain shoes into adorable, unique and personalized ones with a little bit of paint, daisy, and butterfly buttons! This DIY embellished shoes tutorial is easy, quick, and perfect for your little one’s favorite style.
Ingredients
- Plain canvas pair of shoes – any color works but I love how black makes the decorations pop
- Cute buttons – I used daisies and butterflies but the possibilities are endless!
- Thread and needle
- White fabric paint – preferably for dark textiles.
- A thin paintbrush
- Scissors
- Sharpie – optional for personalization
Instructions
Step 1: Pick Your Buttons
- I chose some cute and bright daisy and butterfly buttons to give the shoes a playful vibe. You can find all sorts of cute options at your local craft store or online.
Step 2: Sew on the Buttons
- Using a needle and thread, sew the buttons onto the shoes. Spread them in a fun way like telling a story.
- Make sure the thread knot when you finish sits outside the shoes, under the buttons, so it doesn’t rub against your kid’s feet. The button will hide the knot and keep everything comfortable.
Step 3: Create Butterfly Trails
- With a fine paintbrush and white fabric paint, paint delicate dashed lines on the shoes to mimic the butterfly’s flight path. It adds such a playful touch!
Step 4: Personalize
- This step is totally optional.
- I decided to add Emma’s name with a Sharpie for that extra special touch and also to quickly recognize them at school.
- You could add any word or pattern you like.
- This step is totally optional.
Step 5: Let it dry
- Let the shoes dry in a cool, well-ventilated space for at least 6 hours (24 hours would be ideal) to ensure the paint is cured.
- And that’s it! You’ve now got custom DIY embellished shoes that look store-bought but are truly one-of-a-kind. Easy, right?