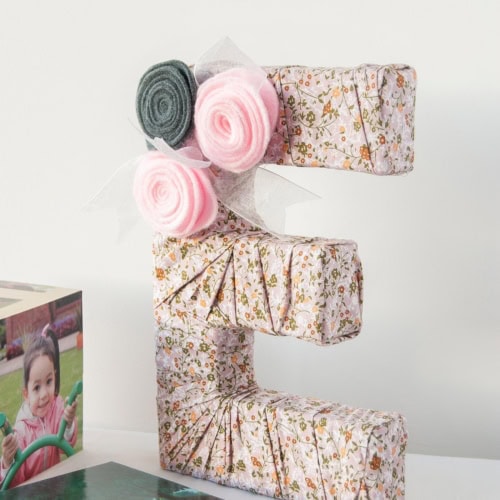
DIY Fabric Covered Letters with flowers
This Fabric Covered Letters project is a super easy and budget-friendly craft that will add a sweet personal touch to any girl’s bedroom or nursery.
Equipment
- Hot glue gun and glue stick
- Sharp scissors
Ingredients
- A letter of your choice. I used a cardboard letter E.
- Fabric of your choice.
- Felt – for flowers colors of your choice.
- Ribbon
- Optionally a few pebbles to add weight to the base of the letter if necessary.
- Tools:
- Hot glue gun and glue stick
- Sharp scissors
Instructions
- Cut some strips of fabric.
- This is totally up to you, the width and length. I made 2 full fabric-width strips of the fabric because one was not enough.
Covering the Letter
- Fold lengthwise so both raw edges go to the back.
- Start by gluing one end of the fabric to one end of the letter. I started with the middle of the E.
- Start wrapping up each part of the letter, using the wrinkles to your favor, and overlap on each loop.
- Here there is no perfect or right or wrong way. Just find your own way to cover the letter completely.
- Pay attention to the outer corners. I covered it with the fabric leaving some on each side.
- Make sure the end of the strip goes to the back of the letter.
- In my case, I used part one strip for the center part of the letter and the other half + the other strip for the rest of the letter.
- Finish the wrapping folding the end of the strip to the back side.
- With the help of your scissors or any other flat tool, push the fabric strip end inside the closest fabric overlap so the finish is clean and neat.
- Secure with a few dots of hot glue.
- Your monogram is done!
Making The Flowers
- I decided to make some cute rosettes for this project. These are super easy to make and the variations and combinations are endless. There are other cute felt flowers you can me make and you can learn how to make them here.
- Pick something round like a small bowl, cup or dish.
- Trace a circle on the felt and cut.
- Then make another cut in a spiral way like this:
- There’s no need to draw a perfect spiral or anything just go cutting and shaping it. The less perfect the better.
- Begin with the outer end of the spiral and start rolling it keeping the center tight.
- When you get to the other end, add some hot glue to the bottom of the flower and glue it to the end of the spiral which should be almost like a circle.
- Do the same for other flowers and then glue them to the covered letter.
- Now cut 2 strips of ribbon and knot them together in the middle to create something like the leaves.
- Glue it to the middle of the flowers and spread each end of the ribbons between the felt flowers to give an idea of leaves!
- The final touch was inserting some small rocks or pebbles between fabric loops to the back bottom to let the monogram stand.
- The problem was that the monogram was really light and the flowers were making it fall. The easiest way to fix that was adding weight to the back.