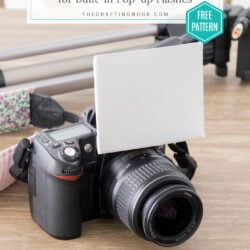
DIY Flash Diffuser for DSLR Built-in Pop-up Flashes Tutorial
In this easy tutorial, I will show how to create a DSLR camera flash diffuser for your built-in pop-up flash. It's easy and inexpensive because you probably already have the supplies at home and if not, they are very inexpensive!
Equipment
- Embosing tool (or a pen that no longer works or the back edge of a scissor)
- cutter
- scissors
- Hot glue gun
Ingredients
- Grey cardboard with a thickness that fits into the flash slot Like architect carboard
- White and black cardstock or pattern if you like
- White glue or mod podge
- Hot Glue stick
- Tracing paper.
- Adhesive tape optionally
Instructions
- Place your pattern on the grey cardboard. This kind of cardboard is used by architects for the structure mockups BUT you can find it often on the back of paper blocks, cardstock blocks and some kind of boxes.
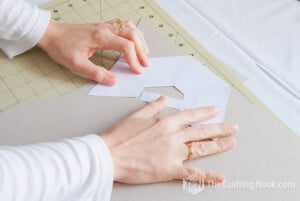
- Transfer the pattern to the cardboard with a pen including folding marks.
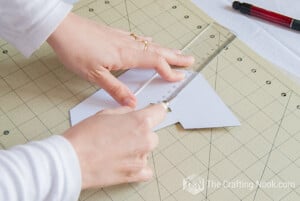
- I cut the pattern helping myself with a ruler.
- With an embossing tool, I embossed the folding lines so the cardboard would fold more easily. You can see what I mean in the video
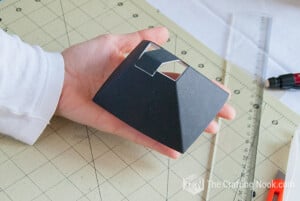
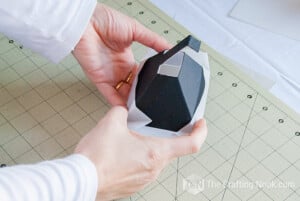
- Once the whole shape was done and verified that it was fitting perfectly I glued the white cardstock to the "inside" side of the diffuser.
- I made sure every edge was well glued and with the help of a ruler I made pressure all over the cardstock to avoid wrinkles.
- Again with the embossing tool, I marked the folding lines. I let it dry.
- Then I cut all the remains of cardstock on the edges to make a fine finish.
- Repeat the same process for the outside cardstock. Back when I made it the first time I used black cardstock, nowadays I like to add some color and patterns!
- I've made this flash diffuser quite a few times over the years so please understand why the photos in the tutorial don't match the tutorial nor the video. LOL
- Once done, I glued both ends with hot glue and I reinforced it with a piece of black cardstock glued on the outside.
- The next step is up to each person, to be honest.
- I used a piece of tracing paper a bit bigger than the wider opening of the diffuser. That way I could hold it to the sides of the diffuser.
- I preferred holding it on the outside with adhesive tape because that way is not so permanent and I can play with different thickness of paper or even colors to bring effects to the photos.
- In this case, it's not so pretty but it is functional which is what I want for this particular project.
- If you want you can just cut on the edge and glue it so it looks pretty!
- That's it!!!
- There you go!
- To use it, just insert flash through the small opening of the diffuser and insert the long piece in the external flash slot to hold it, and adjust as needed.

- As you can see it's not hard to make. Maybe it might take a few more minutes than other options out there but in my experience, the time I invested in this project was worth it a thousand times!