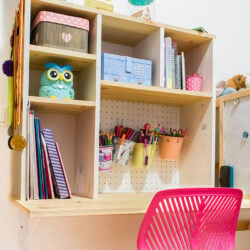
DIY Floating Desk for Kids
Learn how to build a space-saving DIY Floating Desk for small spaces with enough storage to use and in just a few easy steps with this tutorial.
Equipment
- Drill/screwdriver
- Kreg Jig for pocket holes
- Sanding tool
- Protective plastic and masking tape.
Ingredients
Pinewood
- 1 X – 250mm X 780mm X 18mm
- 3 X – 250mm X 650mm X 18mm
- 3 X – 250mm X 200mm X 18mm
- 1 X – 250mm X 526mm X 18mm
- 1 X – 250mm X 650mm X 18mm
- 1 X – 800mm X 600mm X 18mm or 25mm
Plywood
- 1 X – 552mm X 226mm X 5mm
- 1 X – 770mm X 226mm X 5mm
Pegboard
- 1 X – 552mm X 450mm
- Wood screws
- Wood glue
- White latex paint or white varnish.
- Transparent sealant varnish.
- Sandpaper
- Paintbrushes
- Shelf Brackets I got ones that hold 70kg – 140pounds
Instructions
STEP 1: PREPPING THE PIECES
- Firstly, sand your pieces to smooth them and avoid splinters. I especially sand edges. Then clean your pieces well.
- I decided to have vertical pieces painted in white and horizontal pieces painted in transparent varnish. This is totally optional. You can case it all in your favorite color or paint it in different colors.
- Since the dest was created for a little girl, I used a very heavy duty varnish. It’s actually a varnish for wood-flooring around pools. So, I guess liquid wouldn’t be a problem. The white varnish was also water resistant.
STEP 2: PAINTING THE WOOD PIECES
- Protect the surface you are going to work on. I was working on my loving room’s floor (marble and carpet) so I protected it with plastic and masking tape.
- Start painting your pieces as instructed in the packages. I applied 3 coats on each piece leaving them to dry at least 2 hours in between.
- Once all your pieces are ready, it’s time to start building.
STEP 3: ASSEMBLING THE SHELVES
- I like to drill guides for the screws and also made all pocket holes in batch.
- Pocket holes are optional but if you are like me and don’t want the screws to be visible, then pocket holes are your best friends.
- Vertical pieces would have pocket holes and internal shelves as well. Only the top would have normal screws on both ends.
- Measure and mark the place where you want the screws to be. I used 30mm from edges.
- Made all pocket holes.
- Started with the top of the shelves and the left side. Drilled the pieces together with a bit of glue too.
- Then put the shelves in place. Pocket holes facing down and making sure they were evenly separated.
- Once both shelves were secured, I put the second vertical piece in place.
- I like to present the screw’s tip so it’s easier to see where it’s going to touch the other piece.
- Drill away and secure.
- For the shelf separator, I presented the piece to make sure the shelf would be in the right place.
- Mark it and drill the guides.
- Put the separator and the right vertical piece and crew them in place.
- Finally, screw the shelf in place with pocket hole screws.
- The shelving structure is ready. Now we need to prepare the backings.
STEP 4: INSTALLING THE BACKING AND PEGBOARD
- The next step is getting the pegboard in place.
- Measure it making sure it meets the plywood in the middle of the separators on the back.
- Cut it and paint it. I painted it white.
- Put the plywood pieces in place and secure them with small screws.
STEP 5: ASSEMBLING THE DESK
- Ok, now it’s the final step. Build the desk itself.
- Place the table on top of the shelving structure exactly how it would be when counted on the wall. Mark and drill your screw guides.
STEP 6: MOUNTING THE DESK ON THE WALL
- Now it’s time to go to the wall.
- As I mentioned in the supply list, I got the brackets that would hold the most wight. I found these that would hold 70kg each (140 pounds.).
- I decided the height where the desk should be and installed the brackets the same as it would have been any shelf.
- Once it was installed I placed the table on top and secured it with screws.
- Lastly, I secured in place the shelving structure screwing from the bottom up. The internal vertical piece was screwed through pocket holes.
- Because I’m a bit obsessive, I also secured the shelving structure to the wall. My husband said it was not necessary but I can never be careful enough when it comes to my kid.
- That’s it! My girl’s diy floating desk was ready o rock! Used a few hook screws to hang her medals and other decorations.
Notes
QUICK TIP: You don’t need to wash your brushes between coats so they don’t dry or hardened. Just put them into a zip-lock bag and close it very well. The brushes stay wet even overnight if it’s well sealed.