DIY Floating Desk for Kids
This post may contain affiliate links. Please read our Disclosure Policy.
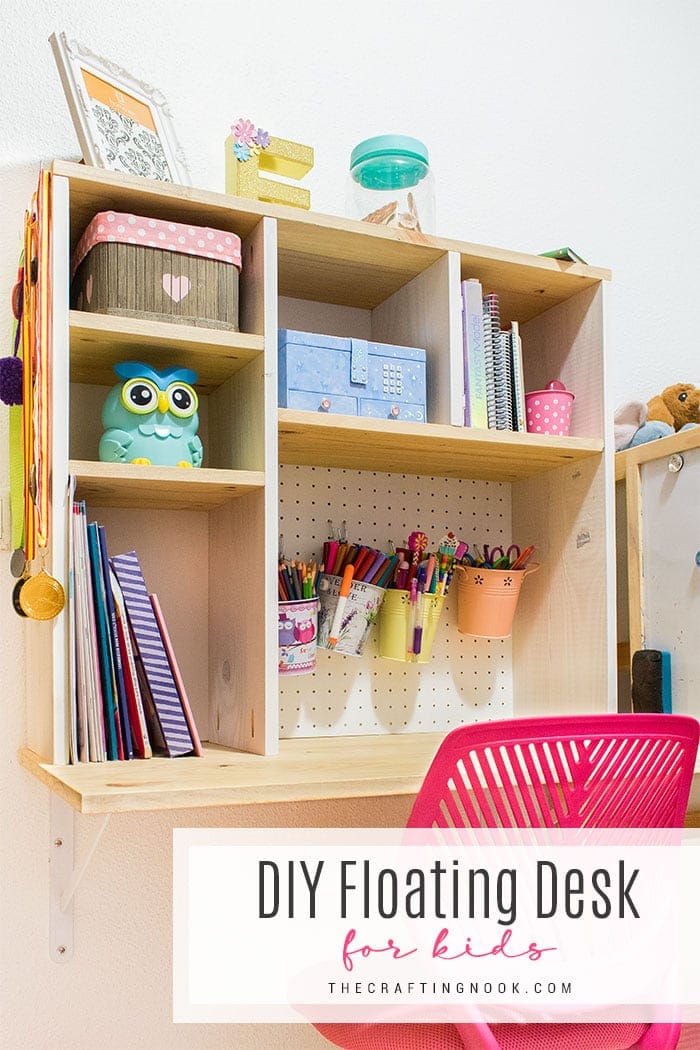
Learn how to build a space-saving DIY Floating Desk for small spaces with enough storage to use in just a few easy steps with this tutorial.
When space is a big inconvenience, anything floating is a blessing, right? In my case, the lack of space is an understatement.
We are currently living in a small town in Spain called Elche. You could say is a traditional Spanish town, with narrow streets, and short buildings one next to the other and believe me when I say most apartments are SMALL.
Table of Contents
DIY Floating Desk for Kids
In many ways, I love it because there’s not much to clean LOL. I do the whole cleaning in a morning or so and the tidying it up takes me about 20 mins every day.
What I don’t love about it is that rooms are so small that it’s hard to have everything you need. For example, a simple dresser won’t fit in my bedroom, a normal bed, a dresser, and a desk can’t fit in my girl’s bedroom so I’ve had to be very creative when it comes to decorating and making each room livable.
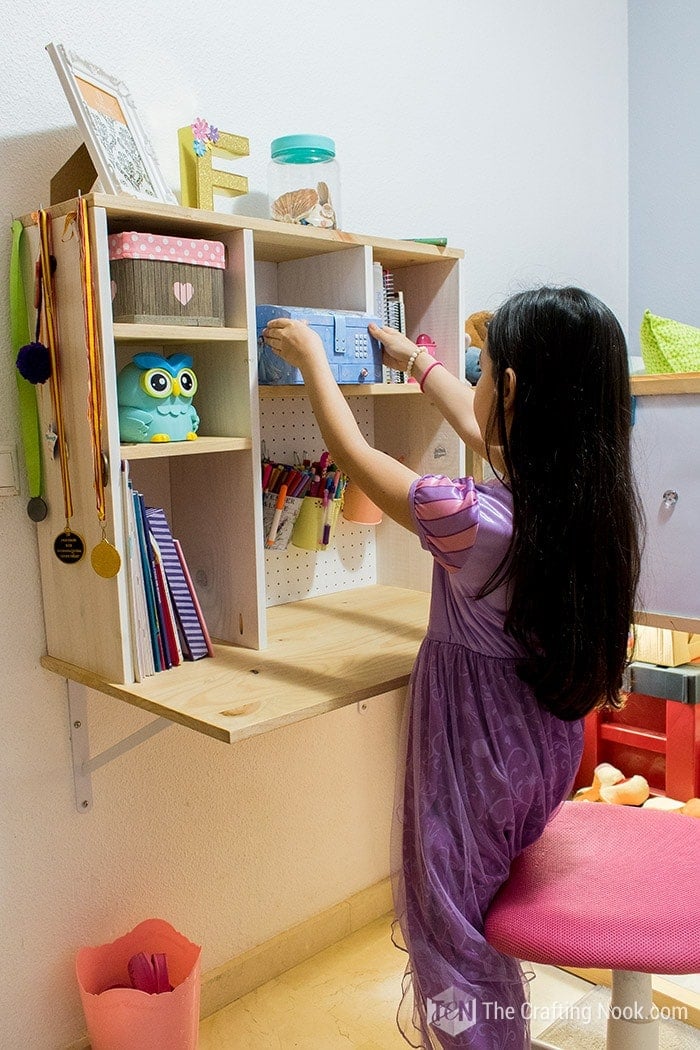
I wanted my girl to have her own desk in her bedroom so she has peace and quiet to study, read and even play.
The space is quite small and no pre-made desk would fit in any available space in her room so I decided to make it myself.
The first thing I realized is that in order to not sacrifice more space than it needed, I had to remove the desk’s legs. It had to be floating.
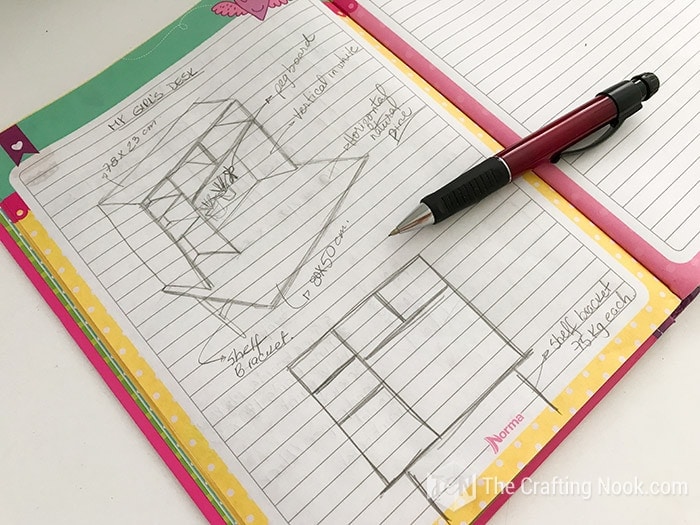
That’s when a wall mounted diy floating desk seemed the perfect option. I started from there and planned the desk first.
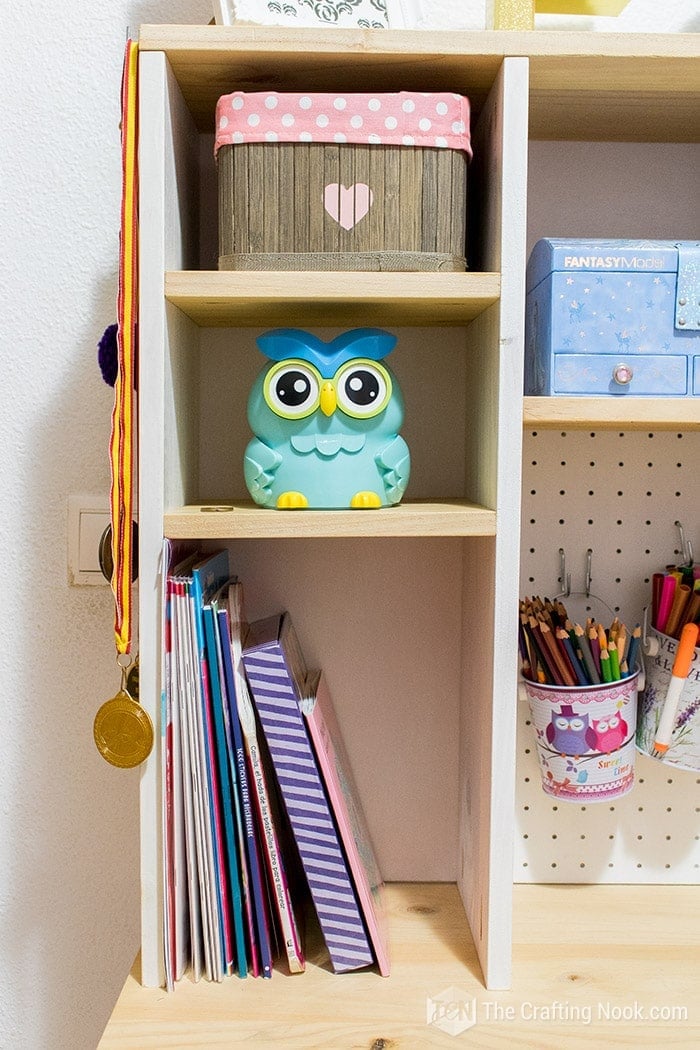
She would need shelves to store her supplies and stuff and I didn’t want to make lots of holes in the wall so I decided to create the shelves on the desk.
Below you can see the plan I created for my girl’s floating desk. It’s simple but functional, no table legs and no drawers.
With all the measures decided I went to the closest hardware store and got my wood pieces cut. I used pinewood.
Confession time, it took me 3 years to publish this post LOL. I built this child’s desk 3 years ago and my girl has been using it ever since so I can definitely say it works perfectly and it’s safe for kids (not that she’s allowed to stand on it!).
HOW TO BUILD A DIY FLOATING DESK
As with any plan, measures are relative to your needs and your metrics. Where I live we work with cm and mm so that’s what I’m giving here. You would need to adjust to your particular needs.
Also, I wanted to be clear that I’m not a carpenter whatsoever. I just figure out ways to make things by myself and only share when it works for me and I think it might work for others. So, in my opinion, if I can make this, I’m sure anyone can no matter the skill level or available space.
Supplies:
Pinewood
- 1X – 250mm X 780mm X 18mm
- 3X – 250mm X 650mm X 18mm
- 3X – 250mm X 200mm X 18mm
- 1X – 250mm X 526mm X 18mm
- 1X – 250mm X 650mm X 18mm
- 1X – 800mm X 600mm X 18mm or 25mm
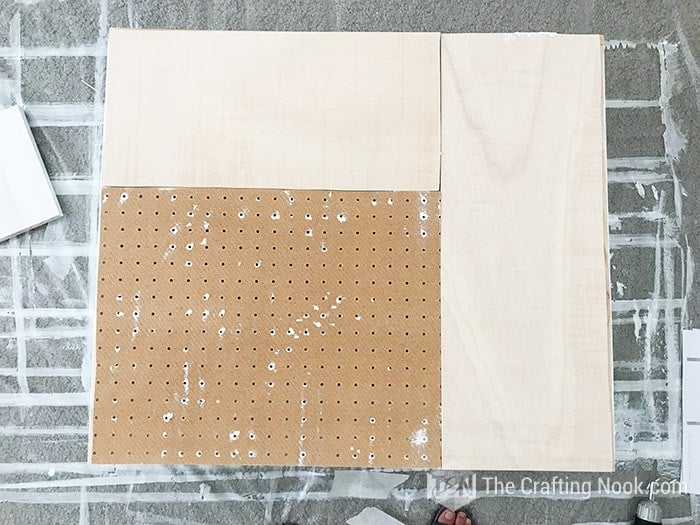
Plywood
- 1X – 552mm X 226mm X 5mm
- 1X – 770mm X 226mm X 5mm
Pegboard
- 1X – 552mm X 450mm
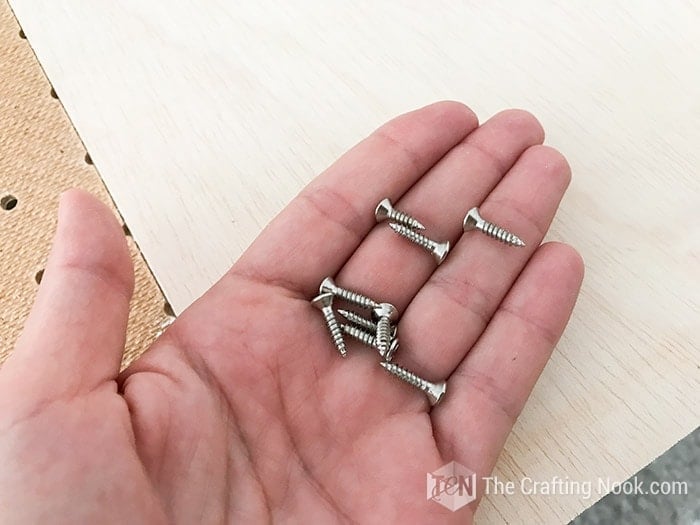
- Wood screws
- Wood glue
- White latex paint or white varnish.
- Transparent sealant varnish.
- Sandpaper
- Paintbrushes
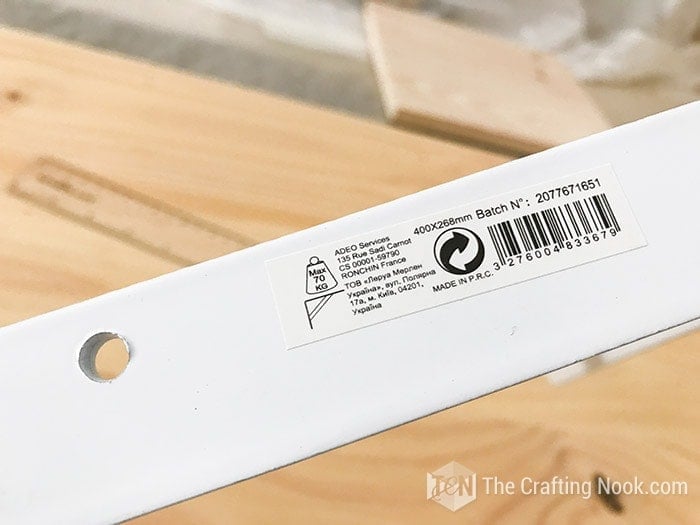
- Shelf Brackets (I got ones that hold 70kg – 140pounds)
Tools:
- Drill/screwdriver
- Kreg Jig for pocket holes and kreg pocket screws
- Sanding tool
- Protective plastic and masking tape.
Step by Step Instructions:
Step 1: Prepping the pieces
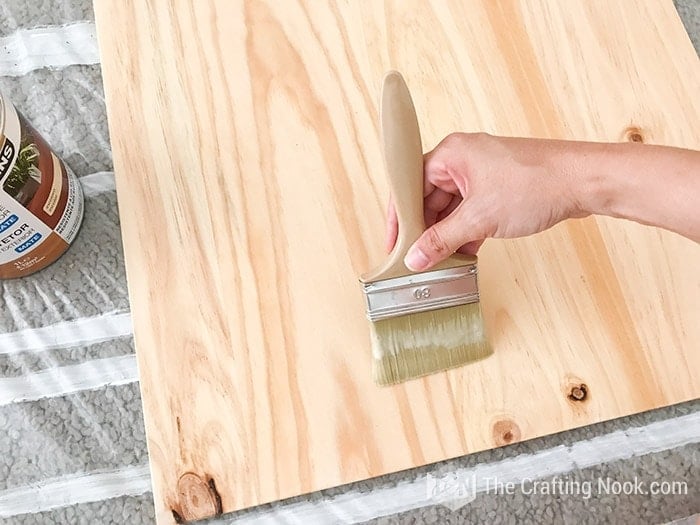
Firstly, sand your pieces to smooth them and avoid splinters. I especially sand edges. Then clean your pieces well.

I decided to have vertical pieces painted in white and horizontal pieces painted in transparent varnish to let the pine board design show. This is totally optional. You can use it all in your favorite color or paint it in different colors.
Since the dest was created for a little girl, I used a very heavy duty varnish for the finished look. It’s actually a varnish for wood-flooring around pools. So, I guess liquid wouldn’t be a problem. The white varnish was also water resistant.
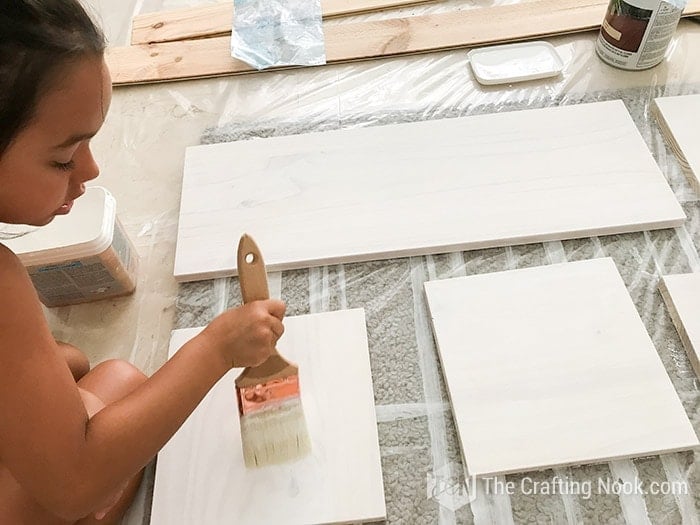
Step 2: Painting the wood pieces
Protect the surface you are going to work on. I was working on my loving room’s floor (marble and carpet) so I protected it with plastic and masking tape.
Start painting your pieces as instructed in the packages. I applied 3 coats on each piece leaving them to dry at least 2 hours in between.
The owner of the desk did her part on the job very well. The best helper ever!!!
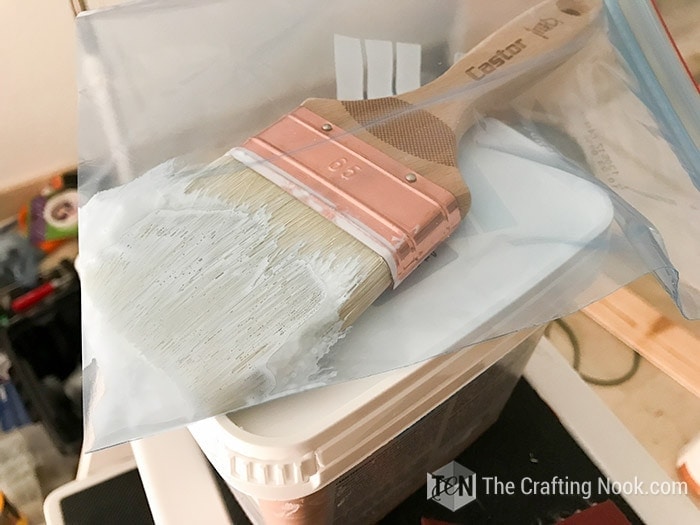
QUICK TIP: You don’t need to wash your brushes between coats so they don’t dry or hardened. Just put them into a zip-lock bag and close it very well. The brushes stay wet even overnight if it’s well sealed.
Once all your pieces are ready, it’s time to start building.
Step 3: Assembling the shelves
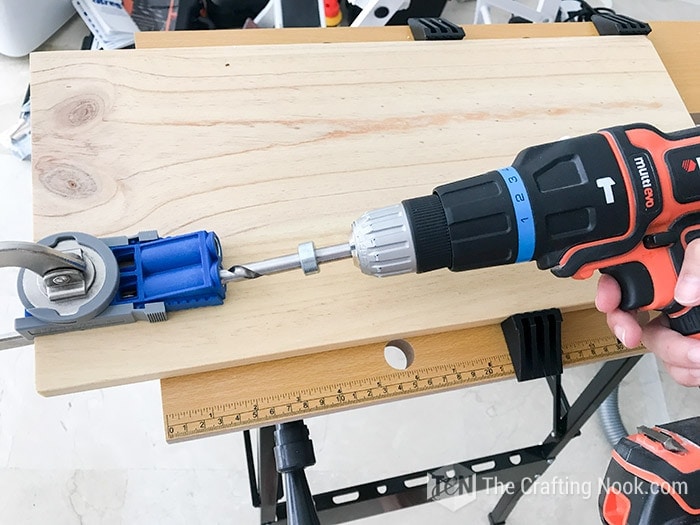
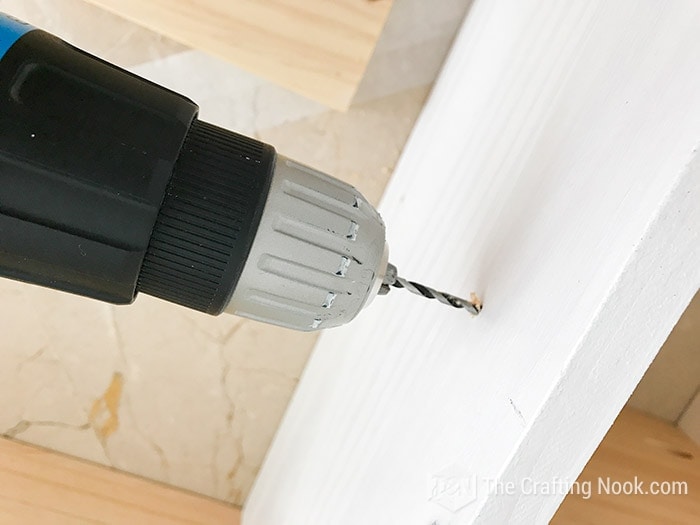
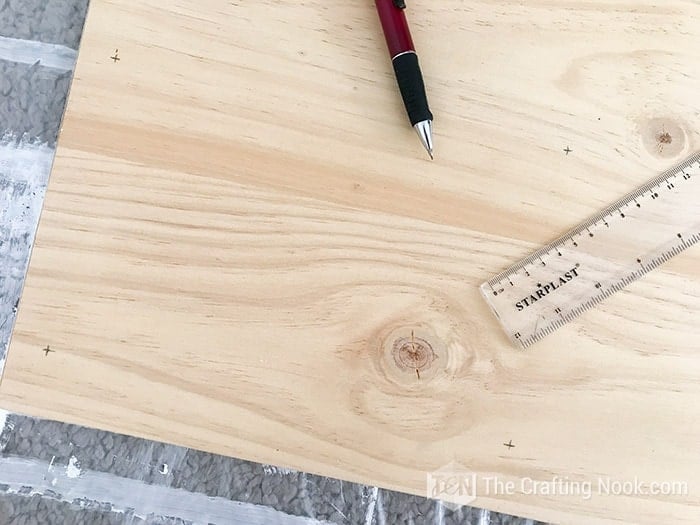
I like to drill guides for the screws and also made all pocket holes in batch.
Pocket holes are optional but if you are like me and don’t want the screws to be visible, then pocket holes are your best friends.
Vertical pieces would have pocket holes and internal shelves as well. Only the top would have normal screws on both ends.
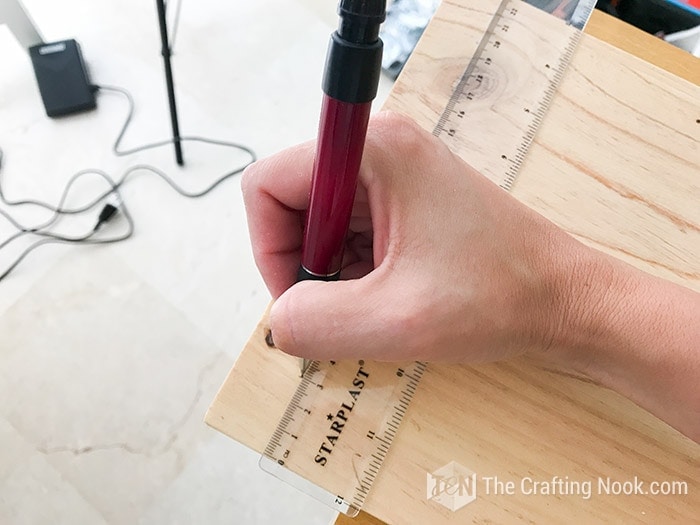
Measure and mark the place where you want the screws to be. I used 30mm from edges.
Made all pocket holes.
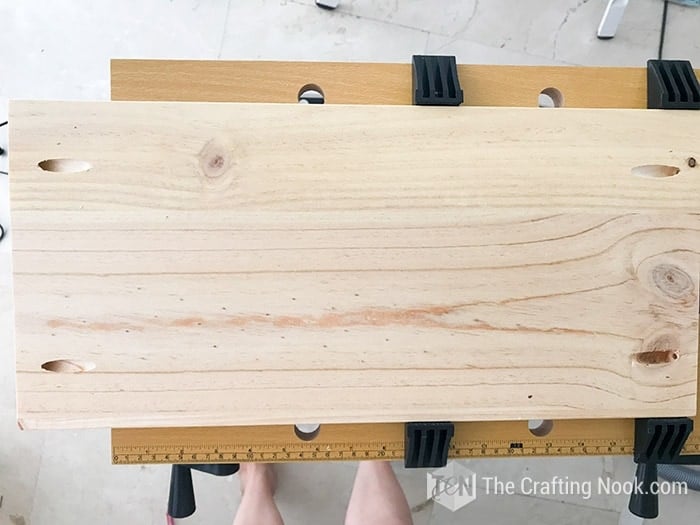
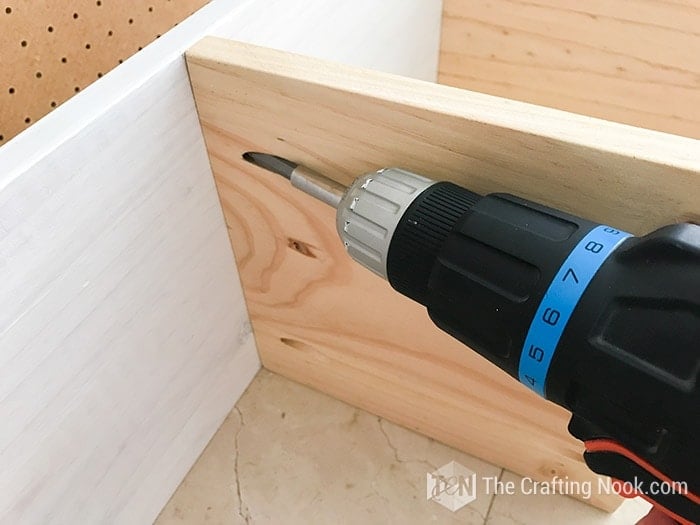
Started with the top of the shelves and the left side. Drilled the pieces together with a bit of glue too.
Then put the shelves in place. Pocket holes facing down and making sure they were evenly separated.
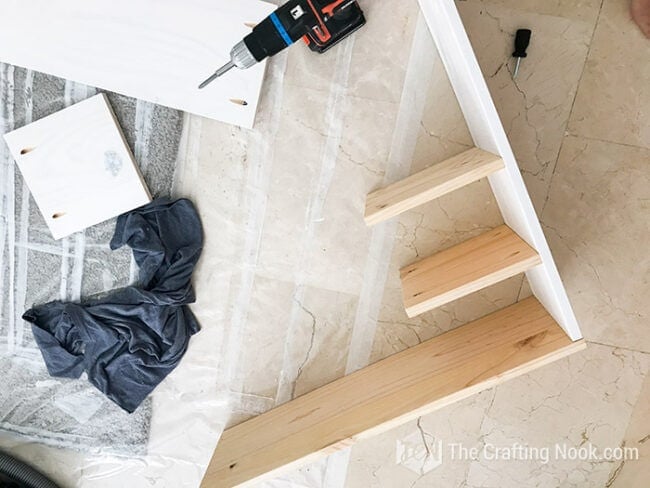
Once both shelves were secured, I put the second vertical piece in place.
I like to present the screw’s tip so it’s easier to see where it’s going to touch the other piece.
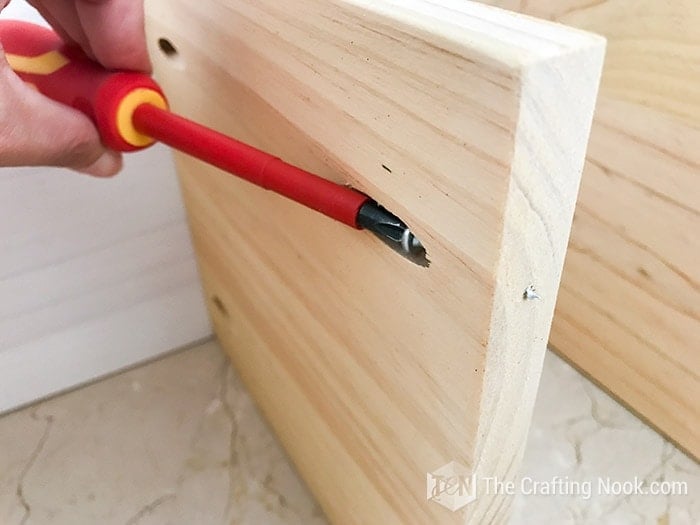
Drill away and secure.
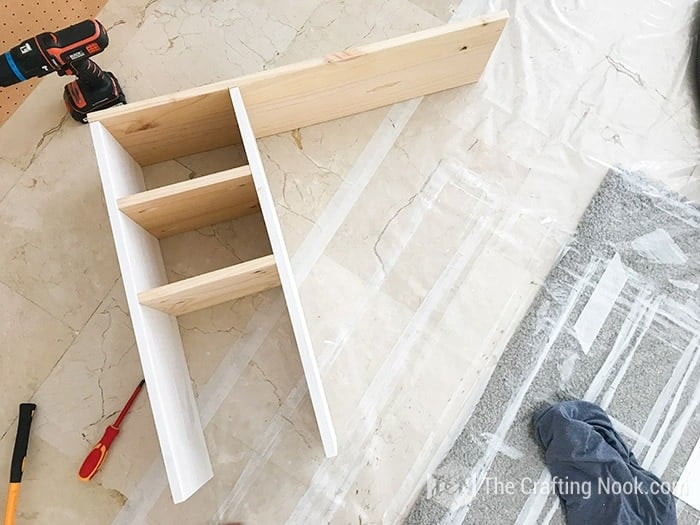
For the shelf separator, I presented the piece to make sure the shelf would be in the right place.
Mark it and drill the guides.
Put the separator and the right vertical piece and crew them in place.
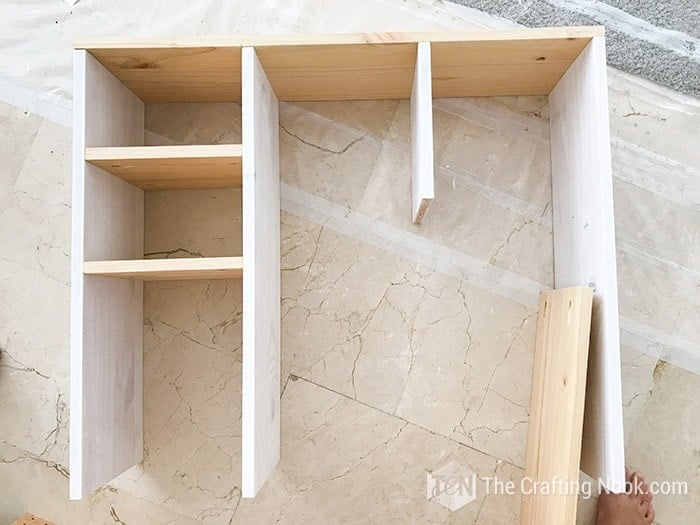
Finally, screw the shelf in place with pocket hole screws.
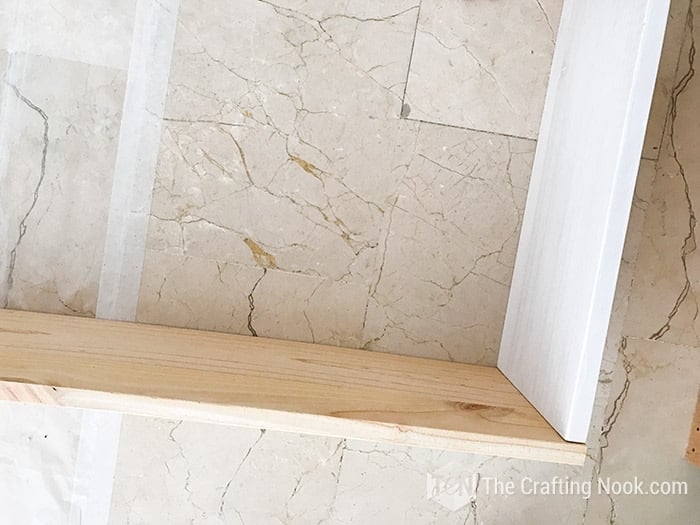
The shelving structure is ready. Now we need to prepare the backings.
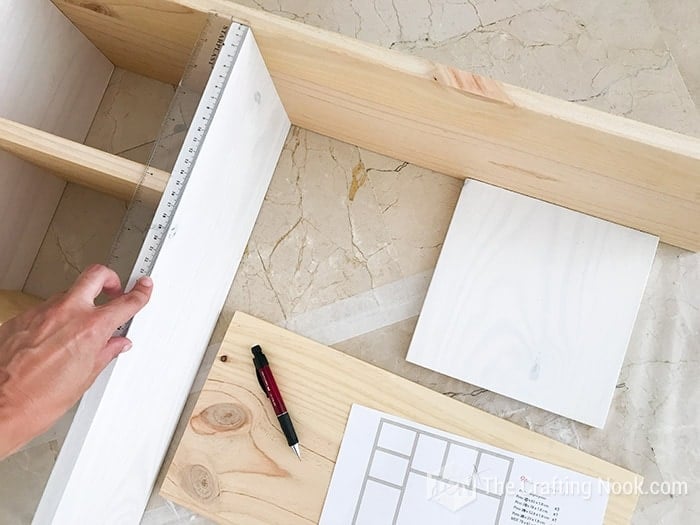
Step 4: Installing the Backing and pegboard
The next step is getting the pegboard in place.
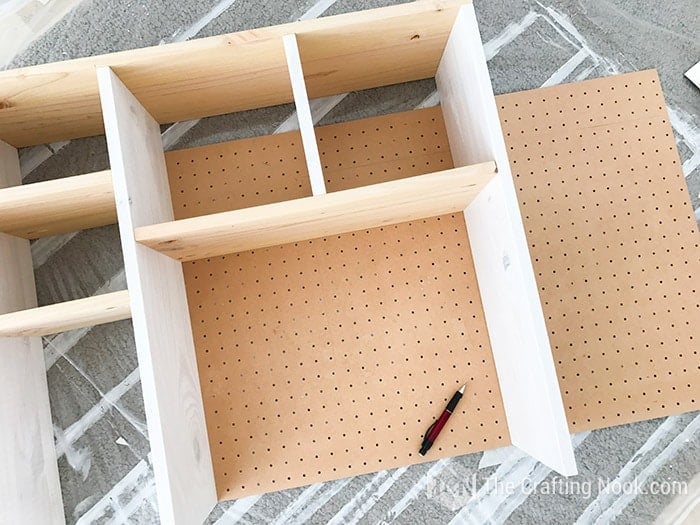
Measure it making sure it meets the plywood in the middle of the separators on the back.
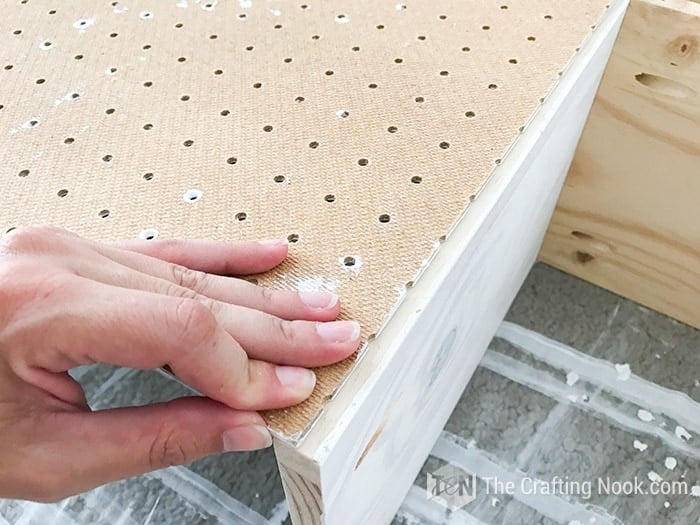
Cut it and paint it. I painted it white.
Put a piece of plywood in both places, top and side of the pegboard and secure them with small screws.
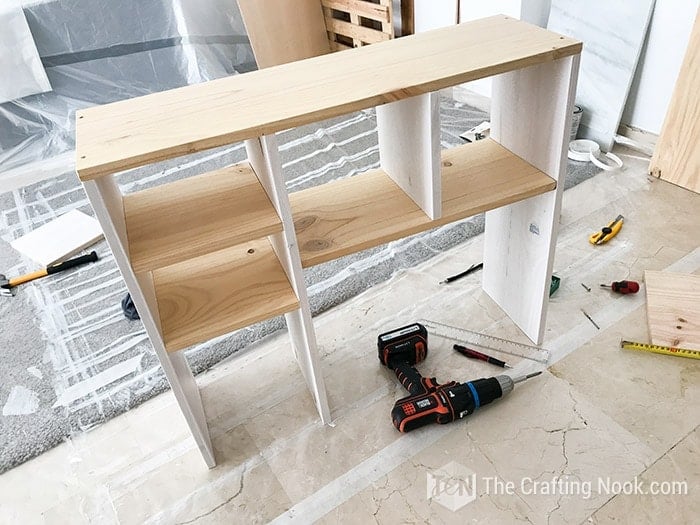
Step 5: Assembling the New desk
Ok, now it’s the final step. Build the desk itself.
Place the table on top of the shelving structure exactly how it would be when counted on the wall. Mark and drill your screw guides.
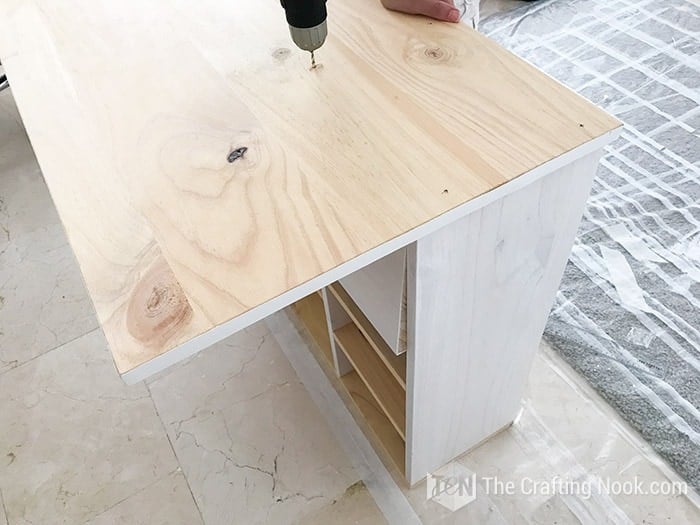
Step 6: Mounting the desk on the wall
Now it’s time to go to the wall.
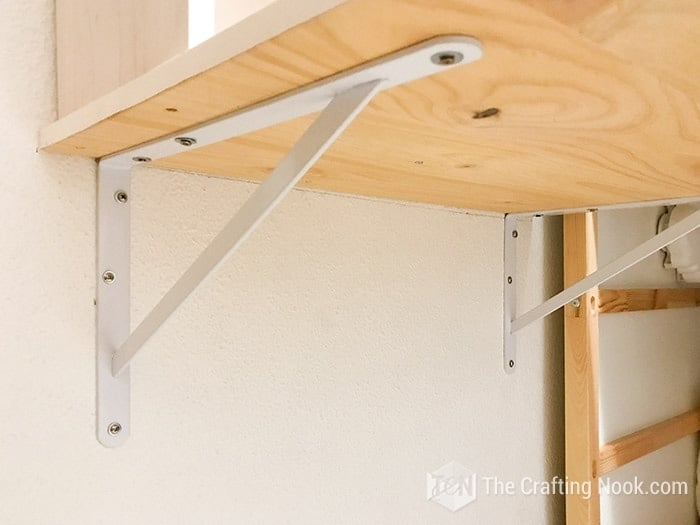
As I mentioned in the supply list, I got the brackets that would hold the most wight. I found these that would hold 70kg each (140 pounds.).
I decided the height where the desk should be and installed the brackets the same as it would have been any shelf.
Once it was installed I placed the table on top and secured it with screws.
Lastly, I secured in place the shelving structure screwing from the bottom up. The internal vertical piece was screwed through pocket holes.
Because I’m a bit obsessive, I also secured the shelving structure to the wall. My husband said it was not necessary but I can never be careful enough when it comes to my kid.
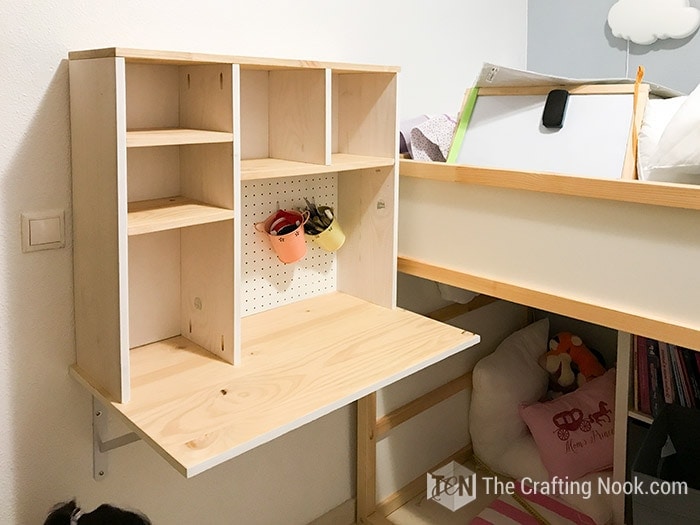
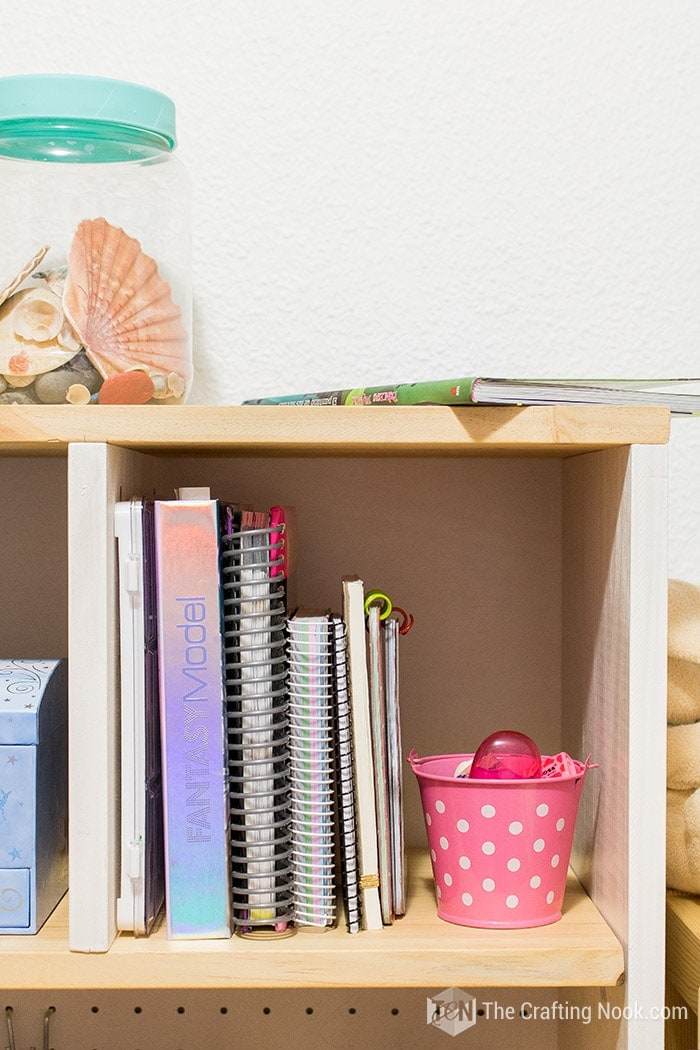
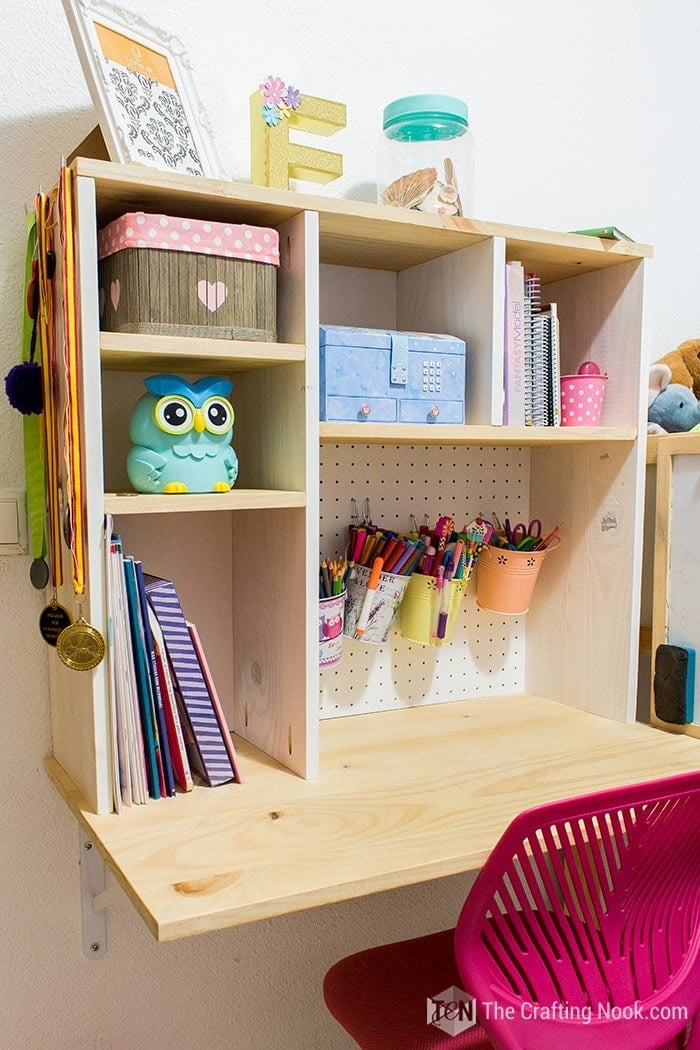
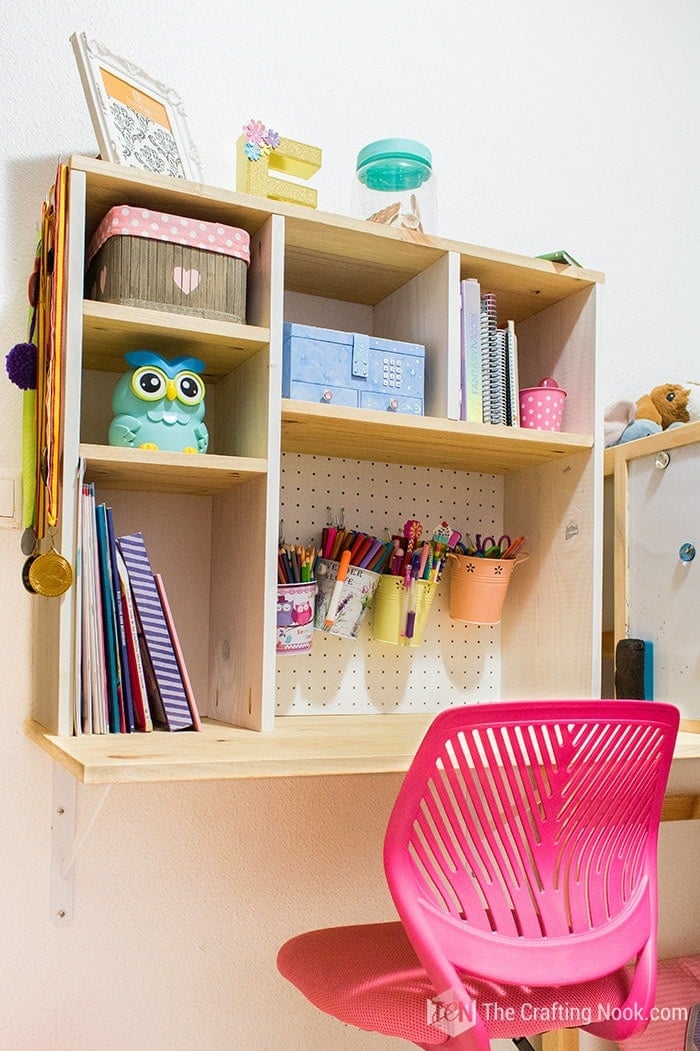
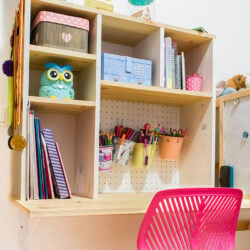
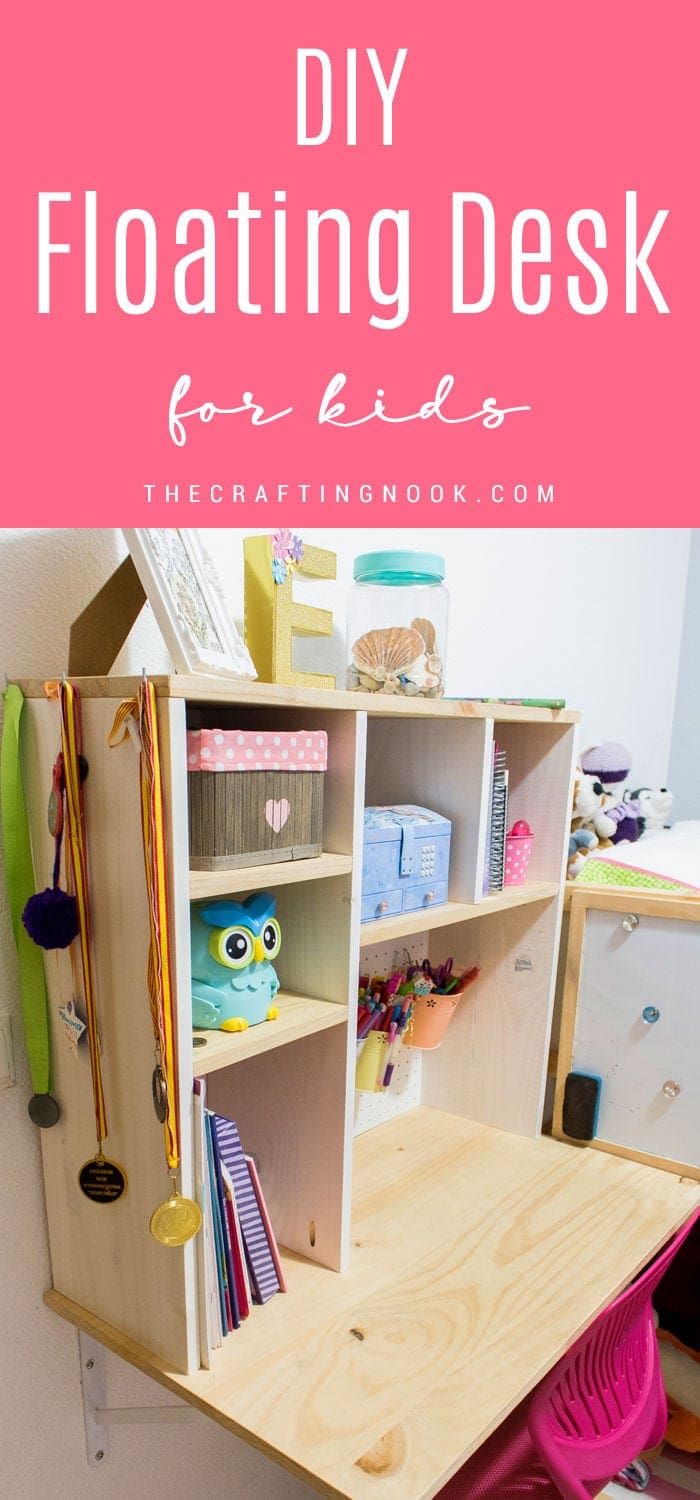
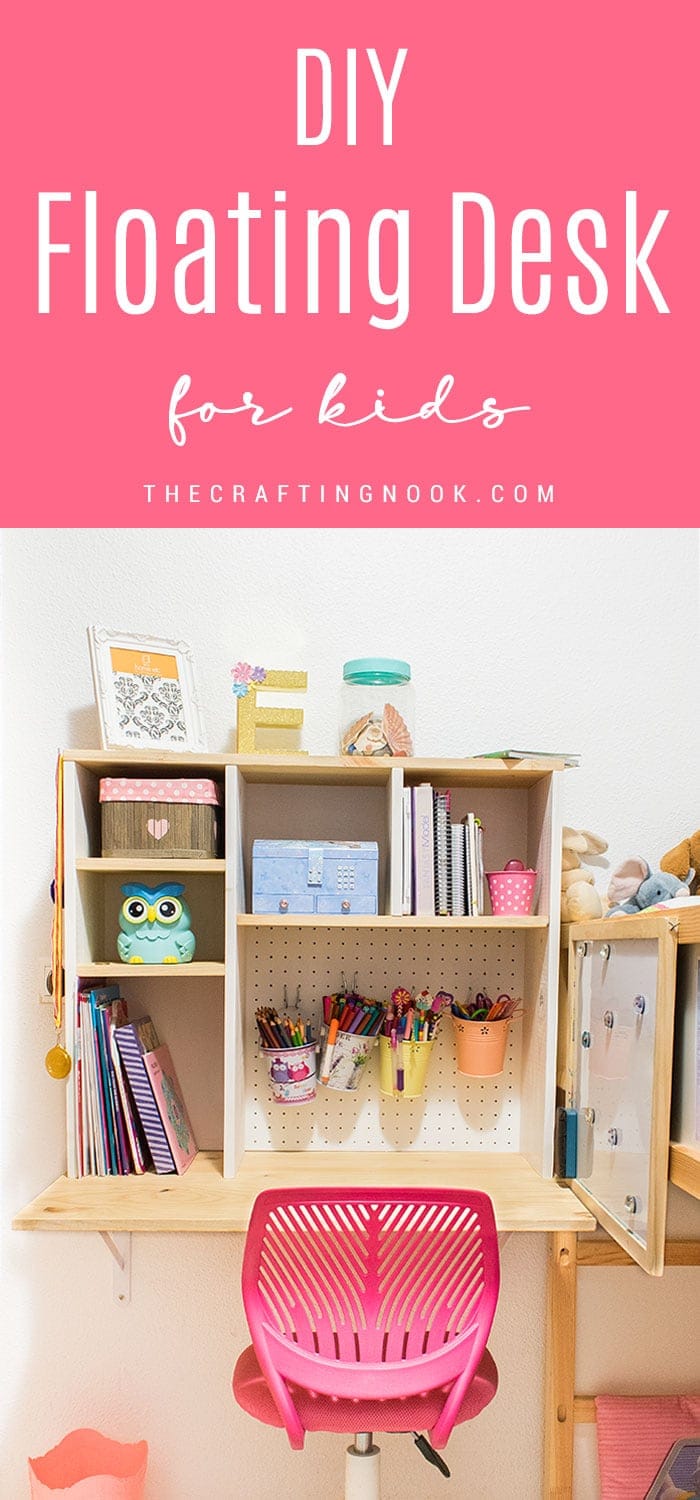
That’s it! My girl’s diy floating desk was ready o rock! Used a few hook screws to hang her medals and other decorations.
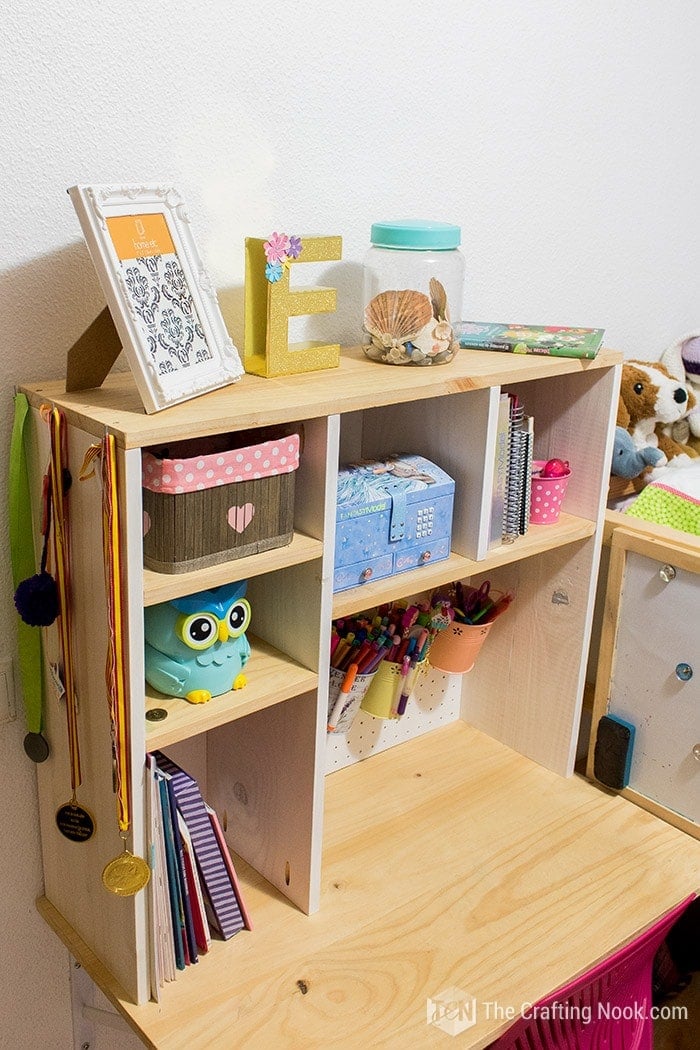
Then with her help, we put her stuff in place. As you can see we haven’t put the photo in the frame but it’s coming soon.
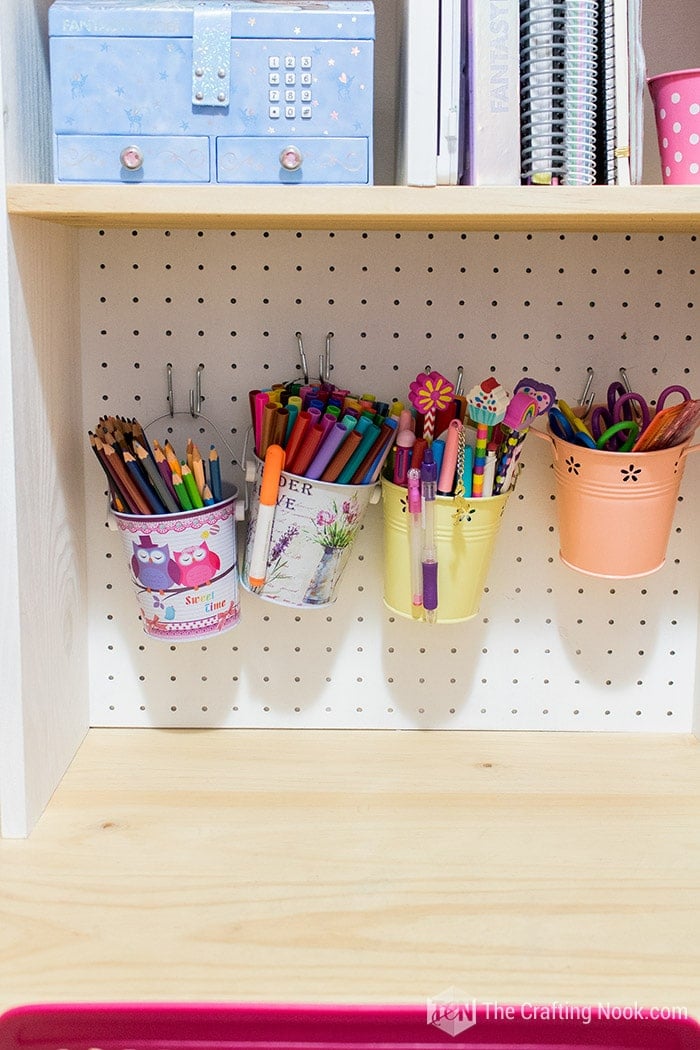
We hung her pencil holders on the pegboard. It used to have scissors and other supplies but she decided she wanted to keep it simple so… it’s hers right?
I also hung her whiteboard from the bed frame so she could have it handy.
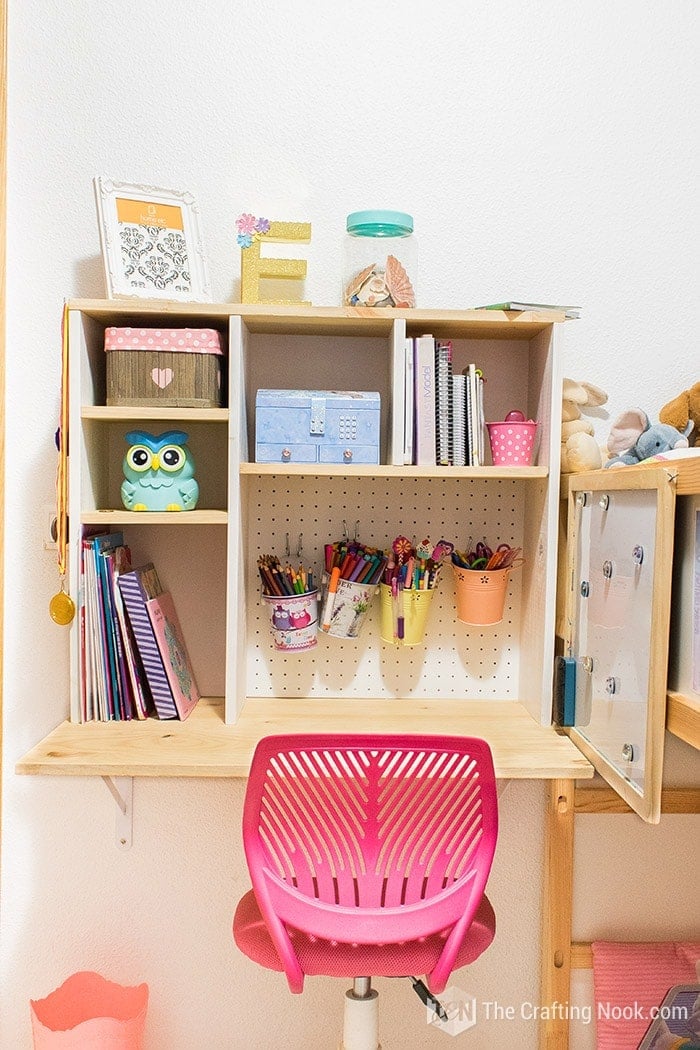
Thankfully she loved it, she finally had her own place to do homework, study and play.
Additional Notes: I decided that as soon as I can, I’ll change the table for one that has laminate. I love the natural pine but this wood is soft and suffers when Emma draws, paint of do most things on it. So I realized that at least as the base of the desk laminate would be the best. I’ll share photos when I finish.
Well, that’s it! I love how the desk turned out, Em loves how it turned out and uses it a lot so we are all happy.
What do you think? Like it? let me know your thoughts in the comments.
Frequently Asked Questions
In comparison with regular work or computer desks, floating desks are relatively less expensive. Plus, you can mount them in smaller spaces without cluttering or overdoing your space, making them the ideal choice for those looking for a compact home office desk.
That’s a question hard to answer because it will depend on the wall characteristics. It’s never the same installing something on a concrete wall as on a wooden wall. My suggestion is to always ask your local hardware store the type of screws to use for your specific type of wall and buy accordingly.
The amount of weight your floating shelf can hold depends on the hanging method, where you hang it, and how big your floating shelf is. Shelves with the lowest weight capacity can’t hold more than 25 pounds, but the sturdiest shelves can hold up to 100 pounds or more.
Yes, Float desks are safe as long as you install them properly. They can be secured to the wall with a variety of mounting options including screws, shelf brackets, and anchors. It is recommended, however, that if you are unsure about how your desk is attached to the wall or if it is falling down on its own, you consult an office furniture professional.
More Woodworking Projects to Try
Also if you enjoyed this cute floating desk tutorial, you might also love these other woodworking project ideas too!
✂️ Tutorial
DIY Floating Desk for Kids
Tools
- Drill/screwdriver
- Kreg Jig for pocket holes
- Sanding tool
- Protective plastic and masking tape.
Supplies
Pinewood
- 1 X – 250mm X 780mm X 18mm
- 3 X – 250mm X 650mm X 18mm
- 3 X – 250mm X 200mm X 18mm
- 1 X – 250mm X 526mm X 18mm
- 1 X – 250mm X 650mm X 18mm
- 1 X – 800mm X 600mm X 18mm or 25mm
Plywood
- 1 X – 552mm X 226mm X 5mm
- 1 X – 770mm X 226mm X 5mm
Pegboard
- 1 X – 552mm X 450mm
- Wood screws
- Wood glue
- White latex paint or white varnish.
- Transparent sealant varnish.
- Sandpaper
- Paintbrushes
- Shelf Brackets I got ones that hold 70kg – 140pounds
Instructions
STEP 1: PREPPING THE PIECES
- Firstly, sand your pieces to smooth them and avoid splinters. I especially sand edges. Then clean your pieces well.
- I decided to have vertical pieces painted in white and horizontal pieces painted in transparent varnish. This is totally optional. You can case it all in your favorite color or paint it in different colors.
- Since the dest was created for a little girl, I used a very heavy duty varnish. It’s actually a varnish for wood-flooring around pools. So, I guess liquid wouldn’t be a problem. The white varnish was also water resistant.
STEP 2: PAINTING THE WOOD PIECES
- Protect the surface you are going to work on. I was working on my loving room’s floor (marble and carpet) so I protected it with plastic and masking tape.
- Start painting your pieces as instructed in the packages. I applied 3 coats on each piece leaving them to dry at least 2 hours in between.
- Once all your pieces are ready, it’s time to start building.
STEP 3: ASSEMBLING THE SHELVES
- I like to drill guides for the screws and also made all pocket holes in batch.
- Pocket holes are optional but if you are like me and don’t want the screws to be visible, then pocket holes are your best friends.
- Vertical pieces would have pocket holes and internal shelves as well. Only the top would have normal screws on both ends.
- Measure and mark the place where you want the screws to be. I used 30mm from edges.
- Made all pocket holes.
- Started with the top of the shelves and the left side. Drilled the pieces together with a bit of glue too.
- Then put the shelves in place. Pocket holes facing down and making sure they were evenly separated.
- Once both shelves were secured, I put the second vertical piece in place.
- I like to present the screw’s tip so it’s easier to see where it’s going to touch the other piece.
- Drill away and secure.
- For the shelf separator, I presented the piece to make sure the shelf would be in the right place.
- Mark it and drill the guides.
- Put the separator and the right vertical piece and crew them in place.
- Finally, screw the shelf in place with pocket hole screws.
- The shelving structure is ready. Now we need to prepare the backings.
STEP 4: INSTALLING THE BACKING AND PEGBOARD
- The next step is getting the pegboard in place.
- Measure it making sure it meets the plywood in the middle of the separators on the back.
- Cut it and paint it. I painted it white.
- Put the plywood pieces in place and secure them with small screws.
STEP 5: ASSEMBLING THE DESK
- Ok, now it’s the final step. Build the desk itself.
- Place the table on top of the shelving structure exactly how it would be when counted on the wall. Mark and drill your screw guides.
STEP 6: MOUNTING THE DESK ON THE WALL
- Now it’s time to go to the wall.
- As I mentioned in the supply list, I got the brackets that would hold the most wight. I found these that would hold 70kg each (140 pounds.).
- I decided the height where the desk should be and installed the brackets the same as it would have been any shelf.
- Once it was installed I placed the table on top and secured it with screws.
- Lastly, I secured in place the shelving structure screwing from the bottom up. The internal vertical piece was screwed through pocket holes.
- Because I’m a bit obsessive, I also secured the shelving structure to the wall. My husband said it was not necessary but I can never be careful enough when it comes to my kid.
- That’s it! My girl’s diy floating desk was ready o rock! Used a few hook screws to hang her medals and other decorations.
Notes
My favorite desk projects from my favorite bloggers:
- How to build a floating desk by Megan over at Two Feet First
- Farmhouse X Office Desk by Ashley over at Handmade Heaven
- DIY Desk out of an Old Door by Karin over at Renovated faith
Share and PIN ME
Til’ next time…


FREE WORKBOOK
Keeping your Sweet Home Organized
Learn how to create intentional habits and simple routines to Keep Your Home Organized. Plus freebies, printables, exclusive content, and tips.
Disclaimer: By clicking on the “Yes” button above you are giving me your consent to collect and use your information according to the law and My Policy Privacy. Zero Spam I promise!
This is such a cute idea! My daughter has a small room, too and there’s not a lot of room for a desk. Since she’s a teen now she wants a desk in her room. Something like this would be perfect!
Hi Michelle, I’m so glad you like this idea. I had to get creative and stick with the only available space we had in her bedroom. You can make it a little bit larger since she’s a teen already and she might definitely need more space to work on the desk.
Thank you for your kind words and for stopping by!!!
Hugs and Love,
Cami