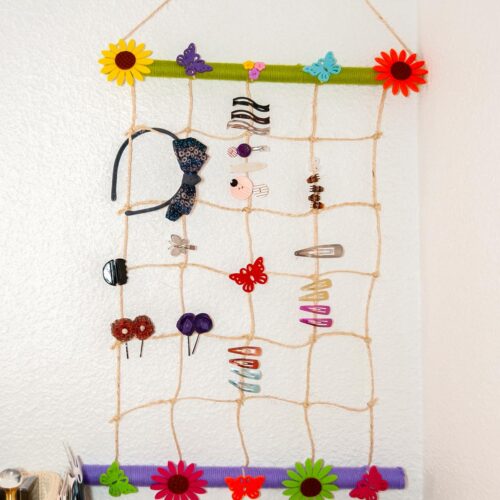
DIY Hair Clip Holder for Kids
Make this easy DIY Hair Clip Holder for kids to keep hair clips organized & add a cute touch to your room! This is a fun craft project for all ages.
Equipment
- Hot glue gun and glue sticks
- scissors
Ingredients
- Twine
- Yarn choose colors that match your room decor or your personal style
- White glue
- Decorating Items
- like felt flowers, butterflies, buttons, or any other embellishments you love
- 2 Contact paper tubes you can also substitute with wooden sticks or other similar materials
Instructions
STEP 1: PREP WORK
- Cut 10 strips of twine (5 longer than the other 5), I can’t give you the exact length because it is going to depend on how long and how wide you want it.
- Clean your cardstock tubes (or wood sticks if you decide to use them).
STEP 2: PREPARE THE BASE
- Take the contact paper tubes and cut them to your desired length if different than the original.
- These will serve as the top and bottom bases of your hair clip holder. You can adjust the length according to how many hair clips you want to store or the available space in your room.
STEP 3: CREATE THE TWINE GRID
- Lay out the vertical and horizontal twine strings evenly spaced apart to achieve the desired length and width.
- Leave at least an inch from the edges of the tube to ensure stability. Secure each intersection with a knot.
- Start attaching each vertical string to the top base tube. A simple knot will do and secure with hot glue.
- I usually start with both ends and then work on the internal strings of the grid.
- Once you have all the vertical twine strings secured in place, it’s time to start actually creating the grid.
- Start with one of the side strings at the desired spacing and make a tight knot.
- Secure the knot with a tiny dab of glue.
- Move on to the next vertical string
- Keep moving from string to string making a know more or less at the same distance.
- Then Start over with the following 4 strings.
STEP 4: ATTACH THE GRID TO THE BASES
- Attach the vertical strings to the bottom base using knots and secure them in place with hot glue just like you did for the top. Make sure the grid is taut and evenly spaced.
- Cut out all excess twine and secure with a tiny dab of hot glue.
STEP 5: WRAP THE TUBES WITH YARN
- Wrap each of the contact paper tubes with yarn in your chosen colors.
- Use white glue to secure the yarn in place as you wrap it around the tubes. This will add a decorative touch to your hair clip holder.
- I used 2 colors but you can mix and match or make all in one color. Imagination is the limit.
- Cut an additional string of twine log enough to go through inside the cardstock tube and create a triangle for the hanger.
- Cut and make a knot. You can hide the knot inside the tube or leave it at the top. I left mine as the project is all about knots!
- There you go!
STEP 6: DECORATE
- Get creative and decorate your hair clip holder with felt flowers, butterflies, buttons, or any other decorative items you have on hand.
- Use hot glue to attach these decorations securely to the wrapped tubes.
STEP 7: FINAL TOUCHES
- Once you’re happy with the decoration, let everything dry completely. Trim any excess yarn or twine if necessary.
- Your DIY Hair Clip Holder is now ready to use!
STEP 8: ORGANIZE YOUR KID’S HAIR CLIPS
- Place your hair clips and headbands on the twine grid of your holder. Now you have a cute and functional way to keep your sweet little girl’s hair accessories organized and easily accessible.
- Enjoy using your new hair clip holder and feel free to customize it with your own unique touches!
Notes
- Add a personal touch to the hair clip holder by incorporating your child’s initials into the design. Cut out small felt letters and attach them to the yarn-wrapped tubes. Not only does this add a unique touch, but it also helps personalize their space.
- Make the most out of your hair clip holder by turning it into a dual-purpose organizer. Hang S hooks to the bottom base of the holder to hang hair elastics, and hair bands. This maximizes storage space and keeps all hair accessories neatly in one place.
- Create a color-coded grid using different shades of yarn to categorize hair clips by type, color, or size. For example, use pink yarn for pink hair clips, blue yarn for blue clips, and so on. This makes it easy for your child to quickly locate the exact clip they need.
- Add a whimsical touch to the holder by incorporating glow-in-the-dark elements, such as beads flowers, animals, etc. Charge them under a bright light during the day, and watch them glow softly at night, creating a magical ambiance in your child’s room.