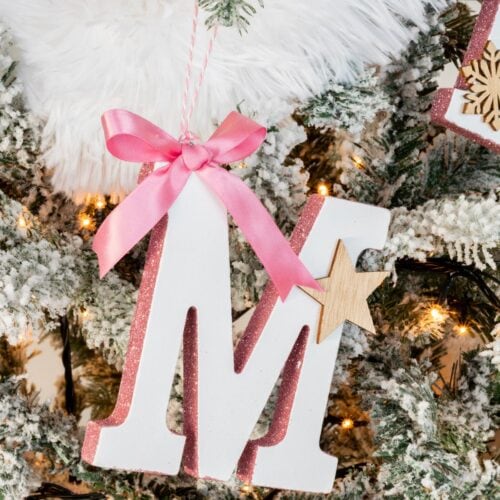
DIY Initial Letter Ornaments with Glitter
Sparkle up your Christmas tree with some adorable DIY Initial Letter Ornaments! Crafted with love, these easy ornaments add cuteness to your holiday decor. Let’s make memories, not just ornaments!
Equipment
- Paintbrush
- Pliers
- scissors
- Hot glue gun and glue sticks
Ingredients
- White-painted MDF letters – one for each family member
- Pink glitter – or your favorite glitter colors
- White wood glue – I like this glue because offers a better adherence to the glitter allowing a longer-lasting look.
- Small wooden Christmas scrapbook appliques – I used Trees snowflakes, stars and reindeer.
- Cute pink ribbon – or your favorite color that matches the glitter color
- Screw eye hooks
- Baker’s twine yarn, or ribbon – for hanger
- Newspaper or a crafting mat – to keep things tidy
Instructions
STEP 1: GET YOUR WORKSPACE READY.
- Put some newspaper or a crafting mat down to catch any glitter that falls. A sheet of paper works too if you have good control over the glitter. This will make cleaning up really easy, so you can focus on enjoying crafting.
- Clean your letters well to remove dust and grease.
STEP 2: ADD GLITTER TO THE EDGES.
- Serve a small amount of glue in a container so you don’t get glitter in the glue bottle.
- I recommend going by sections at a time to avoid drying the glue.
- Use a small paintbrush to put a layer of white glue on the sides of the wood letters outside and inside. For example, letters like O, A, D, P, etc
- Put abundant pink glitter on the edges.
- Tap a little bit with your finger to make sure the glitter adheres well.
- Shake off extra glitter into the tray and move on to the next section.
- Don’t be afraid of getting some glue on the already-applied glitter.
- Once completely glittering the sides, let it dry on a sheet of paper towel.
STEP 3: ATTACHING THE HOOK
- Flip the ornament and twist a small hook into the top. This part can be a little bit tricky but with patience, you can do it.
- I used pliers to help me start the hole for the hook, and then with my hands I twisted as much as I could and then at the end, I used the pliers again to push it all the way through, leaving only the eye visible.
STEP 4: ADD DECORATION.
- Once the glitter has completely dried, it’s time to add a little bit of fun.
- Put a little bit of hot glue on the back of the wooden Christmas tree (or your chosen appliqué) and stick it on the front of the letter where you see fit. I placed them in different places in each letter.
- Now, use a pretty pink ribbon to make a bow.
- Attach it to the top of the letter with hot glue but be careful not to close the hook with the glue. This makes your decoration look festive and charming.
- Cut a piece of baker’s twine with a tied knot going both ends and put it through the hook to make a loop for hanging.
STEP 5: REPEAT AND MAKE AS MANY AS YOU LIKE.
- Do these steps for each person in the family, making the letters and decorations special for each person.
STEP 6: HANG THEM ON THE TREE
- It’s time to let these cute homemade ornaments shine. Hang them on your tree and enjoy the view.