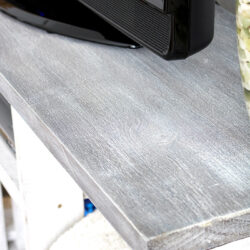
Diy Limewashed Look With Dry Brush Painting Technique Tutorial
Did you know that you could get a limewashed really similar look on wood without the original Limewash technique? The answer is YES! I created that look using the dry brush painting technique.
Equipment
- Brass-bristle scrub brush
- Protective eyeware
Ingredients
- Wood board.
- Dark wood stain I created mine 50-50 sand grey paint and water
- White Cotton latex paint
- 2 brushes.
- Plastic or paper plate
- Paper
- Sandpaper I used 150-grit
- Piece of cloth
- Spray Mata te Clear Varnish
Instructions
STEP 1: PREP WORK
- Firstly, let’s avoid splinters from getting into our fingers. Sand all the edges (I used 150-grit). Only the edges because we don’t want the surface of our board to get too soft.
- Once the edges are done, let’s enhance the whitening effects of dry brushing by opening the wood pores with the brass-bristle scrub brush before applying it.
- Work the brush along the wood grain to avoid unsightly cross-grain scratches.
- Clean the sanding dust off thoroughly before applying the wood stain.
STEP 2: STAINING THE WOOD
- DIY Limewash. If you plan to use paint as stain then prepare your stain diluting 50-50 your dark chosen paint and water. Mix well.
- With a brush, apply your stain all over your wood board.
- It may take more than one application of stain to get the look you’re after. I wanted it slightly dark so it wouldn’t lighten much after dry brushing.
- Let it dry completely. It may take a few hours.
STEP 3: APPLYING DRY BRUSHING TECHNIQUE
- Then dribble a very small amount of paint on the plastic or paper plate.
- Now, very gently dab the tip of your dry paintbrush into the paint and dabbed it on a piece f paper or paper towel to remove any excess paint.
- You want to keep the tip of your paintbrush “dry” and not saturated with paint, so I suggest starting off with just a tiny bit of paint and adding more as you get comfortable with the technique.
- See how most of the bristles are still separated and not soaked in paint? This is what you are going for.
- Use short, quick brush strokes in both directions (along the wood grain and across them) to give it a texture and accent the wood lines.
- This allowed me to brighten up the wood without completely covering the whole design which gives it so much character.
- There’s no right or wrong way to dry brush; so get creative with your painting, you might discover looks you didn’t even know you could love!
- Let it dry once finished.
- Then let’s do the same with another brush but with a dark color. But this time will be really short brush strokes here and there to create slightly darker (depth) spots.
- When you are happy with the result, let it dry overnight.
STEP 4: SPRAY VARNISH TO FINISH YOUR WORK
- Finally, when your piece is completely dry, spray your clear matte varnish to protect and finish your masterpiece.
- Let it dry and you are done!