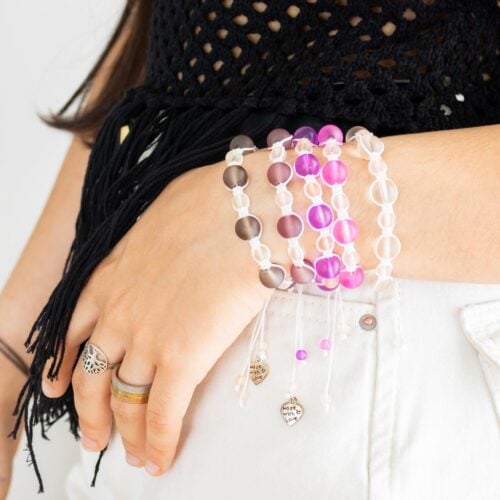
DIY Macrame Bracelet With Beads
Create a cute macrame bracelet with beads and nylon cord! Easy step-by-step guide for beginners. Perfect DIY project for crafting lovers!
Equipment
- 1 Clipboard and 2 paper clips
- scissors
- A Lighter
- Measuring tape.
- Twizer just in case to help pull the cord.
Ingredients
- 1 mm Nylon Chinese knotting cord – one 15-inch 40 cm piece and one 60-inch piece (1.5 m). I used white.
- Glass Beads – alternating small and large. I used some cute Tinted glass beads 7x 4mm and 6x 8mm in shades of pink but you can use any bead you love.
- Extra beads for tail finish – I used 3mm glass beads
Instructions
STEP 1: PREP WORK
- Secure the 15-inch central cord onto the clipboard using the paper clips. Leave out 4 inches of cord at the top clip. This will be your main cord for the bracelet.
- Fold the 60-inch cord in half to find the center.
- Place the center under the main cord, creating two equal lengths on each side.
STEP 2: START WITH SQUARE KNOTS
- The square knot is one of the most basic and versatile knots in macrame. It’s created by using three or four strands: two outer working cords and one or two inner filler/central cords.
- Using the 60-inch cord, create 4 square knots at the beginning of the bracelet. This will be the starting section before adding the beads.
- Place the left working cord over the central cord.
- Pass the right working cord over the left cord and under the central cord and through the loop created by the left working cord.
- Pull tight to complete the first half of the square knot.
- Then repeat the same steps for the other half of the square knot.
- Place the right working cord over the central cord.
- Pass the left working cord over the right cord and under the central cord and through the loop created by the right working cord.
- Pull tight to complete the second half of the square knot.
- Right now you have 1 square knot. Repeat 3 more square knots.
STEP 3: THREAD ALL THE BEADS
- The easiest way to work a beaded bracelet is threading all the beads at once and the work each as they are needed.
- So I like to start and finish with a small bead, you can start with the large one. It’s just a preference.
- Then I alternated one small, one large, one small, one large and so on and so forth until if had inserted all the beads except for the tail ones.
STEP 4: ADD THE FIRST BEAD
- Push a small bead and slide it up to the last knot you made.
- The cords go around the beads on the sides.
- Make 2 square knots with the 60-inch cord below the bead to secure it in place.
STEP 5: ADD THE SECOND BEAD
- Push a large bead and slide it up to the last set of knots.
- Again, make 2 square knots below the bead to secure it.
STEP 6: CONTINUE BEADING AND KNOTTING ALL THE BEADS
- Alternate between small and large beads, securing each bead with 2 square knots. Continue this pattern until you reach the desired length for your bracelet.
- You can use more or less beads as you see fit.
STEP 7: FINISH WITH SQUARE KNOTS:
- After adding the final bead, create again 4 square knots to finish the main section of the bracelet.
- Trim and secure the leftover cords from the 60-inch line.
- Use a lighter or glue to seal the ends of the nylon cord to prevent the knots from getting undone.
STEP 8: CREATE THE SLIDING KNOT CLOSURE
- The sliding knot is a practical knot used for making adjustable closures on bracelets and necklaces. It allows you to adjust the size of your jewelry piece easily.
- To make the bracelet adjustable, overlap the ends of the main cord.
- Use a separate piece of cord (around 5-8 inches) to tie square knots around both ends of the bracelet, forming a loop. This will create the sliding mechanism.
- Typically, 6-8 square knots should be enough.
- Trim any excess cord, leaving 2 small tails on each side of the sliding knot. Use a lighter or glue to seal the ends of the nylon cord to prevent the knots from getting undone.
STEP 9: ADD THE FINISHING TOUCHES
- Insert a small bead onto each tail of the bracelet.
- Tie a Franciscan knot right at the end of each tail to secure the bead in place and avoid the tail from sliding out of the closure.
- The Franciscan knot, also known as the barrel knot, is simple and decorative:
- Loop the cord around your finger or a dowel, creating a loop with a long tail.
- Wrap the tail around the loop and the cord itself several times.
- Pull the main cord carefully towards the tip making sure each loop gets closer together while holding the tip tight then finally pull tight to secure the knot.
STEP 10: ADJUST AND WEAR
- Slide the closure to adjust the bracelet to your desired size. If you pull both sides of the bracelet you will open it so you can slide your hands.
- Then hold one tail between your fingers and your palm and pull the other tail until it fits your wrist.
- Your macrame bracelet is now ready to wear!
Notes
- Keep the tension consistent while making the knots to ensure a uniform look.
- Experiment with different bead sizes and colors for a unique design.
- If you’re new to macrame, practice the knots separately before starting the bracelet.
- Gently stretch the nylon cord before starting to prevent it from stretching out and loosening your knots later.
- If you don’t have a clipboard, you can use painter’s tape to secure the cords to your workspace. It holds well and removes easily without residue.
- Make sample knots on a scrap piece of cord to get a feel for the right tension before starting your actual project.
- Dab a tiny amount of fabric glue on each finished knot to ensure they stay secure over time if you don’t want to use the lighter.