DIY Mini Pallet Wood Sign for Valentine's Day
Valentine’s Day is here and love is in the air! If you are looking for some easy DIY handmade gift ideas, why not make a mini pallet wood sign for your valentine? Get the instructions here.
Equipment
- Hot glue gun and glue sticks
Ingredients
- A mini wooden pallet size will depend on what’s available
- Wooden letters that read L O V E. measure well the pallet width and height to make sure they all fit
- Pink acrylic paint or stain of your favorite color
- Nails and a hammer *optional
- Pencil and black marker
- Black crayon or color pencil.
- Piece of cloth
- Small paint brush
Instructions
STEP1: PREP WORK
- Firstly, clean your mini pallet well to remove dust and possible grease. Use sandpaper if you notice splinters coming out.
- I wanted a more washed look, like a stain that you can see the wood lines and grain so I diluted the paint 60-40 paint-water.
- Also, clean well your wooden letters.
STEP2: PAINTING THE MINI DIY PALLET SIGN.
- So here technique is totally up to each one. I wanted to stain the wood rather than paint it, so I used the cloth to apply the paint.
- Rub the paint roughly throughout each section making sure the wood would absorb the paint and let the wood grain come through.
- Use the brush only to make sure the creases get painted. Right after, rub the paint again with the cloth to avoid lumps of paint.
- Keep going until you cover the whole pallet board.
- Also, paint the sides.
- Once you painted everything let it dry for a few minutes.
- That’s the other perk of applying the paint like this, it dries even faster.
STEP 3: ADD SOME VOLUME TOUCHES
- With your black crayon or color pencil mark or trace the creases of the mini pallet. This is to give a more worn-out rustic look.
- I also rubbed a bit more the cloth everywhere to make sure everything looks even.
STEP 4: GLUE THE WOODEN LETTERS
- This is my favorite part.
- Play around with your letters to make them fit in your space. It’s like a puzzle.
- Once you like the placements, Add hot glue to each letter and glue them to the wood pallet sign.
- If you like, you can put some nails on the back to secure them well.
- When you finish you could have something like this:
STEP 5: HAND LETTERING YOUR MESSAGE
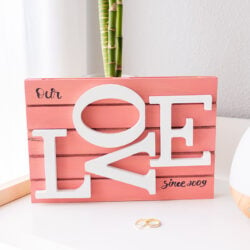
- My final step and rustic touch were hand-lettering the word “our” on the top left corner and “since 2009” on the bottom right corner so it would read “Our LOVE since 2009”.
- There you go! One cute way to celebrate your valentine and the love you have shared with a beautiful sign!