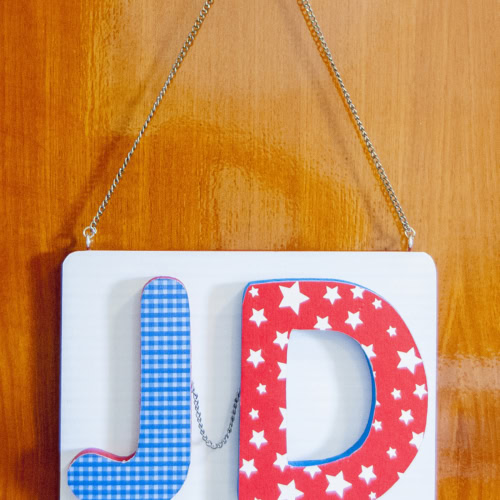
DIY Name Door Sign With Mod Podge for Kids
Create a fun DIY name door sign for your kids room using Mod Podge! It’s easy, budget-friendly, and customizable—perfect for personalizing any room.
Equipment
- Hot glue gun and glue sticks
- Foam brush
- Normal brush
- Scrapper
- Nose Pliers
- Ruler, pencil and scissors – just in case
Ingredients
- A wooden board I used a $1 frame because I couldn’t find a board where I was
- Mod Podge
- Wooden letters
- Paper scraps or sheets of paper
- Acrylic paint
- 2 hook screws
- Chain
- 2 Jump rings
Instructions
Step 1: Prep Work
- Protect the surface where you are going to work. Paper, cardboard, or plastic will do.
- I rarely do it, but you can use gloves to protect your hands from paint and mod podge. I really enjoy the whole messy thing LOL.
Step 2: Prep and Paint
- Firstly start by painting the edges of your wooden board and letters. For my brother’s sign, I used red and blue paint—bright, bold colors that made it pop.
- I found this wooden frame in the $1 section at Walmart or Target (don’t remember) and it worked perfectly. But if you have a solid wood board that will do too.
- Let the paint dry completely before moving on.
Step 3: Mod Podge the Letters and Board
- Once the paint is dry, apply a layer of Mod Podge to the front of the letters and the wooden board.
- For a fun contrast, I picked red paper for the blue-edged letters and blue paper for the red edges.
- Place your paper scraps onto the letters and smooth out any bubbles with a scraper. Sorry I completely forgot to take photos of this step (I got carried away crafting)
- Let everything dry thoroughly before proceeding.
Step 4: Trim the Paper
- After the Mod Podge has dried, use a craft knife or cutter to carefully trim any excess paper around the letters and the edges of your board. Use a cutting mat for this.
- Follow the natural shape of the letters and board to keep it looking clean and polished.
Step 5: Seal the paper with mod Podge
- After the paper is securely in place and trimmed, it’s time to seal everything. Apply a generous layer of Mod Podge over the surface of the paper on both the letters and the wooden board.
- This top coat not only seals the paper but also gives it a smooth, slightly glossy finish that helps protect it from wear and tear, keeping your project looking fresh and vibrant for years to come.
- Make sure to let the Mod Podge dry completely before moving on to the next step.
- At first, you might see the Mod Podge white and filled with strikes, but it’s ok, the mod podge gets clear once dry.
Step 6: Add the Chain
- This part is where the “boyish” vibe comes in! My brother wanted something cool, so I added a chain between the letters for a rugged look. Hot glue the chain to the back of the letters. It’s totally optional though.
Step 7: Assembling the sign
- Then glue the letters to the wooden board with hot glue. Apply abundant hot glue to make sure it’s secure.
Step 8: Attach the Hanging Hardware
- Next, screw two small hooks into the top corners of your board. Go slow to avoid cracking the wood.
- Use jump rings to connect the chain to the hooks. Open the jump rings with pliers, attach one end of the chain, hook them through the rings, and close them back up.
- Repeat the process with the other hook.
Step 9: Hang It Up!
- Here’s a tip: If you don’t want to drill holes into the door (like my dad), you can use heavy-duty adhesive hangers (Like 3M Command). They work like a charm and won’t damage the door.
- And there you have it—your very own DIY name door sign!