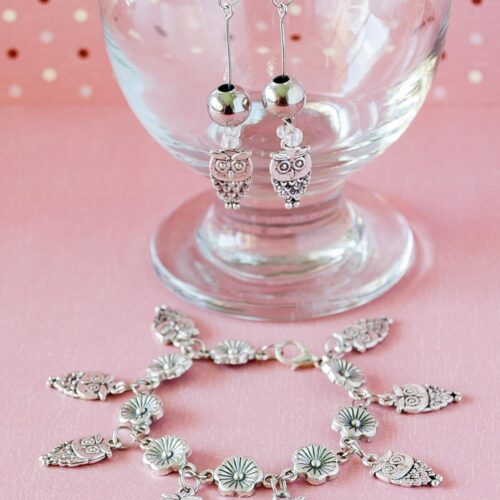
DIY Owls Charm Bracelet and Earrings
Are you a total owl lover? Then you’ll want to check out this adorable and easy DIY owl charm bracelet and earrings tutorial! Get ready to show off your new accessories and be the talk of the town… or school… or library!
Equipment
- Round nose pliers
- Bend flat nose pliers
- Flat Nose Pliers
Ingredients
- Owl charms about 10 or so – or your favorite ones.
- Connectors about 8 or so – I used cute flowers but feel free to use your favorite ones.
- Jump Rings about a dozen – 5 to 6 mm.
- 1 lobster clasp.
- 2 eye pins.
- 2 earring fishhooks
- 4 2mm clear beads
- 2 8mm metal beads
Instructions
THE BRACELET
- For the bracelet, I started joining the connectors with jump rings until I reached the length I needed.
- For this, you open the jump ring using 2 pliers (preferably flat) slightly pushing one forward and the other towards you.
- Insert 2 connectors (flowers) and with the same technique, close the jump ring but backward.
- Make sure you insert the connector facing the same side if yours are like mine and the other side was completely flat.
- When you reached the desired length of your bracelet it’s time to install the clasp.
- I usually use double jump rings for this because it makes it more difficult to slip out.
- And finally, I added the pendants hanging them with jump rings.
- Here again, use the same technique described above to open and close the jump rings.
- Also, make sure all the pendants face correctly. In my case, they were the same on both sides, so I was good.
- Done!!! You got yourself a gorgeous diy charm bracelet!
THE EARRINGS
- Now for the earrings, I started with the eye pins. I made another eye on the other end with needle nose pliers.
- As you can see not perfect but it did the trick.
- So the right way to make a loop to create an eye pin is to put the end of the pin between the jaws of the round nose pliers and bend the wire all around the pliers to make a circle. Adjust the position of the pliers and make the end of the wire reach the wire body.
- I ended up with something like this:
- Then I inserted 2 beads and one owl charm into an opened jump ring.
- Before closing the jump ring, I inserted the eye pin.
- Then I inserted the metallic bead in the eye pin
- Finally, connected it to the earring fishhook with double jump rings.
- Tadaaaaaa! The cute owl earrings are ready to use.