Diy Paper Christmas Village Tutorial
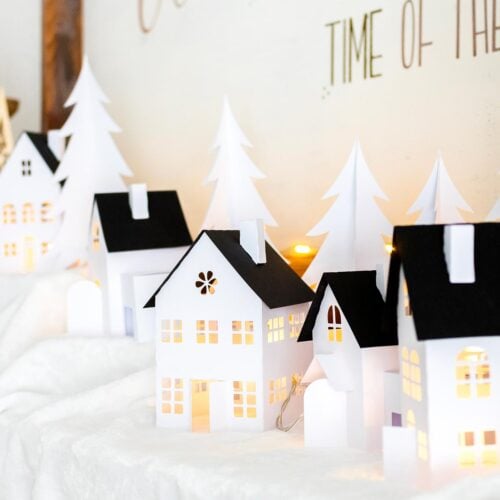
It’s amazing what can be done with just paper and glue. This cute paper Christmas village is a perfect holiday season night craft and a special Christmas decor for sure.
Equipment
- Cutting Machine (Cricut or Silhouette) Printer and an X-acto
- scissors
Ingredients
- Cardstock White for the house and black for the roofs or your favorites, glitter paper looks so cute!
- Contact glue I Love UHU or light temperature glue tool and glue stick.
- Light string.
- Fleece to simulate the snow
- Any other decoration you might have and want to add.
Instructions
STEP 1: GETTING YOUR PAPER HOUSES CUT:
- Snag your cut files to your computer and then open them in your electronic cutting machine app. In my case, I used the Silhouette Cameo app studio.
- The files include a pdf version, silhouette files, and SVG files for your convenience.
- When you are ready, get your cutting settings ready to go (blade, cardstock type, etc).
- On the cutting mat (sticky side up) place your cardstock (or is it card stock???) on the sticky side of the cut mat. I wanted to make the roofs black so I separated the white cardstock at the top and the back at the bottom.
- Load cutting mat on your machine once your design is locked and ready.
- Double-check the settings mentioned above.
- Click “Send” — watch the cutting magic begin!
STEP 2: ASSEMBLING YOUR CHRISTMAS VILLAGE HOUSES
- When you remove the paper you will reveal your designs, it’s so cool. A good cut will just lift right off.
- Then carefully lift your designs off of your cutting mat.
- Remove the excess paper around your designs and windows because sometimes it happens when the cuts are small.
- Then start folding along the dashed lines and you’ll see exactly how the house should come together.
- Start gluing your flaps and securing tricky spots.
- Roof and chimney are one of those. I like to turn the house over and using a pen or the back of your hook tool to secure the flaps from the inside.
- Carefully fold and glue each part of the house like garages on the side of the house and other parts.
- If you want to go the extra mile you can cut pieces of vellum paper or tissue paper and cover the windows on the inside of the houses. I thought about that too late.
STEP 3: ASSEMBLING YOUR VILLAGE TREES
- For the trees, fold them in half and glue side by side of the tree until they meet the first one again.
- You can glue 3 or 4 pieces.
- Let them dry.
STEP 4: PUTTING THE CHRISTMAS VILLAGE TOGETHER
- The last part and in my opinion the most exciting one is putting the Christmas Village together.
- I decided to make my Christmas village in my special place… My mantel!
- I used fleece as my “snow” and created hills with card boxes underneath them.
- Then place houses and trees along the space to create a cute vignette on my mantel.
- I wanted to lighten up the houses but didn’t want to use battery candles because I thought it would be so annoying to turn each one on and off so I went for a light string. It even gives a vibe of fairy lights, so magical!
- I place it along the mantel inserting some of the led bulbs through the back windows. Here if you had added the vellum or tissue paper, you can just cut them a bit exactly where you need the light to go through.
Notes
NOTE:
Just please keep in mind that for Cricut users, I’ve heard the SVG get a bit messed up in their app. Score lines/fold lines turn into solid lines which are read as cut lines and sometimes the elements don’t show in the right size. So there’s that.
The files shared include a pdf version, silhouette files, and SVG files for your convenience.
The files shared include a pdf version, silhouette files, and SVG files for your convenience.