DIY Pink Christmas Card - A Winter Magic
Create your own adorable Pink Christmas Card with this super easy and fun DIY tutorial. Spread joy and love this holiday season with a personalized touch.
Equipment
- Ruller
- scissors
- Pencils
- Craft knife
- Cutting mat
- Hot glue gun and glue sticks
- Tweezers
Ingredients
- White cardstock 12×6 inches.
- Scrapbooking paper of your taste – I used a flower-patterned one that is light pink with pink flowers and then a pink background with light pink flowers.
- Dark pink or fuchsia cardstock
- Light pink embossed paper 6.8×6.8 inches.
- An illustration. I used this cute one called Annabelle and the Tree from Wild Rose Studio but you can use your favorite one or even a photo.
- Red satin Ribbon
- Silver marker
- A Sentiment cut on a paper ribbon.
- Pink and clear rhinestones.
- Universal Glue
- Double-sided tape
- Foam Double-sided tape to give volume.
Instructions
- Firstly, start creating your different card pieces. Follow the Free Template Patterned shared on the blog post for measurements and shapes. Also, print the illustration or photo.
- The card pieces in the template file are 100% of their size so you can print and cut them to use them as templates for the actual materials you are going to use. For the envelope, however, you need to draw it on a larger cardstock piece following the pattern because it didn’t fit in a letter sheet.
- Once you have all the pieces cut we can start.
THE CARD
- Ok so first, fold in half the main white cardstock as it will be the card base. Leave it aside.
- Use the light pink embossed cardstock (or the one you chose for this piece) or Layer 2 from the pattern as a temporary base. You will be assembling all the pieces on this piece and later glue it to the main card.
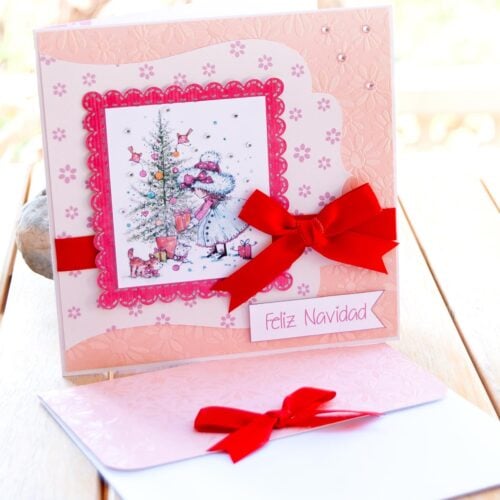
- Glue your Layer 3 (patterned paper or scrapbooking paper) shape on the layer 2 aligned to the left edge.
- Cut a strip of red satin ribbon longer than the layer 2, place it on top of layers 2 and 3, and glued it with hot glue on the back at about 2/3 of the card from the bottom up.
- Take layer 4 (scalloped rectangle) and put foam double-sided tape pieces around the back and glue it to the card right in the center of layer 3 and on top of the ribbon.
- This will create a feeling of 3D, volume on the card.
- Then get your illustration and glue it in the center of layer 4. You can use glue or double-sided tape. Also, you can choose flat or foam double-sided tape.
- At the bottom right of the composition, place your paper ribbon sentiment. I made it in Spanish since my mom speaks Spanish and it means “Merry Christmas”.
- Use the foam double-sided tape to make it stand out like the illustration.
- Here’s a quick overview of how the layers should look like:
- Then make a cute ribbon bow with the same satin ribbon you already used for the card and glue on the ribbon strip right next to layer 4 overlapping the illustration.
- To add a touch of sparkling magic, glue a few light pink rhinestones on the embossed cardstock where it makes sense. In my case, I used them as the center of the embossed flowers. And also put some clear rhinestones on the illustration as the snowflakes.
- Cut an 8×6-inches piece of scrapbook paper in inverted color from the one used in layer 3 and glue it to the inside of the left side of the card. Basically, place it where you would not be writing.
- Finally, glue the layer 2 with the whole decoration as centers as possible to the front side of the card with foam double-sided tape.
- Your card is finished!
THE ENVELOPE
- This envelope is super simple (I’ll show a more detailed tutorial on how to make one on another post).
- Having the envelope pattern cut, fold through the score lines shown above.
- First, fold the lateral flaps.
- Apply a line of glue along the flaps and fold over the longer (inward) flap and press to adhere it well.
- Cut a piece of cardstock (preferably the same one you used in layer 2) the size and shape of the top closing flap of the envelope.
- The final touch is a cute ribbon bow glued in the center bottom of the closing flap!
- That’s it. A cute and full of love Christmas card for your beloved ones!