DIY Pom Pom Garland for Valentine's Day
A DIY pom pom garland is a quick and easy craft and a super fun way to add a whimsical element to your home. It doesn’t take big crafty skills to do this DIY project, so I’d encourage you to give it a try and even get your kids involved in making it! Learn how to make one with this easy tutorial.
Equipment
- Sharp scissors
- An embroidery or tapestry needle
Ingredients
- White yarn or twine if you want a more rustic look.
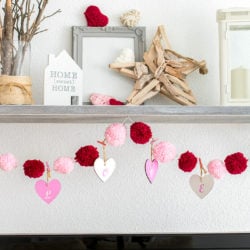
- 16 pom poms 8 pink, 8 red and the size of pom poms are totally up to you or more if you prefer.
- 4 wooden hearts ornaments with L O V E letters painted on each with hangers
- Mini Clothe pins
Instructions
STEP 1: PREPARE THE POM POMS
- Firstly, if you haven’t already made all the pom poms. You can make them with pom pom maker or with cardstock. Follow these tutorials to make your own pom poms. Make sure they are fluff and ready to go trimming any weird strings of yarn. You can also play with the size of the pom poms.
STEP 2: PREPARE THE GARLAND STRING
- Then cut a long piece of yarn. the length of the string will depend on where you will hang it, so make sure is long enough to go from one end to the other of your mantel or preferred place plus 2 inches on each end for attaching.
- Insert the end of your yarn into your needle hole. If it’s too thick, use a piece of thread, insert a loop through the hole, then insert the end of the yarn through the thread loop and then pull back the thread and bring the yarn with it. See video.
STEP 3: START INSERTING THE STRING THROUGH THE POM POMS
- Then insert the threaded needle through the center of your fluffy pom poms.
- The best way to do this is to make sure you find the heart or center of the pom pom where all the strands of yarn converge.
- Insert right there your threaded needle and then push it through until you see the need on the other side.
- Then pull the needle out and push the pom pom down close to the other end of the long piece of string.
- Repeat the process with all your pom-poms alternating colors.
STEP 4: HANG THE HEART ORNAMENTS
- Spread them evenly along the length of your garland and decide where your hearts will be.
- Using your mini clothespins secure your heart charms on the yearn between pom-poms. If you want to learn how I made these cute wooden hearts check out this post.
STEP 5: LET’S GET HANGING!
- Lastly, hang your garland. Woot!
- Voila! There you go!