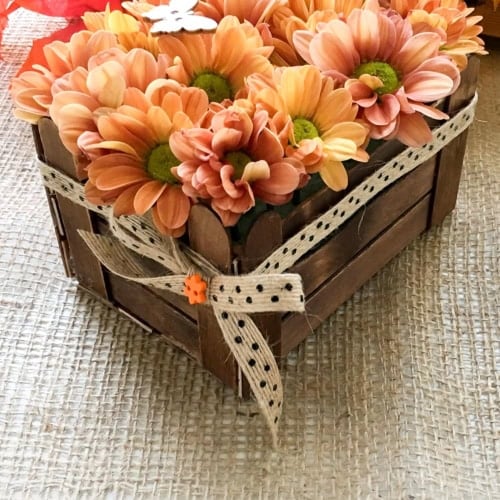
DIY Popsicle Stick Thanksgiving Flower Centerpiece
Make a small Thanksgiving flower centerpiece using popsicle sticks, ribbon, floral foam, and fall flowers. This handmade mini crate can be filled with fresh, faux, or dried flowers for your Thanksgiving table.
Equipment
- Hot glue gun
- Craft knife
- Metal ruler
- Cutting mat
- scissors
- Paintbrush or cloth, if staining
Ingredients
- 20 to 25 popsicle sticks or wooden craft sticks
- Wood stain or craft paint optional
- Hot glue sticks
- Jute ribbon
- Grosgrain ribbon
- Wooden skewers optional
- 1 small floral foam block
- Plastic wrap if using fresh flowers
- Fresh faux, or dried fall flowers
- Small butterfly buttons or other embellishments optional
- I would use 20 to 25 sticks rather than giving an exact number. The original instructions don’t provide enough measurements to calculate a fully reliable number and the total will change depending on the crate size and any mistakes while cutting.
Instructions
Stain the popsicle sticks
- Apply wood stain or paint to the popsicle sticks, if desired. I used a dark walnut stain for a rustic wood finish.
- Place the sticks on a protected surface and allow them to dry completely before assembling the crate.
Cut the pieces for the side panels
- Cut one rounded end from the popsicle sticks that will be used as the upright supports. Leave the top ends rounded to create a small fence-like shape.
- Trim both rounded ends from the horizontal sticks. Measure carefully so the matching pieces are the same length.
- Each side panel will need two upright sticks and three horizontal sticks.
Build four side panels
- Place three trimmed sticks horizontally on the work surface.
- Glue one upright stick across each end, keeping the straight-cut ends aligned along the bottom.
- Repeat until you have two longer panels and two shorter panels. Let the glue cool before moving them.
Make the bottom panel
- Lay four popsicle sticks side by side.
- Cut two support pieces to fit across them and glue one near each end to hold the base together.
Assemble the crate
- Glue one short panel to one long panel. Continue attaching the panels until all four sides are connected.
- For extra support, glue short pieces of wooden skewer vertically inside the corners.
- Glue the completed crate walls onto the bottom panel. Check that everything is aligned and allow the glue to cool.
Decorate the crate
- Wrap jute ribbon around the middle of the crate and secure the ends with hot glue.
- Layer grosgrain ribbon over the jute and add a small bow or other embellishment where the ribbon ends meet.
Prepare the floral foam
- Cut the floral foam to fit snugly inside the crate.
- For fresh flowers, use wet floral foam made for fresh arrangements. Soak it according to the package instructions and line the crate with plastic wrap before adding it.
- For faux or dried flowers, use dry floral foam. Do not soak it.
Arrange the flowers
- Trim the flower stems and insert them into the floral foam.
- Start with the larger flowers, then add smaller flowers, leaves, and greenery until the arrangement looks balanced.
Add the final decorations
- Glue butterfly buttons or other small decorations onto pieces of wooden skewer.
- Insert the skewers between the flowers as a finishing touch.
Notes
Use a craft knife and metal ruler for straighter cuts. Scissors can crack or split the popsicle sticks.
Make several light passes with the craft knife instead of trying to cut through the wood in one motion.
Apply most of the hot glue inside the crate so the finished outside looks neater.
Always line the crate with plastic before adding soaked floral foam.
Place a fresh flower arrangement on a small plate or tray to protect the table from moisture.
Remove wet floral foam after the flowers are finished and allow the crate to dry completely before storing it.
Handle the finished crate from the bottom because the popsicle sticks are lightweight craft wood.
Make several light passes with the craft knife instead of trying to cut through the wood in one motion.
Apply most of the hot glue inside the crate so the finished outside looks neater.
Always line the crate with plastic before adding soaked floral foam.
Place a fresh flower arrangement on a small plate or tray to protect the table from moisture.
Remove wet floral foam after the flowers are finished and allow the crate to dry completely before storing it.
Handle the finished crate from the bottom because the popsicle sticks are lightweight craft wood.