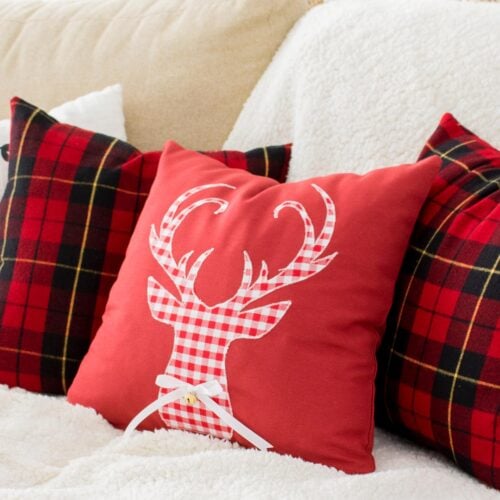
DIY Reindeer Applique Plaid Christmas Pillows
Festive and pretty Reindeer Applique Plaid Christmas Pillows are a fun and cute project that will dress up your room for Christmas. Bring the festivity to your home while enjoying a special and cozy space with this tutorial showing how to cut fabric, create the applique and sew the pillow cover.
Equipment
- Sewing Machine
- Normal foot and zipper foot.
- Cutting Machine – Silhouette Cameo or Cricut
- Coordinating threads, pins, sharp scissors, and measuring tape.
- Iron or heat press.
Ingredients
- Solid Fabric size of your pillow +1cm
- Buffalo Plaid fabric size depends on the size of your design. If it’s this one would be 11×12 Inches
- Interfacing – of your favorite fabric stabilizer
- Zipper – the size of your pillow
- A Pillow Insert.
Instructions
STEP 1: DESIGN REINDEER APPLIQUE
- I start by ironing the fabric and then set it aside.
- Prepare your design. I made this Reindeer silhouette and prepared it for my project needs on my silhouette studio software. If you like it, you can download it here.
- I used the total height my cutting mat allowed me.
- With defined measures proceed to cut the fabric piece to the size needed. In this case, mine was 11×12 Inches.
STEP 2: PREPARE AND STABILIZE THE FABRIC
- Before moving on we need to stabilize our fabric. For this tutorial, I chose the fusible interfacing method. But there are many others.
- Now cut your interfacing (or Fusible Web of your choice) just slightly smaller than your piece of fabric so it won’t stick on your iron.
- Place the interfacing shiny (non-paper) side against the back side of the fabric.
- Hot iron interfacing and fabric together. Place the fabric right side up, so your interfacing is underneath your fabric with the paper backing against the ironing board.
- Once it has cooled, carefully peel away the paper backing. You’ll see the interfacing adhered to the fabric.
STEP 3: CUT YOUR FABRIC WITH THE SILHOUETTE
- Place the fabric right-side up and the sticky side on the Silhouette cutting mat. There is a little more to this than just slappin’ it down on the mat. It’s very important that the fabric be well-adhered to the mat. If your mat is full of lint, dust, or paper bits, then you might not get a clean cut. If the mat has started to lose some of its stickiness, then spray a Repositionable Adhesive Spray to the back of the fabric/fusible web before placing it on the mat.
- Load the mat into the silhouette machine.
- Be sure to be using the fabric blade (the blue one or a standard brand new blade that you can use only with fabric).
- Choose the cut settings which is Fabric Cotton Print. When I choose this setting, the software sets the thickness of the cut to 3 but, I’ve found that I I get great results and a perfect cut by setting my blade depth at 4 when the fabric seems thick. You would need to test what works for you.
- Send the design to the Silhouette to cut. (you can do this with your Cameo or Portrait!).
- Carefully, peel away all the surrounding fabric from the mat leaving only the deer.
- Then really carefully start peeling off your deer from the mat.
STEP 4: INSTALL THE REINDEER APPLIQUE
- Once done place it onto the front piece of your pillow. Mine I chose centered horizontally but closer to what I choose to be the base (where the zipper will be).
- Iron the design onto your fabric.
- Top zig-zag stitch around the whole design. Slow and steady is best.
- Your pillow design is done!
STEP 5: INSTALL THE PILLOW COVER ZIPPER
- Fold about 1 cm (0.4 Inch) wrong sides together of the bottom side of your fabric and Iron it. Do this on both pieces.
- Then align your 2 pieces of fabric (folded sides together) and place your zipper on top as centered as possible.
- Now, align your zipper from end to end to the folded edge on top of the folded side. Pin in place on both sides making sure the 2 pieces are still aligned.
- If you turn it you will see the zipper is not visible.
- My zipper was slightly larger than my pillow size so I centered it. Once you finish pining zipper in place you will get something like this:
- The first thing you need to do is to put your zipper foot on.
- I found out easier to work with the zipper unzipped. I mean all open.
- Be sure you are back to a regular straight stitch and start at the end of the zipper farthest away from the zipper handle sewing just like you would any other straight line, but keep it as close to the zipper teeth as possible.
- When you get to the zipper pull you won’t be able to keep going because it takes up some space. So stop just a little bit away from it, keeping your needle down in the fabric (if possible.) Lift your foot and carefully zip the zipper past the foot, lower your foot and continue to the end of the zipper. Backstitch to end your stitch.
- For the other side, I do the same I did but I start from the other end as I mentioned. That way I keep the fabric always on the left side of the sewing machine. Am I too weird?
- Your zipper is installed. Woohoo!
- But before moving on we need a final touch to the zipper. Zip the pillow all the way shut and about 1 cm (0,4 Inch) from the fabric edge, stitch across the zipper along the edge for the beginning of the zipper and then open it slightly and align the zipper ends. Stitch again but this time across the zipper. Just a few stitches about an inch long onto the zipper.
- After you zipped the pillow part way in the step above, you will want to cut off any overhang on the zipper track
STEP 6: ASSEMBLE THE PILLOW COVER
- Next up, zip the pillow about three-fourths of the way shut. Your fabric squares should still line up nicely when you do this. If off a little – you should be okay. But if you see some significant shifting at this point (which it shouldn’t) you will need to unpick one of the sides of the zipper and redo it.
- Go back to your machine, put your regular foot back on and sew the remaining edges with a 1/4 inch seam allowance, cutting across diagonally at the corners.
- Then I like to zig-zag stitch the edge (serge without a serger) to make sure the fabric won’t fray. This will give your edges a finished look and keep them from fraying.
- You’re ready to turn your zippered pillow cover right side out! My favorite part! I usually use my scissor tips to help fully push out the edges (but very carefully!) you don’t want to rip your beautiful new pillow cover! Iron it and you are ready!
STEP 7: ADD SOME EMBELLISHMENTS
- The final touch was making a cute ribbon bow with a Jingle bell. Stitch it to the neck of the reindeer and you are done!
- Now, get a throuw pillow in there and enjoy!!!