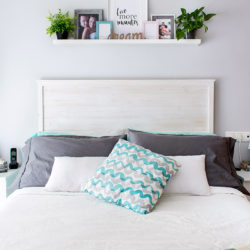
DIY Rustic Wooden Headboard
Add some rustic charm to your master bedroom with this simple Rustic Wooden Headboard. No need to spend a lot to make your bed look gorgeous! We’ll show you how to build yours, from design to construction in an easy, fun, and inexpensive way!
Equipment
- Drill
- Screwdriver
- Hammer
- Clamps
Ingredients
- Main Wooden Headboard:
- Shiplap boards. Size and number will depend on your bed’s size I used 7 140 x 10 x 1,3 cm (56x4x1/3 Inch
- Pinewood board for legs 2x4s is enough
- Screws appropriate for your board’s size
- Paint of your choice.
- Sandpaper 80, 150 and 250 grit
- Wooden Headboard Frame:
- 1 Pinewood board 1×2 – 53.15 Inches (135 x 3 x 1,5 cm)
- 1 Pinewood board 1×2 – 57.5 Inches (146 x 3 x 1,5 cm)
- 2 Pinewood board 1×2 – 31.5 Inches (80 x 3 x 1,5 cm)
- 2 Pinewood board 1×1 – 31.5 Inches (80 x 3 x 1,5 cm)
- Headless nails
- Sandpaper
- Wood glue
Instructions
- First thing I did was protect the area where I was going to work. I put plastic and used masking tape to secure the plastic in place. I left my rug underneath so I wouldn’t make so much noise LOL. You will see why in a bit.
- Also, cover electronics and other furniture if you have (I didn’t have much at the moment.)
- We started this headboard by taking measurements of the bed frame that the headboard was being made for. You will want to measure to the outside edge of the bed frame headboard brackets.
- Then you will want to add 1-2″ to the total distance to give a slight overhang. You definitely want to make sure the headboard doesn’t look skinnier than the bed after the pillows, comforters, etc are added as mine does. We learn from mistakes, right? Still, I love how mine turned out!
- Of course, you need to select the height of your headboard. First, we measured the distance from the floor to the top of the mattress. Then we determined how tall we wanted our headboard to be by measuring from slightly below the batters top to where the top of the headboard would be. With some simple math, I divided that number by the width of the shiplap to know how many boards to use.
- Once all measures are done, get your shiplap cut and all the smallest boards too.
- I wanted the headboard boards to look used so I hammered it. I actually released a lot of stress there. I just hit it hard LOL. I also used screws and nails and hammered them against the boards so it would get more marks. That’s why I needed my rug. I live in an apartment so I didn’t want the whole community mad at me.
- Then lightly sand each board especially on the edges with an 80 grit sandpaper to avoid splinters.
- Once finished, clean them well with a piece of cloth. Make sure they are dust free.
- Shake your paint and start painting.
- I love this paint because it lets the wood marks show up. I don’t live in the USA so I can’t really tell you what brand to use, but you can ask at your local hardware, for a satiated, whitewashed paint. The paint also blocks UV and is waterproof. As I mentioned above, The only problem is that it gets shiny because it’s kind of plastic.
- Paint each board in the same direction as your wood marks. Let it dry at least 2 hours between coats and give a slight sanding (150 grit). Clean too. I used 3 coats to get a really white shade.
- Once done with all the coats, let it dry overnight and give a final sanding with a fine grit sandpaper. I used 250. Again clean well.
- Since the shiplap boards come with these rabbeted edges that fit each other, you just need to slide one to the next until you have them all together. Of course, make sure the side edges are aligned and right side facing the floor (or the table.)
THE PINEWOOD BOARDS FOR THE WOODEN HEADBOARD LEGS.
- Measure and mark the height that will go off the headboard.
- Place one leg board about 10-11 inches (30 cm) from each side. Decide each screw spot and mark. I like to drill a path for screws but if you feel confident you can skip this step. Then screw each screw in place. I placed 2 per board.
- The Original wooden Headboard was done at this point. I screwed a closed hook to the inner side of the leg boards and drilled a hole on the wall for an L-shaped hook.
- There you go! The main headboard is done, now needs the upgrade.
WOODEN HEADBOARD FRAME:
- Let’s start by mounting and presenting the pieces in place just to make sure everything fits and everything is looking good.
- Then is good to give each piece a slight sanding, again to avoid splinters. As for the main headboard, I sanded it really hard trying to remove that shiny aspect that’s why you see so much pinewood color showing up.
- Next, fasten the side back 1×1 piece to the 1×3 front piece with glue and secure with clamps, as shown. Once the glue has dried, apply some nails along the back piece. Use a really thin nail to avoid cracking the wood. Repeat with the other side pieces.
- Put it in place to make sure is all fine. If so, then paint all your pieces with the same paint and using the same technique as before BUT I used one less coat because once it’s all done I’ll give the final paint coat. Let it dry for a couple hours.
- Sand each piece, use sanding machine when possible and paper for edges and narrow sides. Clean each piece well.
- To start framing, let’s start with the top piece. Find the center of the headboard, 136×3 and 146×3. Mark it.
- Apply glue to the back of the 136×3 and match center marks making sure the edges are aligned. Secure in place with clamps. Let it dry and then screw along the top edge to secure it even more.
- Same process for the sides. Apply glue, fasten with clamps to each side and make sure it matches the top side of the frame.
- Again, on the back screw in some screws to secure boards from the back.
- For the very top piece, you need to do the same as the first piece. You already should have marked the center. So, apply glue along the board and then making sure both centers marks match and the back of both are aligned. Secure with clamps. Let it dry very well.
- Once the top piece is dry, Measure the front edge to the center of the side frame piece. Then mark that measure on the top where you want to put some headless nails to secure it.
- In order to avoid damaging the wood, I used a piece of cloth and hammers it on top of it.
- There you go! The rustic wooden headboard is basically done.
- The last step is optional but you can give a last coat of paint to make sure the color is even.