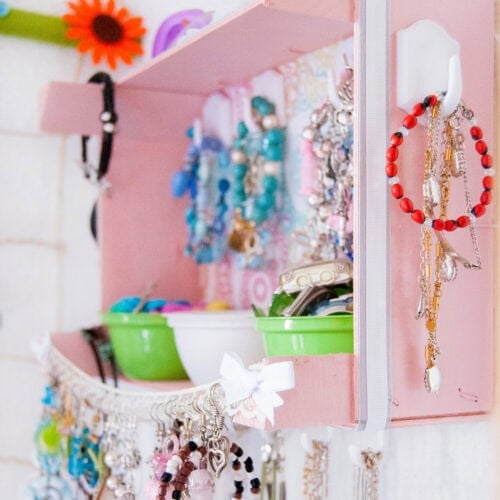
Diy Wall Jewelry Organizer with An Upcycled Fruit Crate
This DIY wall jewelry organizer is a creative way to upcycle a fruit crate into a beautiful and practical storage solution. Plus, it adds a touch of rustic charm to your home decor!
Equipment
- Hot glue gun and glue sticks
- A brush
- Screwdriver
- scissors
Ingredients
- 1 wooden crate – upcycled from a fruit crate or any wooden box or drawer will work.
- White water-based spray paint – smell less than the normal ones.
- Water-based spray paint in your choice of colors – I used pink and green for a pop of color.
- Spray primer.
- Ribbons and lace – for decorating and holding earrings.
- Small plastic containers I used upcycled ones – perfect for rings and watches.
- Scrapbook paper – to line the inside of the crate.
- White glue or Mod Podge – to seal the scrapbook paper.
- Small self-adhesive hangers – to hang bracelets.
- Small self-adhesive cup hangers – for the bottom of the organizer.
- 1- inch framing sawtooth hangers and small screws.
- Sandpaper – 150 and 400 grit
- Protective paper or plastic.
Instructions
Step 1: Clean and Prep the Crate
- Start by giving the crate a good sanding with the 150 grit sandpaper and thoroughly clean the crate and the small containers.
- Protect the work surface to prevent any paint stains.
Step 2: Apply the Base Coat
- Spray paint the crate with a primer or a white base coat. This helps the top color coat to stand out more effectively. Allow it to dry completely before proceeding to the next step.
- Apply prime to the plastic containers too. Let them dry well.
Step 3: Paint the Crate and Containers
- Give the crate another sanding to smooth the surface with the 400 grit sandpaper.
- Choose two colors for spray painting the crate and containers.
- Spray the crate with one of the colors (in my case, pink) and the small containers with the other color (two were painted green, and one was white).
- Wait about an hour between coats and apply a total of three coats for complete coverage.
- Let everything dry overnight to ensure it’s fully set.
Step 4: Line the Crate with Scrapbook Paper
- Measure the scrapbook paper to fit the bottom of the crate.
- Apply white glue, thinned with water for easier application, or use Mod Podge.
- Once the paper is secured, apply another coat of glue or Mod Podge over the top to seal it.
- Allow it to dry thoroughly (about 2 hours).
Step 5: Attach the Hangers Inside the Crate
- Once the crate is dry, attach small hangers along the inside, near the top.
- Space them evenly to hang bracelets.
- Additional hangers can be attached on the sides of the crate for added storage.
Step 6: Attach Cup Hooks for Necklaces
- On the outside of the bottom side (what would normally be the crate’s base), attach cup hooks.
- What makes these special is the “U” form that makes them perfect to be attached upside-down.
- These will be used for hanging necklaces.
- For extra strength and durability (and to avoid the scare of your life if they fall in the middle of the night), reinforce the adhesive backing on the hooks with hot glue.
Step 7: Decorate with Lace and Ribbons
- Glue the lace along the wooden crate’s corners, securing it with hot glue.
- Add small ribbon bows at the ends for a decorative touch.
- The lace will serve as a place to hold earrings.
Step 8: Add Final Ribbon Details
- Take two different types of ribbon (e.g., light blue organza and white grosgrain) one wider than the other so you can layer them. Wrap them around the borders of the crate.
- Finish by adding a cute simple ribbon bow at the top for a decorative look.
Step 9: Install Wall Mounting Hangers
- On the back of the crate, attach framing sawtooth hangers.
- Make sure they are aligned and evenly spaced from the edges to ensure the jewelry organizer hangs straight on the wall.
- Put your plastic container on the base of the crate and you are done.
- And there you go, your super crafty diy wall jewelry organizer is ready to be used!!!
Step 10: Organize your Jewelry
- Hang all your bracelets and necklaces.
- Use your plastic containers for things you can’t hang like rings, brooches, and watches and the top for other pieces or decorating items.
- Hang all your earrings from the lace.
- You are done! Now you have all your jewelry pieces organized in one place!