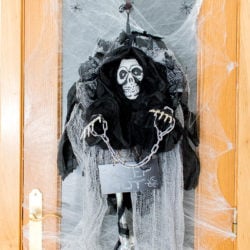
Easy DIY Halloween Skeleton Wreath
Get crafty this Halloween by making this easy DIY skeleton wreath. Not only will it look great on your front door, but it might just give that special trick-or-treater a fright! The best part is, no glue is needed to create this wreath, just lots of pins. Make yours here.
Equipment
- Your hands!
- Scissors maybe.
Ingredients
- Craft foam Wreath
- Black fabric any type goes and enough to wrap the foam
- Grey creepy Cloth rags
- Skeleton skull hanging decor – preferably those that come with a parca outfit.
- Plastic skeleton hands feet and arms
- Bats rats, or any other creepy plastic animal, like plastic spiders, rats, bats, bugs, ravens, etc. Even spooky eyeballs if you dare!
- Black ribbon for hanging
- Straight pins
- Small Chalkboard sign
Instructions
- Take your foam wreath and wrap it with your black fabric. It doesn’t have to be perfect. Actually, the least perfect, the better.
- Pin the fabric on the back to secure it.
- Once you are done, then wrap it with your creepy cloth. Here again, nothing perfect, it’s almost like where it lands, it’s fine! LOL.
- Add a few pins to secure.
- Bring the skeleton!!!
- Depending on the size of your wreath foam and your skeleton, it might fit tight or get loose. You can always secure it with pins or even with wires in the back. It all depends on your skeleton.
- In my case, the skeleton was itself a decoration it had its own rags like a parca, so I inserted the rags through the wreath to the back.
- Fit your skeleton inside the wreath and fix all the rags around the head. Secure with pins in different places.
- Adjust the skeleton’s hand position as desired. Most of these decor has its parts made with wires so you should be able to adjust them too.
- Time to add some creepy animals.
- If your plastic rats and bats are hollow, you might be able to pin them to the wreath. What I did was to find one hidden place between a leg and the belly and inserted the pin there.
- Then I pin it to the wreath.
- The same with the bats, but in this case, there was no hidden place so I used black pins.
- Then you can add more spooky details, like skeleton legs, or more hands, spiderwebs. In this case, I put a skeleton leg and a chalkboard sign saying keep out.
- The last detail is the hanger. I used a black ribbon to make the hanger.
- There you go! You got yourself a spooky, creepy Halloween skeleton wreath for your door!