Easy DIY Rustic Spring Wreath
If you love Spring as much as I do and also love wreaths, you will so love this Easy DIY Rustic Spring Wreath. Easy, pretty and on a busget!
Equipment
- Hot glue gun
Ingredients
- 10-12 Felt Flowers and leaves
- 1 Grapevine Wreath
- 1 Green felt
- Twine as needed
- 1 yard Burlap ribbon
- Hot glue bars as needed
- 1 “Home" Cut-out wood sign.
- 1 White Spray Paint *Optional if your sign isn’t white like mine.
Instructions
- Using your wreath as your base trace the shape of the space you want to decorate on your wreath.
- Cut it off and Let’s start.

- I started with both ends by gluing some leaves on each. This is optional, you can start however you like.
- Then make your composition over the green felt base. Arrange your Felt flowers as you love and in a way you will remember. Just play around with the flowers and leaves.

- Once you are happy with your opposition, start gluing each flower in place. Also apply some glue between flowers on the touching sides.
- Then glue the leaves every now and then where you had planed it.
- Now you have your bouquet. Place them on the wreath and make sure everything fits and looks as you like.
- Place your sign right above the bouquet and make sure you like how it looks. Adjust placement if needed.

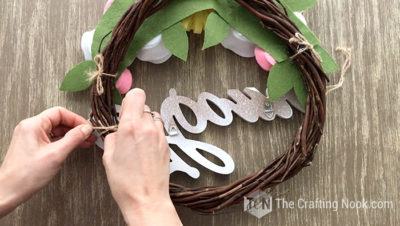
- Since I like to re-invent my wreath for every season or holiday, I never use hot glue or anything permanent to affix things to the wreath. I rather use twine, yarn, even wire but nothing that would damage the wreaths. It makes taking it apart and making another one so much easier!
- So, once you are happy with your wreath so far, cut some strips of twine (I used 5 in total).
- Turn over your bouquet and glue one strip of twine on each end and another one on the center.
- I covered each glued twine strip with a piece of the same green felt to make it stronger.

- Place your wreath over the back of the bouquet and tie a bow with each twine strip.
- Turn it over and place your “Home" sign where you want it and with 2 strips of twine tie it on the back like you did the bouquet. I used the holes on the H and the e to insert the twine.
- There you go!
- You are only one step closer to be all ready!
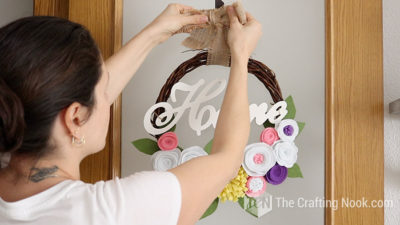
- Use your burlap ribbon to hang your wreath on your door!!!!