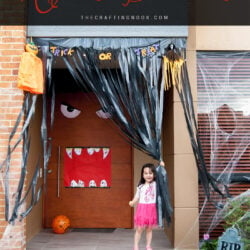
Homemade Front Door Halloween Decor
This Homemade Front Door Halloween Decor was so easy to make and perfect to have fun with kids. With just a few old Halloween decoration items, cardstock, large black trash bags, crayons, and markers you can create this fun spooky decoration!
Equipment
- Hot glue gun and glue sticks
Ingredients
- Black cardstock
- White cardstock
- Red Cardstock
- Crayons
- Red Marker
- Glue
- Adhesive tape.
- Black Jumbo Plastic trash bags
- Spider web
- Any other spooky stuff you have from past years!
Instructions
STEP 1: CREATING THE MONSTER EYES
- Firstly, We started drawing spooky eyes. We used a huge pan lid for the circle.
- The eyes seem angry so we used a half-circle of each eye but draw it as only one.
- Using the red graphite from a red crayon and fingers we painted the inner edges toward the center to simulate the eye redness.
- Then freely my brother drew shaky, uneven lines to simulate the thin veins in the eyes.
- In the same white cardstock, I also drew the teeth and a couple of fangs.
- While my brother was working on the eyes, I was creating the pupils.
- I created 2 circles smaller than the previous one. Extracted some irregular shapes from each to simulate the eye sparkle.
- Then I cut some long triangles, like eyebrows to make it look really angry and spooky.
STEP 2: CREATING THE MOUTH
- We wanted the teeth to be really gross. Made them look dirty and really bad looking so we painted them green and brown with some stains all over them. LOL, My brother really made them look so terribly gross.
- For the mouth, we used red cardstock, and we used almost the whole sheet. We cut a small rectangle from it and used the big part.
- We tore up some black cardstock to create a mouth-like effect on the top and bottom of the mouth and over the teeth.
- And this was the result of the mouth. With a dark red crayon, I made a semi-circle to give the idea of the tong LOL. It’s not like is really visible but gane piece of mind LOL.
- We put the eyes close and this is how it will look on the door!
STEP 3: ASSEMBLING THE FRONT DOOR DECOR.
- Then using tape we stuck the eyes and mouth on the door. Using a black plastic bag we cut a hair-like shape and put it at the top of the door.
- There you go!!! A spooky front door.
STEP 4: ADDING FINAL DETAILS
- We got the rest of the black plastic bags, cut the sides to get a LONG piece of plastic and then folding it almost to the top we cut strips leaving the edge so we could glue it to the entrance.
- We got this cool black curtain.
- With a hot glue gun, we glued it to the ceiling of the entrance right before the door.
- Finally, we also added lots of spider webs around the house. We put some other Halloween decorations from last year like the jack-o-lantern, spooky skull, tombstone, and a skeleton arm. The trick-or-treat banner was the final touch.