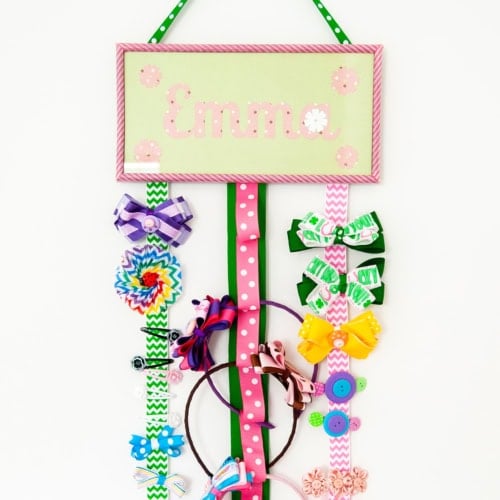
How to Make a Personalized DIY Hair Bow Holder
Let’s Learn how to make These pretty, bright, and inspirational DIY Farmhouse Wood Signs with a cutting machine and some really cool lettering fonts! Here’s how.
Equipment
- Hot glue gun and glue sticks
- Silhouette Cameo – Totally optional, you can still make this without it.
- scissors
- Ruler
- cutter
Ingredients
- Different Ribbon colors sizes, and patterns
- Scrapbooking paper – for your daughter’s name and cutout. If you have a cutting machine Cricut or Silhouette you can use it to cut your daughter’s name and cute decorative shapes.
- A rectangular plain photo frame – those you can find at a dollar tree or the dollar zone in Target. It doesn’t have to be a fancy one unless you want to.
- Washi tape
- Cutouts – Flowers letters, hearts, any detail your daughter loves.
- Thread and needle.
Instructions
The Top of the Holder
- Open your photo frame and remove the backing, glass, and paper cover.
- Apply washi tape along the frame.
- Then cut a piece of scrapbooking paper with the frame paper size.
- Decorate your scrapbook paper with your girl’s name and your cutout shapes
- For example, I made my Girl’s name in a cute font and also cut some cute flowers with my silhouette.
- Apply some dots of glue to secure the decorating pieces in place.
- Put back the flame glass into the frame and place your creation facing down towards the glass
- When you turn it over you should see something like in the photo below.
- Set it aside.
The Bow Holders
- Measure the length of your ribbon. Make it as long as you wish and as many as your photo frame allows, leaving enough space to handle the hairbows.
- I used around a yard of 3 ribbon strips.
- If you want to have headbands there too, then get an extra strip of ribbon slightly narrower than the main ribbons and don’t cut it yet. You should have 2 ribbons for the headbands to hold.
- I used a solid 1-inch wide one as my base and a polka-dot narrower.
- Make marks with a ruler on the base one every 6 cm (2 1/4 inches).
- Then make marks every 9 cm {3 1/2 inches}. Pin together each mark as shown below.
- When you get the length you need for the narrower ribbon, make cute cuts at the end of both.
- Now. stitch both ribbons together on each mark to create the loops for the headbands. You can do this by hand sewing like I did or using a sewing machine.
Assemble the Hair Accessory Holder
- Now get the back of your photo frame with the inside facing you, place one ribbon end about 1 inch from the left edge, one in the middle, and one about 1 inch from the right edge. You can secure them temporarily with adhesive tape.
- If you are using more ribbons, separate them evenly on the frame backing.
- Then secure each ribbon well with hot glue.
- Place the backing back into the photo frame.
- You can completely remove the frame stand if you want. I didn’t since it didn’t make any difference.
- You are almost done!
- If your photo frame doesn’t have a built-in wall hanger then you create it, it’s super simple.
- Open the backing of the frame again.
- Finally, cut a strip of a thin ribbon, about 6-8 Inches, and glue each end of the ribbon on both ends at the top of the photo frame – right on the opposite side of the hair bow ribbons.
- Tadaaaaaa! There you have it. Now your new DIY Hair Bow Holder is ready to rock!