How to Make Doll Bedding Set for Cribs or Cradles
Learn how to make doll bedding set in just a few hours! This easy step-by-step guide will show you how to create a custom blanket, pillows, and mattress for your child’s doll crib.
Equipment
- Sewing Machine
- Sharp Fabric Scissors or rotary cutter
- Hot glue gun and glue sticks
- Pins
- Measurement tape
- Ruler
Ingredients
- Scraps of coordinated fabrics
- Pillow stuffing.
- White Batting
- An MDF board 44×26 cm
- Color matching thread
- Fabric Marker
Instructions
Prep Work
- We need to cut all the pieces. So I’m explaining the measurements I used which come from the Graco Playset.
- You might need to adjust measurements depending on your kid’s specific doll crib.
- The Fabric:
- A: pattern 1
- B: Pattern 2
- C: White
- D: Pattern 3
- E: Pattern 4
- Quilt Front:
- 6 pieces of 3 different – Coordinated fabrics. In my case A B C: 10×28 cm (4 x 11 Inches) – this includes seam allowance.
- Quilt Back:
- 1 Piece of batting: 44 x 26 cm – 17 x 10 Inches.
- 1 piece of coordinated fabric D: 50×28 cm – 20 x 11 Inches.
- Mattress:
- 1 Piece of batting: 48×26 cm – 19 x 10 Inches.
- 1 Piece of fabric E: 50×32 cm – 20 x 12.5 Inches.
- 1 Piece of fabric C: 46×28 cm – 18 x 11 Inches. – Or any fabric goes since it’s for the base, I used white.
- Main Pillow:
- 2x Fabric C: 28×18 cm – 11 x 7 Inches.
- Fabric B: 18×6 cm – 11 x 2.5 Inches.
- Fabric E: 18×8 cm – 11 x 3 Inches.
- Pillow 2: 2x Fabric E: 20×20 cm – 8 x 8 Inches.
- Pillow 3: 2x Fabric A: 18×15 cm – 7 x 6 Inches.
Step 1: Creating the Mattress
- If your kid’s doll crib is a different size than ours, I recommend measuring the bottom of the crib (where the mattress should be) and cut your MDF board a few millimeters smaller.
- Then Use that board to cut your fabric. Place the board on the wrong side of the fabric, leave about 1 inch (2.5 cm) around the board and cut the fabric.
- The fabric for the matress cut around the mdf board
- First, put together your fabric E wrong side up and your batting as centered as possible.
- Put on top some stuffing. Enough to cover all the batting.
- Then place your MDF board on top of everything as centers as possible.
- Press it down a little bit and start applying lines of hot glue on the board close to the edge and start attaching the fabric to the back of the board.
- Keep gluing in small patches, so the glue doesn’t get cool and hardened before you get there.
- When you hit the corners, just carefully pull a little bit of each side and glue them together to the board.
- Don’t worry about it not looking pretty, will be taking care of that.
- Take your white fabric (or Fabric C), fold the edges about 2 cm, and glue it to the back of the board to cover all the ugly raw ends from fabric E. Use a lot of hot glue here. Don’t be shy.
- Ok, the mattress is done! Set it aside.
Step 2: Making the Blanket
- Stitch together fabric A with B and then B with C, then A, C and B. You can mix and match in any way you like.
- The whole top of the blanket should measure about 50×28 cm.
- Then place together front and back right sides together and stitch the edges leaving one side open. Because this piece is small, I used less than 1 cm seam allowance
- Serge the raw edges, or zig-zag the edges if yu don’t have a serger to avoid fraying.
- Cut a bit of each corner and turn it right side out. Press.
- Insert batting. It should fit perfectly inside.
- Fold edges towards the inside edging the batting.
- Pin in place and stitch 1/2 cm from the edge.
- Finally, as a simple final touch, stitch close to each fabric seam where they join to make it look more like a quilt.
- Woot! The quilt is ready to go!
Step 3: the Pillows.
- First, fold fabric B in half.
- Fold a hem in fabric E.
- Place fabric B on top of fabric C aligning edges.
- Place fabric E over fabric B leaving about 1 cm offset. Make sure all raw edges on the back are aligned to the folded hem of fabric F on the wrong side.
- Pin in place.
- Then, stitch together fabric B, C, and E close to the fabric E folded edge.
- Now lay your fabric C onto the piece we just created right sides together and pin in place.
- placing a piece of fabric over the sewn pieces
- Next, stitch along the edges of the pillow leaving an opening big enough to insert the stuffing.
- showing the space reserved to fill the pillow
- Turn it inside out. Press.
- Fill it up with your stuffing and stitch the pocket to close the pillow. You can either do this part sewing by hand doing the invisible stitch or with your sewing machine.
- Finally, repeat the 3 last steps for the other 2 pillows. I chose to make a French seam for the small throw pillows bu that’s just optional. If you want to learn how to shame French seam you can see this tutorial.
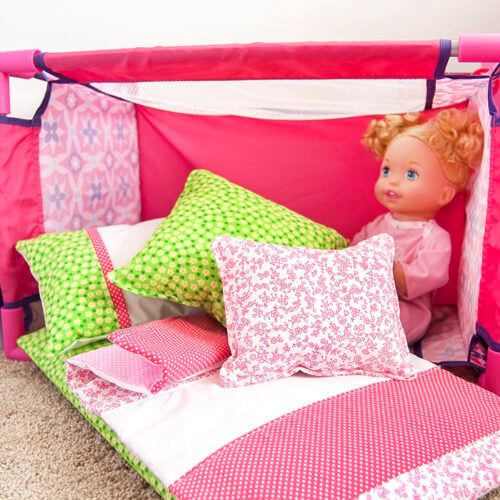
- Step 4: Put the Bedding set in the doll crib
- Insert your cute mattress in the crib, then style the bed with your new blanket and pillows.
- Your Girl’s baby doll bedding set is all ready for her to play with!!!