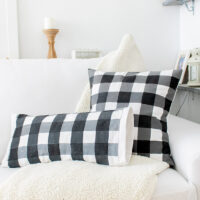
How To Paint Buffalo Plaid The Easy Way.
Learn how to paint buffalo plaid easily on fabric or any surface with some paint and painter’s tape. Watch a video tutorial on how I made some cute pillows for my living room.
Equipment
- Brushes
Ingredients
- Piece of white fabric
- Painters tape – Masking tape I used 2 Inches wide
- Black and white paint grey if you have or create it yourself
- Plastic or paper plate
- Plastic protection for your work surface.
Instructions
STEP 1: PREP WORK
- Firstly, Protect your working surface with a plastic sheet. I used my cutting mat and secured the plastic on the back with tape.
- Lay your fabric piece on the cutting mat.
STEP 2: CREATE THE HORIZONTAL LINES
- Then starting at the top of your fabric edge, add your first piece of tape to create horizontal stripes. Press them down smoothly on your fabric to seal it so the paint won’t leak through.
- Use a strip of tape as a spacer in between stripes. Lay 3 rows of masking tape tight together but without overlapping.
- Then remove the second piece of tape and place it right below the third piece of tape.
- Then add a new piece of tape below the fourth. here again, you remove the fourth and place it below the fifth.
- Keep doing this until you reach the end of your surface.
- You will need 2 shades of grey and black. You can either create your own grey or just buy your favorite shades. In this case, the light grey will be my base color.
- Start painting with the lighter grey stripes.
- Let it dry for a few minutes and then peel off the tapes.
- Then wait until it’s completely dry. Don’t discard your tape stripes.
STEP 3: CREATE THE VERTICAL LINES
- Once dry, Start taping your fabric creating vertical stripes from one of the fabric ends. Use the same technique described in step 2.
- Paint your stripes using the second color of paint, in this case, a darker shade of grey.
- Let it dry completely.
- This time you won’t remove your vertical tapes. You will need them in place for the next step.
STEP 4: ADD THE BLACK SECTIONS
- Once dry, put back your initial horizontal tape stripes in the same place as in Step 2.
- Now start painting the unmasked squares on your surface with black paint but don’t soak your brush too much, just a thin coat will do.
- Let it dry for a few minutes and remove your tape stripes carefully.
- Let it dry completely.
- You are done. Your Buffalo plaid painted fabric is ready to be used.