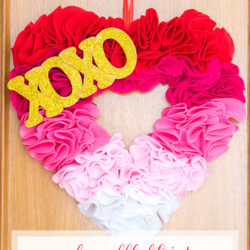
Ombre Felt DIY Valentine Heart Wreath
This Ombre Felt Valentine Heart Wreath is a fun project, easy to make, and the perfect DIY to get creative alone or at a family gathering. Just a few supplies and lots and lots of love!
Equipment
- Cutter or Scissors
- Hot glue gun and glue sticks
Ingredients
- A large piece of cardboard – I used 15” x 20”
- Approximately 1/2 yard of felt per color shade all shades of pinks it will depend on the size of the heart you want to make
- X & O wood or foam letters.
- White glue
- Gold glitter
- A strip of red ribbon.
Instructions
- The first thing you need to do is decide the size of your heart and draw it. Yup, you heard me right. Let’s use our hands here. As I said earlier, no need for perfection.
STEP 1: CREATING THE WREATH FORM.
- Place your cardboard on a table and draw with a pencil, a large heart first to create your heart wreath form.
- Correct things as you think needed. I did a lot of trajectory corrections until I was happy. You don’t need to be perfect here.
- Then draw another heart inside making sure you have at least 2 Inches between both heart edges, 3 inches would be best because that’s the thickness of your heart.
- Using a cutter or scissors (a cutter is a lot easier) cut your hearts until you get your heart frame.
- Set aside.
- The heart shape wreath form cut out from the cardboard
- Then I divided the heart’s height into 5 since I’m using 5 shades. I drew a line across the heart evenly to fill the spaces with the felt circles.
STEP 2: PREPPING THE RUFFLES
- For this project, I need tons of felt circles. Since I love making my life easier, I folded each felt piece twice to cut in bulk. I got a four-layer fell piece now. Of course, make sure that you can fit as many circles as you can when folded.
- I started with the red felt and then move to each shade.
- Using a large coffee cup as my circle pattern, I traced as many circles as I possibly could.
- I made about 30 circles of 4 Inches each but didn’t use all of them since not every part of the heart requires the same amount. It’s always better to have more than necessary just in case.
- Then I started cutting. The good thing is that I got 8 circles with four layers each. Over 30 circles easy peasy.
- Cut all of your felt shades. Set aside.
- STEP 3: ASSEMBLING THE HEART WREATH
- Your first row would be the darkest color (or lighter if you want to).
- Take one circle, and fold them in half twice to form rosettes.
- Apply some hot glue to the bottom corner of the rosette.
- Then apply some hot glue to the cardboard. To start do this close to the edges and work your way down.
- Attach the felt rosettes to the heart, making sure to group the rosettes tightly enough that no cardboard is showing through the rosettes.
- After you’ve added a few, fluff and open your ruffles as you go along and adjust the rosettes as you like.
- Continue gluing, and attaching the rosettes until you’ve worked your way along each shade space.
- Then move on to the lighter shade and repeat the process until you finish covering the whole heart.
- If you have circles that are slightly misshapen place them toward the outside or inside edges, where they can’t be seen when the wreath is hanging.
STEP 4: MAKING XOXO GLITTERED WOOD WORD
- The final touch is the gold glittered XOXO word.
- Simply brush some glue all over each letter.
- Apply abundant glitter on top and let it sit for a few minutes, while you glue and glitter the other letters.
- Then just lift the letters, tap them a few times to lose any free glitter, and let it dry completely for a few minutes.
- When dry, you can either glue the letter together first by slightly overlapping each letter or gluing them directly to the wreath. I tried both, but working the word first ends up being easier, like in the video.
- Place the XOXO where you think you like it best and add some extra glue where you think might secure it a bit better.
STEP 5: HANGING OUR VALENTINE’S HEART WREATH.
- After you’ve finished adding the felt rosettes and the XOXO, cut approximately a 10-inch length of ribbon, fold it in half, and attach it to the back of the wreath with hot glue to form a hanger.
- Optionally you can create a pretty bow as most DIY valentine’s day wreaths have but I preferred to keep it simpler and let the felt be the main focus.
- You are finihsed