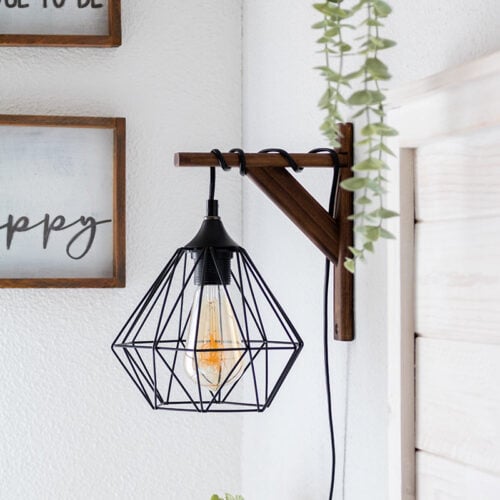
Rustic DIY wall sconce light Tutorial
Looking for an easy and fun Diy project? Try making a wall sconce. Here is an easy step-by-step guide on creating your own DIY wall sconce light.
Equipment
- Drill
- Wood drill bit
- Concrete drill bit if it’s the case.
- Screwdriver
- Screws
Ingredients
- Pendant light kit You can find really inexpensive ones on amazon and Ikea
- Switch and plug if the light kit doesn’t include it
- Metal Wire Cage Lamp Guard
- A vintage Lightbulb
- Wooden Shelf Brackets
- Walnut wood stain
- Wood sealer
- Cheap brushes
- Sandpaper 400 gritt
- Protective wear Plastic apron, latex gloves, and plastic cover
- Cloth
- Masking tape
Instructions
Step 1: Prep The Work Area
- Cover your work surface with a plastic sheet or drop cloth to protect it from stain and sealer.
- Wear latex or nitrile gloves when handling stain and wood sealer.
- Before you begin, lay out all your materials and tools so everything is within reach. This helps avoid mistakes once staining starts.s handy.
Step 2: Drill the Wire Holes in the Brackets
- Because shelf brackets are not designed for wiring, the top board may not have a hole or may have one that’s too small. If needed, mark where the wire should pass through. I used the light cage as a reference to center the hole correctly.
- Place a scrap wood block or wood cube underneath the bracket to support it while drilling.
- If the wood feels fragile or prone to splitting, start with a pilot hole using a small drill bit. I used a 2 mm wood drill bit first, then switched to the drill bit size needed for my cord.
- The final drill bit size will depend on the thickness of your lamp cord. The hole should be just large enough for the wire to pass through smoothly without forcing it.
Step 3: Sand the Shelf Brackets
- After drilling the holes, sand each shelf bracket to remove splinters and smooth the surface. Pay special attention to edges and corners, where rough spots are more likely.
- Use sandpaper to reach tight areas as best as possible, especially near the drilled hole and along the edges.
- Once sanding is complete, wipe each bracket thoroughly with a dry cloth to remove all dust before staining.
Step 4: Stain and Seal the Brackets.
- Before you begin, protect your clothing and work area. Wear gloves and, if needed, a plastic apron to avoid staining accidents.
- Apply wood stain evenly to each bracket. I used two coats of walnut wood stain. Instead of wiping off the excess, I let the wood absorb the stain fully to achieve a deeper, richer finish.
- Allow the stain to dry until it no longer transfers when touched. Drying time will vary by brand and environment, so follow the manufacturer’s recommendations.
- Once dry, apply a matte wood sealer. This extra step helps prevent fading and protects the wood from humidity, sunlight, and general wear over time.
- Let the sealer dry completely according to the product instructions before moving on to assembly.
Step 5: Wire the Wall Sconce
- Most plug-in lamp kits do not come with the plug or switch attached, which allows the cord to fit through the drilled hole. If your kit includes them, disconnect the plug and switch from the cord before continuing.
- Insert the cord through the hole in the bracket from the bottom up.
- Reattach the switch and plug following the instructions included with your lamp kit. Each kit may be slightly different, so always follow the manufacturer’s directions.
- Once assembled, decide how far you want the socket and shade to hang below the bracket. Wrap the cord around the bracket as needed to achieve the desired length.
- In my case, the light cage hangs about one inch below the bracket, but this can be adjusted based on your preference and cord length.
Step 6: Install the Wall Sconce on the Wall
- To mark the drilling points accurately, place masking tape over the mounting holes on the back of the bracket and poke small holes through the tape where the screws will go.
- The masking tape places and holes marked.
- Use a level to position the tape on the wall, making sure the bracket will be straight.
- Drill the holes using the correct drill bit for your wall type. For concrete walls, use concrete drill bits. For drywall or other surfaces, choose appropriate anchors and hardware.
- Secure the shelf bracket to the wall using a screwdriver or drill, making sure it is firmly attached before hanging the light.
Step 7: Install the Light Bulb and Test the Sconce
- Finally, install the light bulb into the socket. I used a vintage-style LED bulb with warm light and low brightness, which works well for ambient lighting.
- Make sure the bulb’s wattage does not exceed the maximum recommended for your lamp kit.
- Once the bulb is installed, plug in the cord and test the light. If everything turns on properly and the fixture feels secure, your DIY wall sconce is complete.