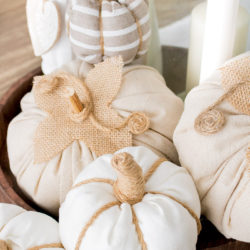
Rustic Fabric Pumpkins DIY
This quick and easy rustic fabric pumpkins DIY project is perfect for the Fall season. See how to make fabric pumpkins with or without a sewing machine, and add a few pumpkins to your fall season decor.
Equipment
- Hand Sewing Needle
- Thread (I used a thread color that matched my fabric)
- scissors
- Hot glue gun
- Fabric Markers.
Ingredients
- Polyester Fiber Fill poly fill
- Burlap
- Twine
- Fabric For the tutorial I used rustic linen and white cotton
- Ruler
- A small piece of branch.
- Pins
- Twine
Instructions
FABRIC PUMPKINS DIY METHOD 1
STEP 1: PREP WORK
- Fold your fabric twice with edges even.
- Using a ruler, measure the length from the folded corner to the shortest edge. That will be your measure.
- Then start marking that same measure from center corner left side towards the other side every half inch. You will create an arch.
- Cut along the marks. to make sure the fabric stays in place I used pins.
- Once you cut you will get a circular piece of fabric.
STEP2: SEWING
- Thread your needle. Start sewing in and out of your fabric, running a gathering stitch around the outer edge of the circle. You’ll want about a half inch seam allowance. You do not need to sew small stitches, just make them about as they come out.
- Gather the raw edges tightly all the way around.
STEP 3: FILL THE PUMPKINS
- Do not close your pumpkin yet. It’s time to get to stuffin’, so I just loosened the stitches to fill but don’t cut the thread.
- This is a good way to get your kids into the project :)
- Stuff unfinished pumpkin with poly fill.
- Once you have the desired amount of fullness, it’s time to close the top.
STEP4: CREATE PUMPKIN STEM
- Finish by pulling the ends of the thread till opening is as small as possible but enough to fit your branch piece through it.
- Using your threaded needle, pull the string, pinch the top of the pumpkin where all the fabric is gathered and start sewing it up. Give the thread a few loops around the branch and stitch again. This does not have to be perfect. You just want to make sure the top is not going to pop open or the branch to come out.
- Tuck a small twig or stick into the opening for the pumpkin stem.
STEP 5: MAKE PUMPKIN LEAVES
- Now cut a small square piece of burlap to add leaf decor the top of the pumpkin. calculate the size depending on your pumpkin’s size.
- Fold it twice as triangle like follows:
- Make a cut in the center of the burlap.
- Then cut a tiny bit of the center.
- Insert the branch through the burlap hole until it reaches the bottom.
- Using your hot glue gun start winding the rope around the stem until you get up a few loops. Give as many loops as you wish, I did just a few. Cut the Twine.
- Hold until glue has set.
STEP 6: LAST TOUCHES
- The last detail is cutting a couple of twine strings and swirling around with some hot glue and your finger.
- Using fingers to coil twine.
- Glue it to the base of the pumpkin stem.
- You are done! The first Pumpkin is ready and pretty!
FABRIC PUMPKINS DIY METHOD 2
STEP 1: PREP WORK
- Cut your fabric into a rectangle. For a rounder pumpkin, the length should be 1.5 times the width (6″ wide by 12″ long). For a slightly squattier pumpkin, the length should be 2 times the width ( 6″ wide by 15″ long).
STEP 2: SEWING
- Fold the fabric in half width-wise with right sides together and sew along the open edge across the fold first. You can either use a sewing machine if you have it or hand-sew it. You don’t need to be perfect here.
- With right sides still together, gather up the fabric at one of the openings and stitch roughly like in the first method around the edges.
- Without knotting or cutting pull the string to the maximum to ruffle it and then tie some loops around the ruffle to secure it. Tie a knot.
- Use tread to tie some loops around fabric end to secure.
- Turn the pumpkin right side out.
STEP 3: FILL THE PUMPKINS
- Time to stuff your pumpkin. Fill the pumpkin with stuffing until it is fairly firm.
- Ruffle the opening twisting it tight to close it.
- Then with your needle and thread stitch across the stem. Give some loops around it and then stitch across again. Repeat this a few times until you see it firm.
- Now Insert the needle from the stem through the bottom of the pumpkin.
- Pull the string tight to give the shape of a pumpkin. make a couple knots and cut the string.
STEP 4: CREATE THE STEM
- The next step is wrapping this baby up! Seriously, the tighter you pull the rope, the more gathered and sectioned your pumpkin will look!
- You will start from the stem and across the bottom so that you end up back up on the top. Give it a loop overlapping the twine end and go again across the bottom and back up with another loop around the stem. Repeat until you get 6 to 8 sections.
- Run twine from top to base and around to create pumpkin shape.
- When you are happy with the sections start wrapping the stem tightly all the way up.
- Wrap the twine around fabric to create stem.
- Keep wrapping twine until it is long enough.
- When you think it’s tall enough, stop and cut the remaining fabric.
- Then apply some hot glue to the fabric and make the last loops until the very top.
- Apply some more hot glue to the top of the stem and make the last loops in a spiral.
- Right before the last tiny loop, cut the twine apply a bit more of hot glue and insert the end through the opening.
- The last detail is giving a slight bending to the stem.
- Bend the stem with hands.
- Viola! Your second Pumpkin is ready.