
Twine Ball Christmas Ornament Tutorial
If you want to add a rustic yet glamorous touch to your Christmas tree, here you have a cute Twine Ball Christmas Ornament Tutorial, it's super easy to make and so super rustic!
Equipment
- Hot glue gun and glue sticks
- Glass bowl
- scissors
Ingredients
- Twine or jute… A lot of twine LOL
- White yarn {optional}
- White glue or mod podge. I used white glue for wood.
- Glitter optional to add sparkle.
- Christmas bells {gold and silver}
- Plaid Ribbon
- Balloons
Instructions
- Blow up your balloons to the size you want the twine ball to be. I first blew it up big and then released the air until I found the perfect size. What this did is to get a more circular shape than a pear.
- In a small glass bowl mix 2 parts of glue for each part of water. This makes the glue a little thiner and easier to handle.
- I used about 10 me meters {11 yards} of twine for each ball. And about 3 meters {3.2 yards} of yarn for those that had yarn.
- Soak your twine in the glue. Then take one end and with your thumb and index finger remove the excess of glue pressing and pushing the glue along the twine.
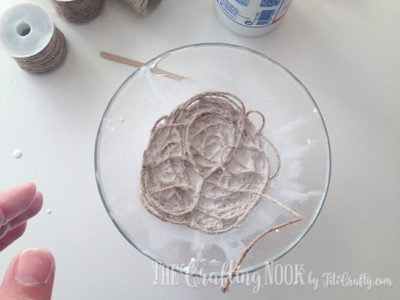
- Wrap the twine around the balloon randomly. I started putting one end of the twine close to the knot of the balloon and then made loops without a pattern. It’s important to keep the string tight against the balloon as you wrap because it could unravel. It happened a couple times and it’s so annoying. When you feel like you’ve wrapped enough the balloon, tuck the end under the closest twine string.
- If you feel the ball is too wet you can remove excess with a paper towel by making quick but soft pats around the ball.
- Hang the balls and place some plastic bags or plastic wrap on the floor below them so they don’t drip directly on the floor.
- Let them dry overnight.
- Next day, you should have a dry and hard twine ball, pretty and ready to be decorated.
- Pop the ballon. I unattached the balloon from the twine first. Just tuck your finger through the open spaces between strings and you will hear it sound like cracks. Then I popped it with a needle. FUN!!!!
- Carefully remove the ballon {or pieces of balloon} through the widest opening of your twine ball.
- Cut small strings of twine.
- With a knot hang a bell on each end of the twine. I used a silver and a gold on each string.
- Fold the string making sure one bell gets lower then the other.
- Insert both bells through the largest hole on your ball until a desired height.
- Insert the folded end through the closest string, make a loop back where you inserted the bells and make a knot.
- You will get your hanger.
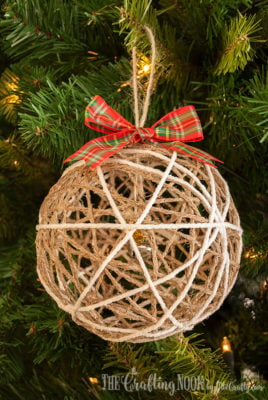
- Finally, the last touch is making a cute ribbon bow and glue it with your glue gun to the base of your hanger on the knot.
- Hang it and enjoy it!
Notes
If you want to add the white yarn then right after applying the twine apply the yarn tucking one end under any string of twine and start wrapping randomly until there’s no more yarn. Tuck the other end under a string of twine as well and hang it to dry.