How to create Photoshop Actions to Resize and Optimize Images
This post may contain affiliate links. Please read our Disclosure Policy.
Creating Photoshop Actions to Resize and Optimize Blog Images will allow you to save you time and have a more fluent workflow.
I’ll ask you this before letting you read anything else. Don’t you feel like you already have a lot of work to do as blogger and would be nice to be able to simplify some of those tasks?
Table of Contents
How to create Photoshop Actions to Resize and Optimize Blog Images
Well, let me tell you that we can, and as silly and simple as this may sound, creating Photoshop Actions for specific tasks can save a lot of time. In my case, it’s been a game-changer when it comes to resizing and optimizing my images.
This is the first blog post of a short series of Photoshop Actions to optimize your time as well as your images. I invite you to check out the second one if you haven’t seen it yet.
I just have to edit my photos as usually do, then I open them in Photoshop in batches and just click an action play button and each image gets the right size, right compression and goes to the right folder (the one I decide of course)
I’ve been asked so many times how I resize and organize my images or how do I add watermarks or even how do I optimize my images. I’ve never been secretive about my process but then somehow I never thought of creating a post for it.
In the video, you will be able to see how I create my actions and why. In my 9 years of blogging I’ve had my actions for at least 6 and believe me, it does save time.
If you are not familiar with Photoshop or what’s an action let me explain a little bit before moving on to the tutorial.
What are Photoshop actions?
An action is a series of tasks that you playback on a single file or a batch of files—menu commands, panel options, tool actions, and so on. For example, you can create an action that changes the size of an image, applies an effect to the image, and then saves the file in the desired format and folder.
How do I get Photoshop?
Nowadays, getting Adobe Photoshop CC is so much easier, back when I started studying graphic design, all Adobe Products came in CDs and cost hundreds of dollars. It was almost impossible to have them unless you had someone that had it or worked in a company that had these apps.
Today you can go to the Adobe website and just download for a trial and then choose the license you need. For example for Lightroom and Photoshop as a photographer pack, you pay $9,99 a month with all the support and updates available. This is not sponsored or anything. I just love it and think it’s worth it.
Probably there are other great apps but I truly haven’t used them so I can’t really recommend or talk about them. I’ve always used Photoshop since I’ve worked almost my whole professional life in big advertising companies. I can only help with my knowledge about this specific app.
How do I create an Action in Photoshop?
The short and direct version to create actions is as follows:
- Firstly, Open a file.
- In the Actions panel, click the Create New Folder button (folder icon) to create your own set of actions and give it a name.
- Then, in the Actions panel, click the Create New Action button (sheet icon), or choose New Action from the Actions panel menu.
- Enter an action name, and set additional options:
- Click Begin Recording (which usually starts automatically when you click save action). The Begin Recording button in the Actions panel turns red
- Perform the operations and commands you want to record.
- Not all tasks in actions can be recorded directly; however, you can insert most non-recordable tasks using commands in the Actions panel menu.
- To stop recording, either click the Stop Playing/Recording button, or choose Stop Recording from the Actions panel menu, or press the Esc key.
- You can create as many actions as you like and you can edit them any time. I definitely suggest checking Abobe’s page about this they have a lot of useful information.
Now, for the sake of this tutorial, I’m going to show you step by step how I CREATE PHOTOSHOP ACTIONS specifically for resizing and optimizing the images I use for my blog.
Resize and Optimize Blog Images with Photoshop Actions
This video shows my process to create Actions for my own blogging and image needs in hopes that it might help you optimize your time and your processes. If you are more of a step-by-step text and images kind of person, scroll down and keep reading!
Before we begin, be sure to follow us on Pinterest, Facebook, Instagram, and YouTube, and also sign up for our email list (at the end of this post), so you’ll never miss a post!
How to Organize Photoshop Actions:
The first thing I did was creating a folder on my computer called TEMPORAL, you can name it as you like and store it in an easy place to remember. The reason is my actions take images from here and also leave them here afterward. That way I don’t have to modify the actions depending on each post. It’s like my control center.
Inside that Temporal Folder create a sub-folder and name it something like “small” or “optimized”.
Then I open a photography that has been already edited and is ready to be resized.
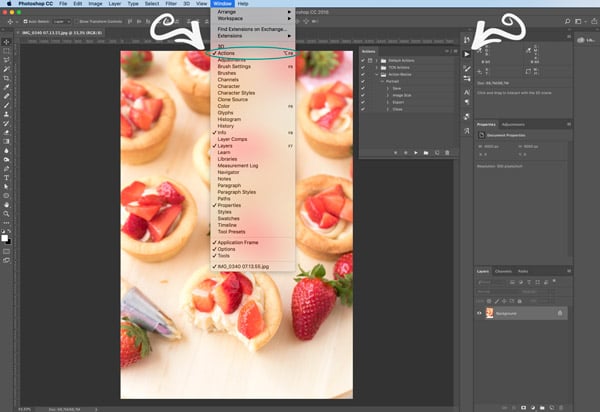
Open your Action window (Window > Actions or right-side panel of your Photoshop screen)
Click the Create New Folder button (folder icon) to create your own set of actions and give it a name. I like to give a really straight name. I named mine “TCN Actions”
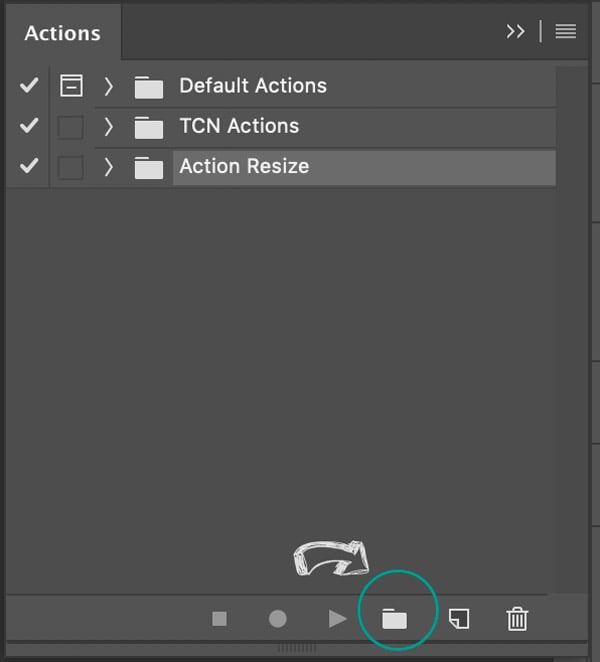
Then, click the Create New Action button (sheet icon), or choose New Action from the Actions panel menu and give it a name.
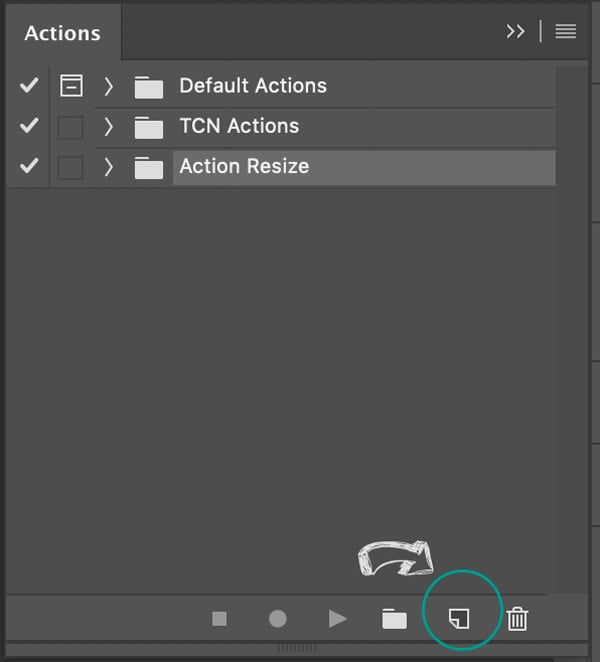
Image Resize
Since I’m sizing and images can be portrait (vertical) or landscape (horizontal), I just use that for the names, “Portrait” and “Landscape”.
Once the action has been created hit the Record button and you will see that action you created will show up in your folder and with the red circle in red which means is now recording.
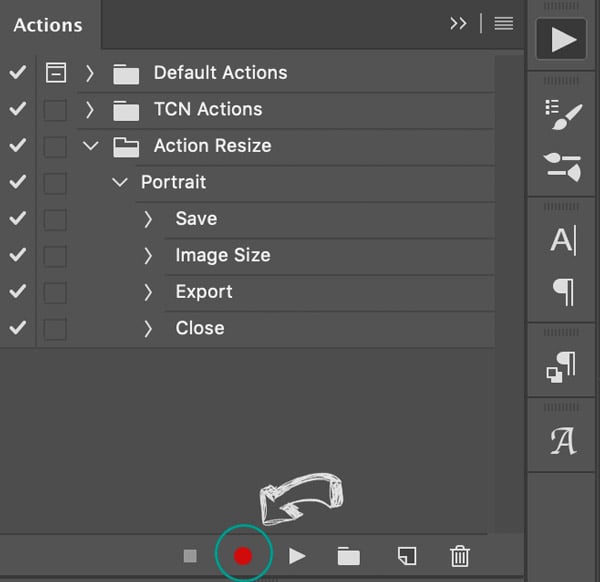
Anything you do from now on will be recorded. Even a layer selection so whenever you think you made a mistake, remember to stop recording and delete the action you don’t need and then hit record again.
If your photos come from a raw file, the first thing I record is a full-resolution and original-size version of my image. It’s always good to have an original image stored besides just the Raw.
So, I click on “Save As” (command-shift key S Mac or ctrl shift S PC) and save it in .jpg format in your Temporal Main Folder.
Now, let’s resize the image. I use all my images in a 2:3 aspect ratio in pixel dimensions at 1200px X 1800px when Portrait (it used to be 700px X 1050px when I originally wrote this post) and 1200px X 805px when in Landscape.
The reason is that most screens nowadays have a high-resolution density and the old 800×600 tends to be fuzzy and small, 1200 seems to be the new default. But I don’t recommend uploading images much larger than that. You can check this post about Image optimization and why it’s not good to upload large images. But you can set your preferred size.
Ok so, click on Image size (Image > Image Size) or (on your keyboard command-alt i on Mac and control-alt I en PC) to open the image size dialog box and FIRST set your resolution, then your width, keep constrain proportions option and Resample to Automatic checked.
There you will be able to see how the document size decreases drastically.
Hit “OK”.
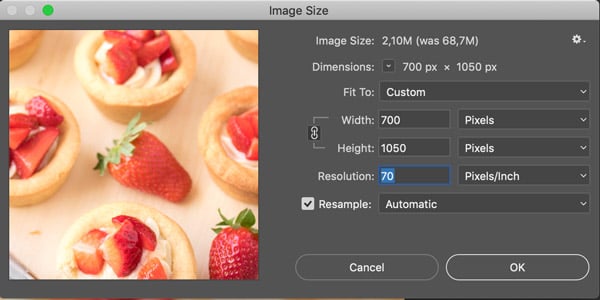
The image will resize and the action will be updated.
Optimizing the Image for Web
The next step is optimizing for the web. Photoshop has this saving feature called “Save for Web” which optimizes and compresses your images ready for the web. You still have a few options to decide how much compression but it’s way better than just “Save As” feature.
So, go to File > Export > Save for Web. Or command-alt-shift S on Mac, ctrl-alt-shift on PC. A dialog box will open where you will see your image as original and optimized. If not, just look at the top-left corner of your dialog box and click on the 2-Up tab.
The settings I use for regular images is as follows:
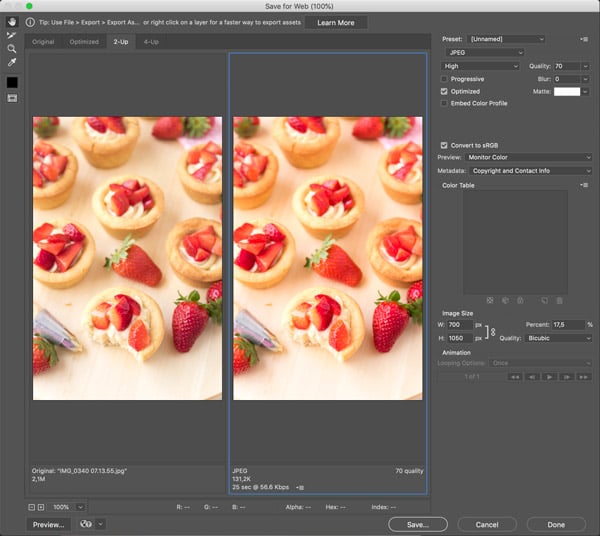
The quality percentage is something you can play with. It doesn’t have to be 70%. That’s the safe spot, however, I have found that lowering it a bit to 65% or even 50% provides good results, but it depends on each image. My type of photo goes well with 50% but I keep adjusting until the image quality and the file size are still adequate.
You can zoom in on the image in the preview window so you know how much you can compress without losing image quality
Set your optimization type checkmark to progressive instead of optimized. This helps the browser to load your image in a more efficient way.
I don’t touch the image dimensions at this point since I did it in the previous step.
Note on the bottom left corner of each image, how the file size of the resized image is now small and optimized.
Quick tip: Keep in mind that when choosing your file type you need to differentiate when to use each type: for photos always use .jpeg and set the necessary compression; for illustrations or images that require transparent backgrounds use .png files. PNG files tend to be heavier when used in photos so it uses a lot of resources on your website to load.
Then click Save Button and here you choose the Temporal SUB-FOLDER you created. The reason why for this is because:
- Images so far have the same name and you don’t want to override the original and
- If later you want to add a watermark in a batch you need a specific folder for Photoshop to pull images from and save to. I’ll be sharing how to add a watermark with a Batch Action.
Finishing up the Photoshop Action
Lastly, close the image (command W or X button on the top-left corner) but DO NOT SAVE the image in this step. Click on “Don’t Save” button.
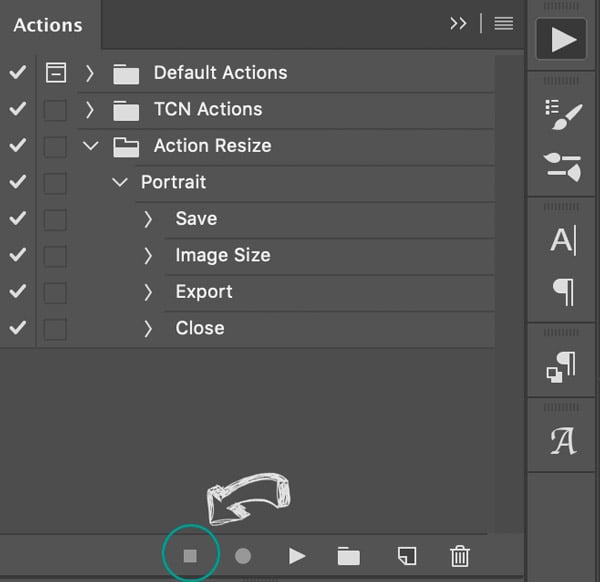
Ok on a quick note here: since you closed the image you can’t see the action anymore but it’s still recording. So open any image and click on the square icon to stop recording and then delete the “Open” task in the action list. Your LAST TASK should be “Close”.
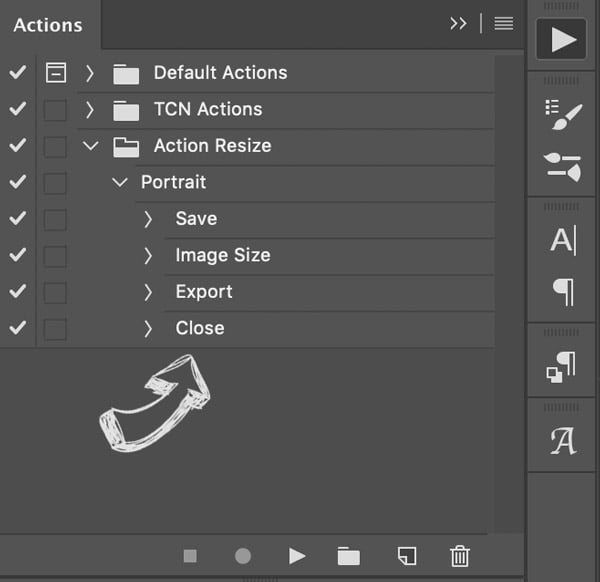
That’s it, you are done.
You can repeat this process (without creating a new folder) and create the landscape Action, or any specific sizing you need.
For example, I have an IG size Action which I have for the image I want to upload to my phone and then post on IG and another for images that will go to my iMovie videos.
You can always change specific tasks like changing the target folder, or the size itself. You have a lot of freedom with Photoshop Actions.
Then to actually use the actions, you just can open your photos in batches, like I open 15-20 images (it all depends on your computer capacity) and then just select the action and hit Play button (triangle icon) on each image. That’s it.
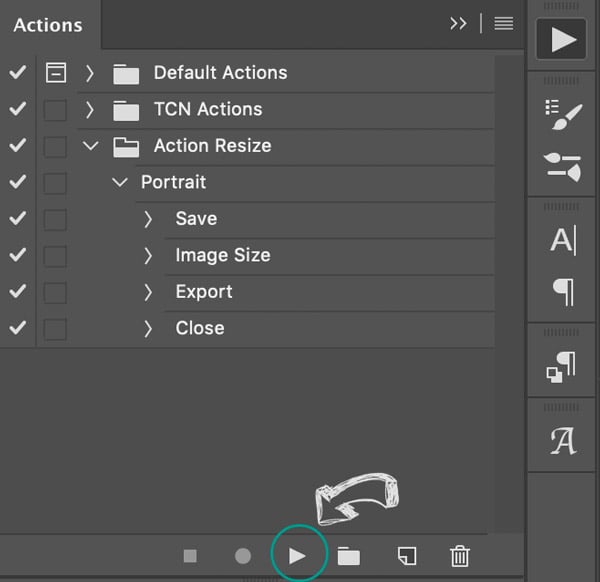
Both images original and optimized will go to their specified folders so you just have to go and drag them to the correct folder.
Last notes:
Always drag your optimized images to a different folder and keep this folder as clean as possible. Especially the sub-folder because if you decide to add a watermark, you don’t want to add a watermark over watermark over and over again.
I hope this tutorial and the video have been helpful. If you have any questions or suggestions, don’t hesitate to let me know. I might have missed something or maybe forgotten a step since I do it automatically LOL.
If you have a different way to do this, feel free to share it in the comments I’m always on the hunt for new strategies!
Find the next Photoshop Tutorial where I share how I add watermarks to all my images in just a few clicks by creating actions and then automate batch. In just a few seconds you will have watermarks in all your images.
If you liked this Photoshop Action tutorial, you might also love these other posts:
Til’ next time…


FREE WORKBOOK
Keeping your Sweet Home Organized
Learn how to create intentional habits and simple routines to Keep Your Home Organized. Plus freebies, printables, exclusive content, and tips.
Disclaimer: By clicking on the “Yes” button above you are giving me your consent to collect and use your information according to the law and My Policy Privacy. Zero Spam I promise!

